Penrose tiling quilt
Making my first quilt, based on a famous mathematical tessellation.
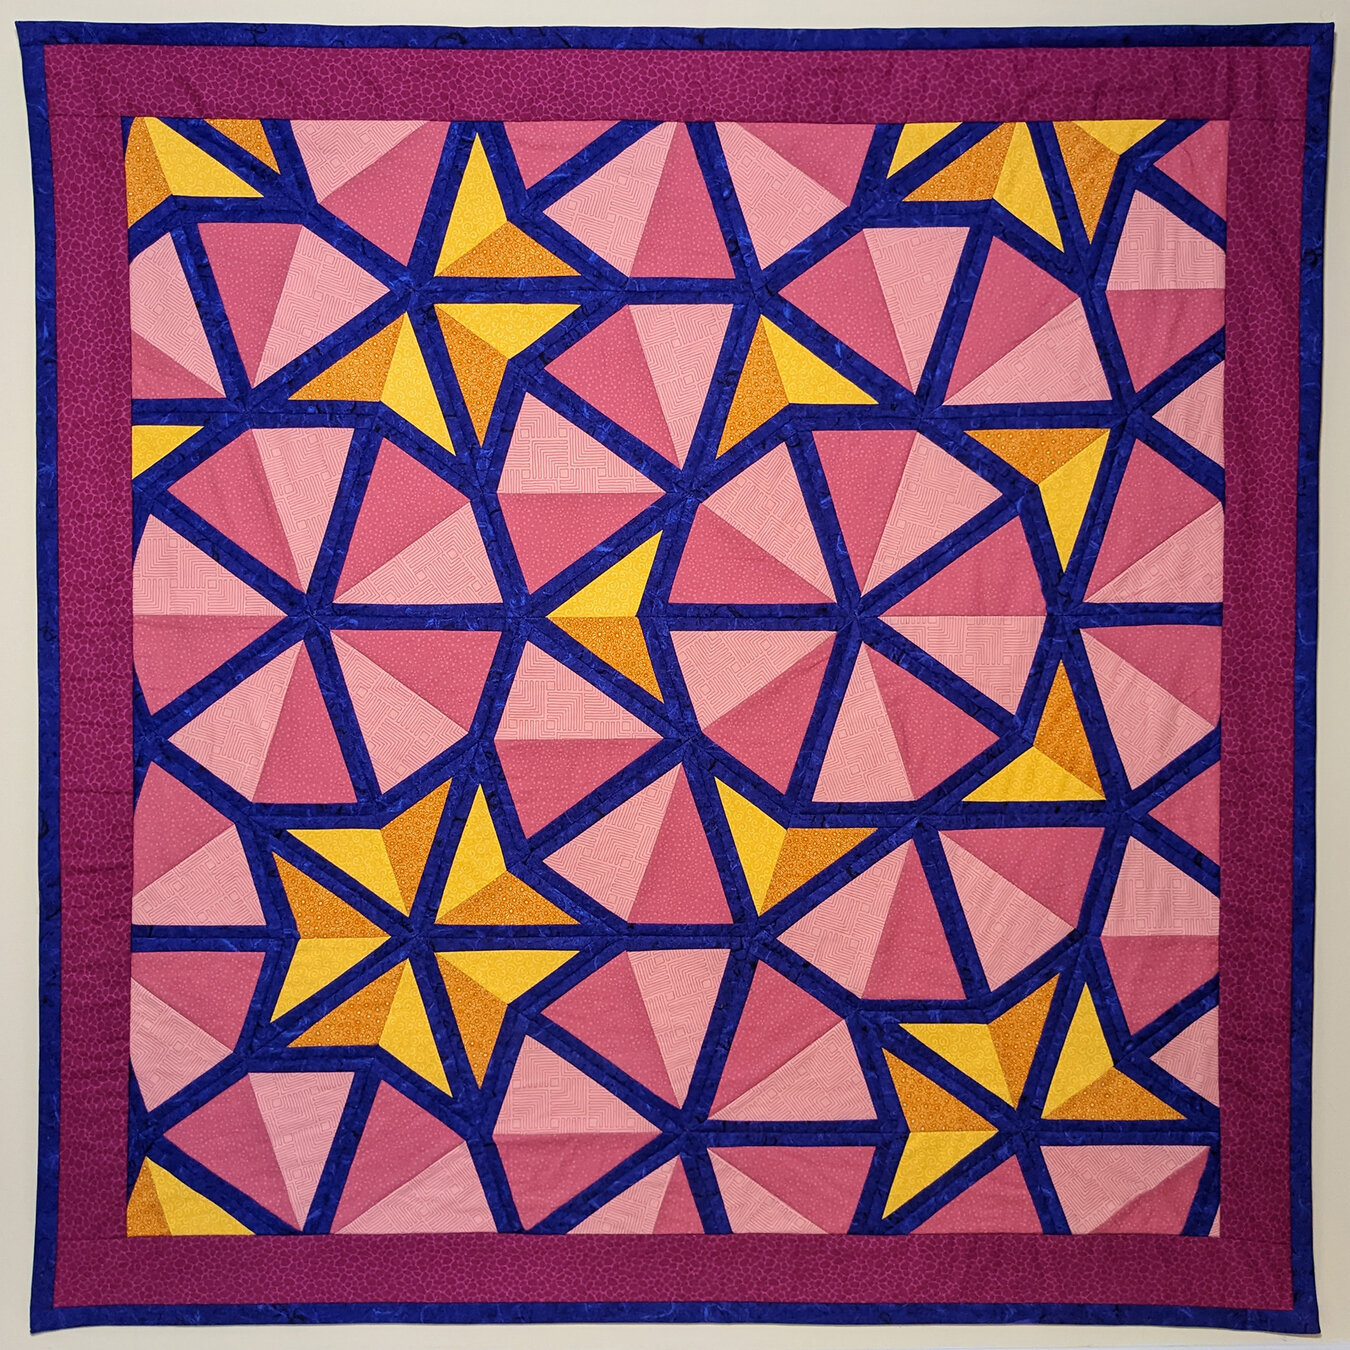
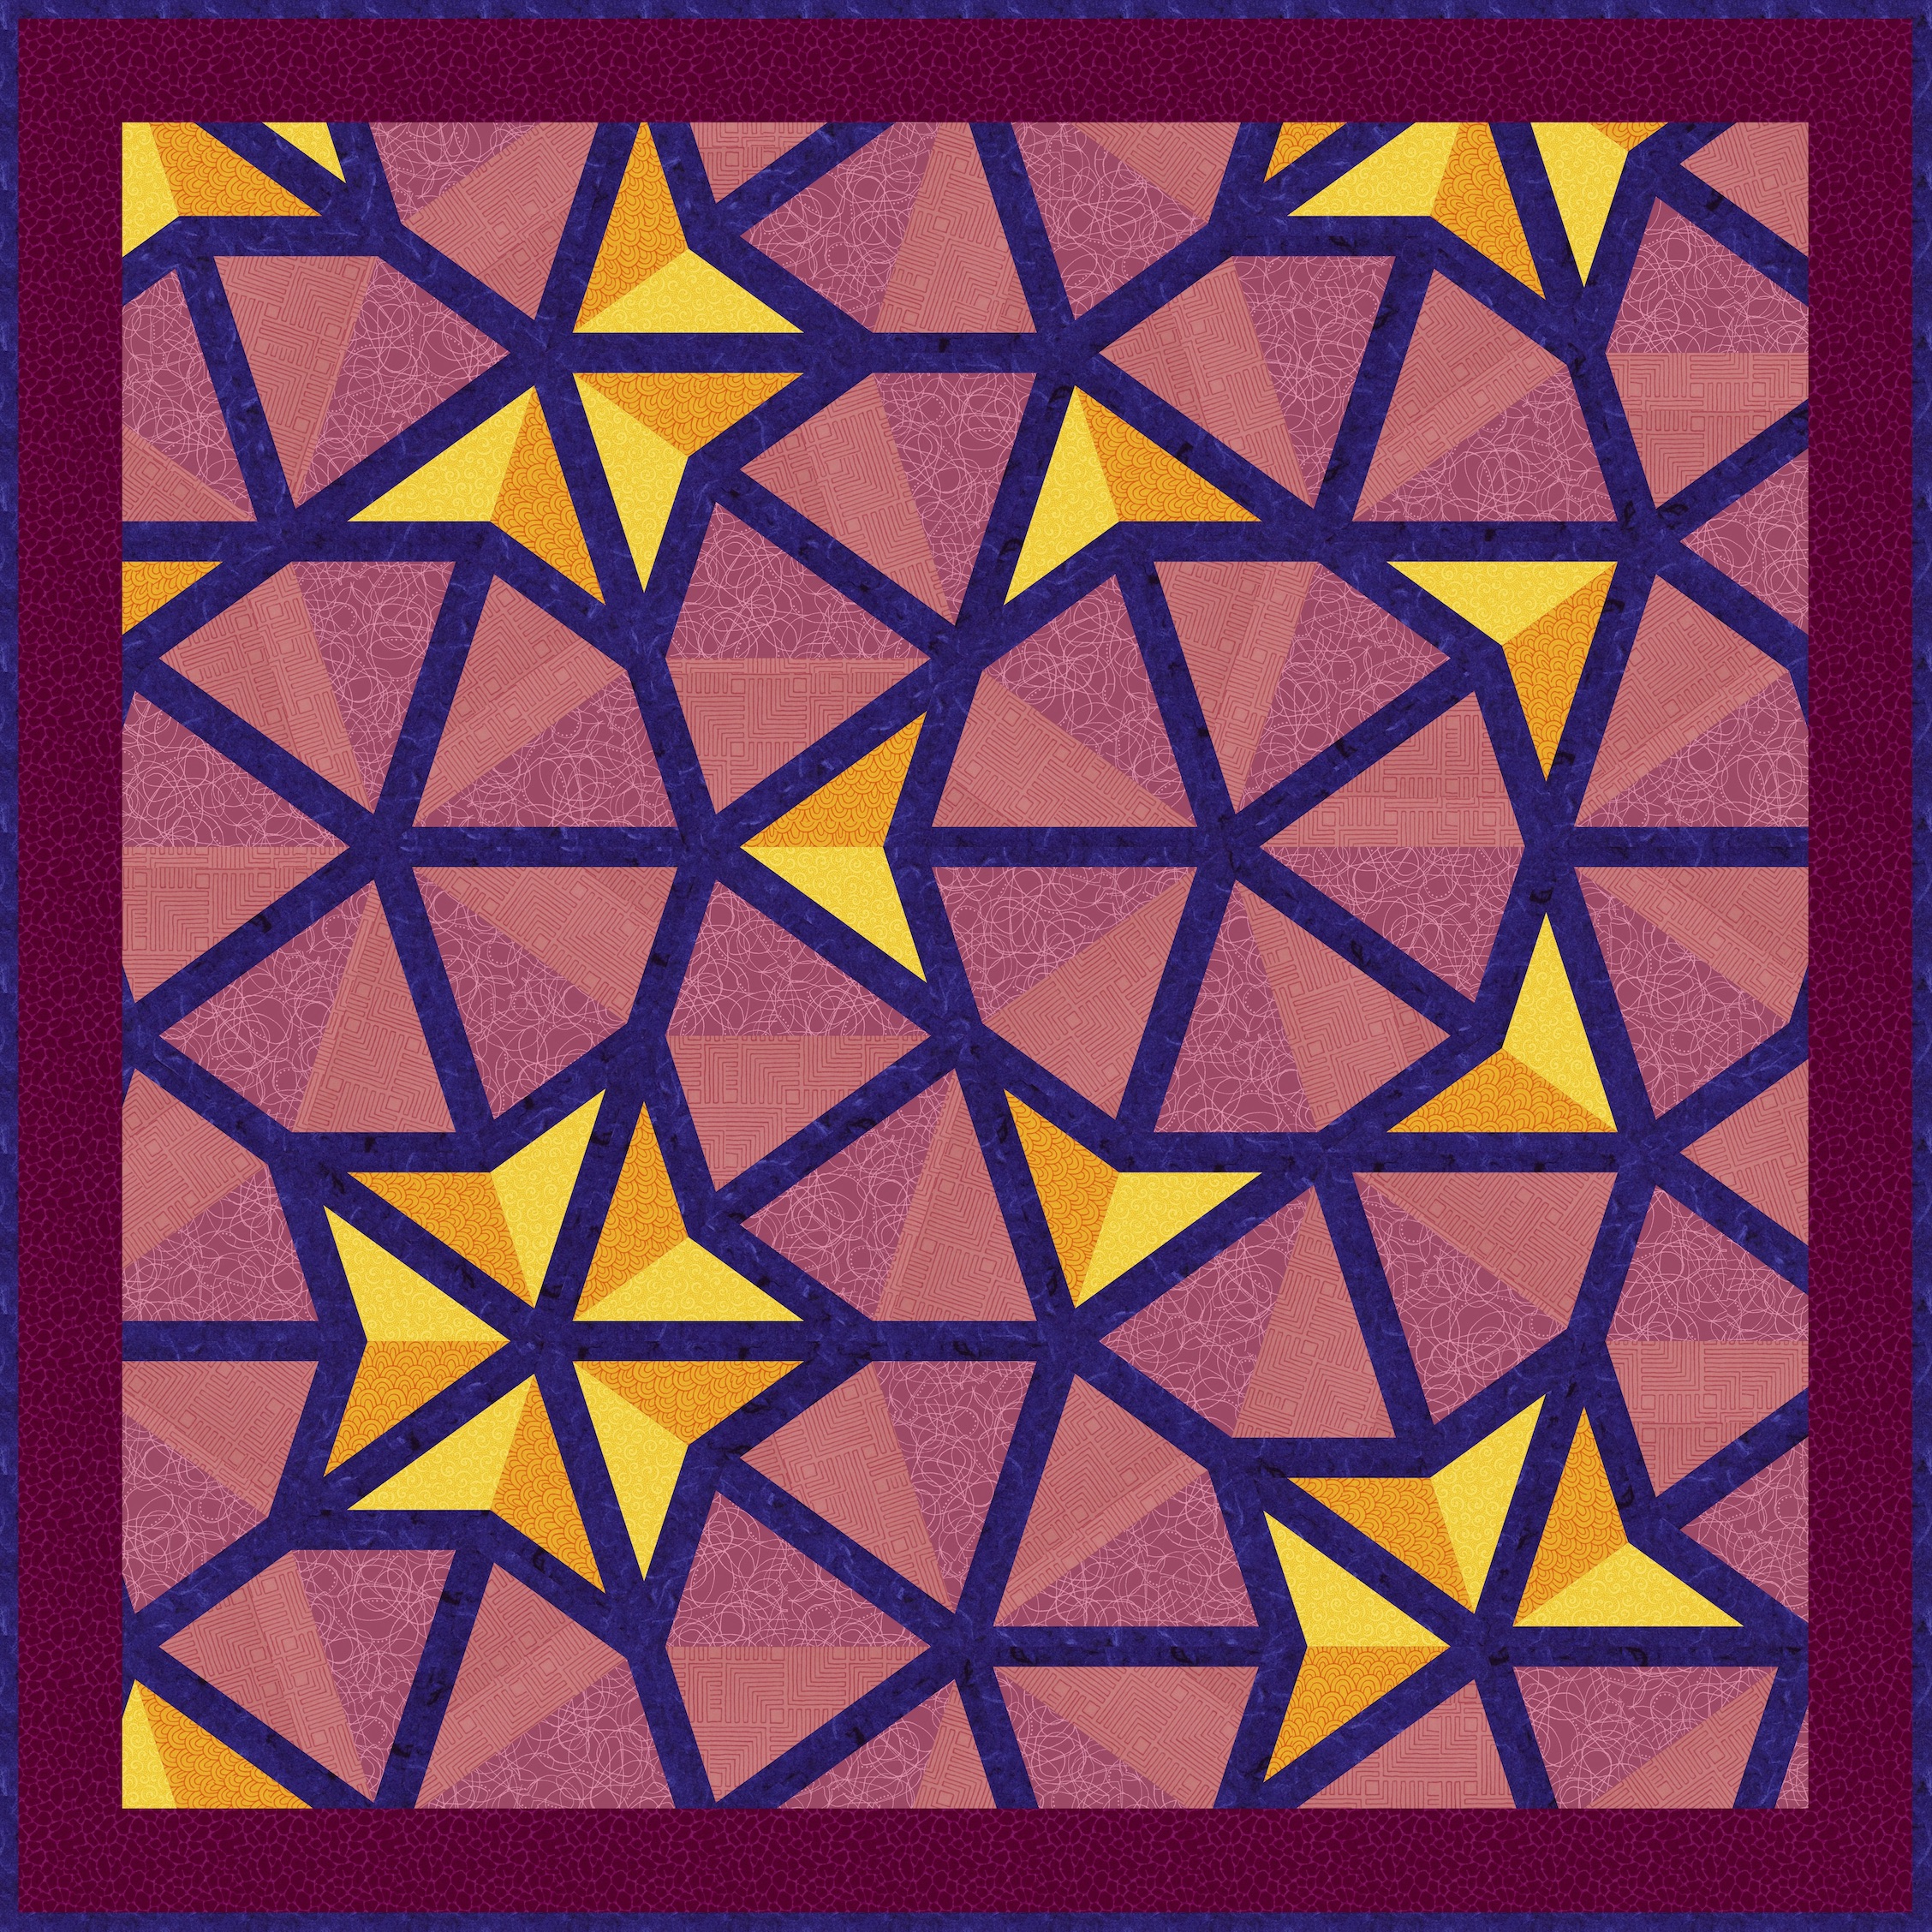
This blog post documents the design and fabrication of the 4’ × 4’ (120 cm × 120 cm) Penrose tiling quilt depicted above. The project began in early 2021 and took two months of planning/prototyping, followed by two months of fabrication.
I first liveblogged about it on twitter – this article is the longform version of the story.1
Inspiration and background
It all started with a savage nerd sniping: my brother had designed some 3D-printed cutting templates for cloth masks during the first year of the COVID-19 pandemic, and he told me that he thought something similar could be used to quickly and accurately cut out the kite and dart shapes to make a Penrose tiling quilt pattern. I was instantly hooked on the idea.
What’s a Penrose tiling? Glad you asked. It’s a set of tile shapes, together with a set of rules for joining them together to tile the plane infinitely, without repeating. The idea is due to Sir Roger Penrose, who won a Nobel in 2020 for theoretical discoveries about black hole formation. He is also the eponymous co-inventor (re-inventor?) of the Moore-Penrose pseudoinverse, which pops up everywhere you find least-squares problems and other over-determined linear systems.
Here’s an animation by Wikipedia user PrzemekMajewski showing the generation of the so-called P2 Penrose tiling variant. My brother’s idea was to make something like this, but in quilt form:
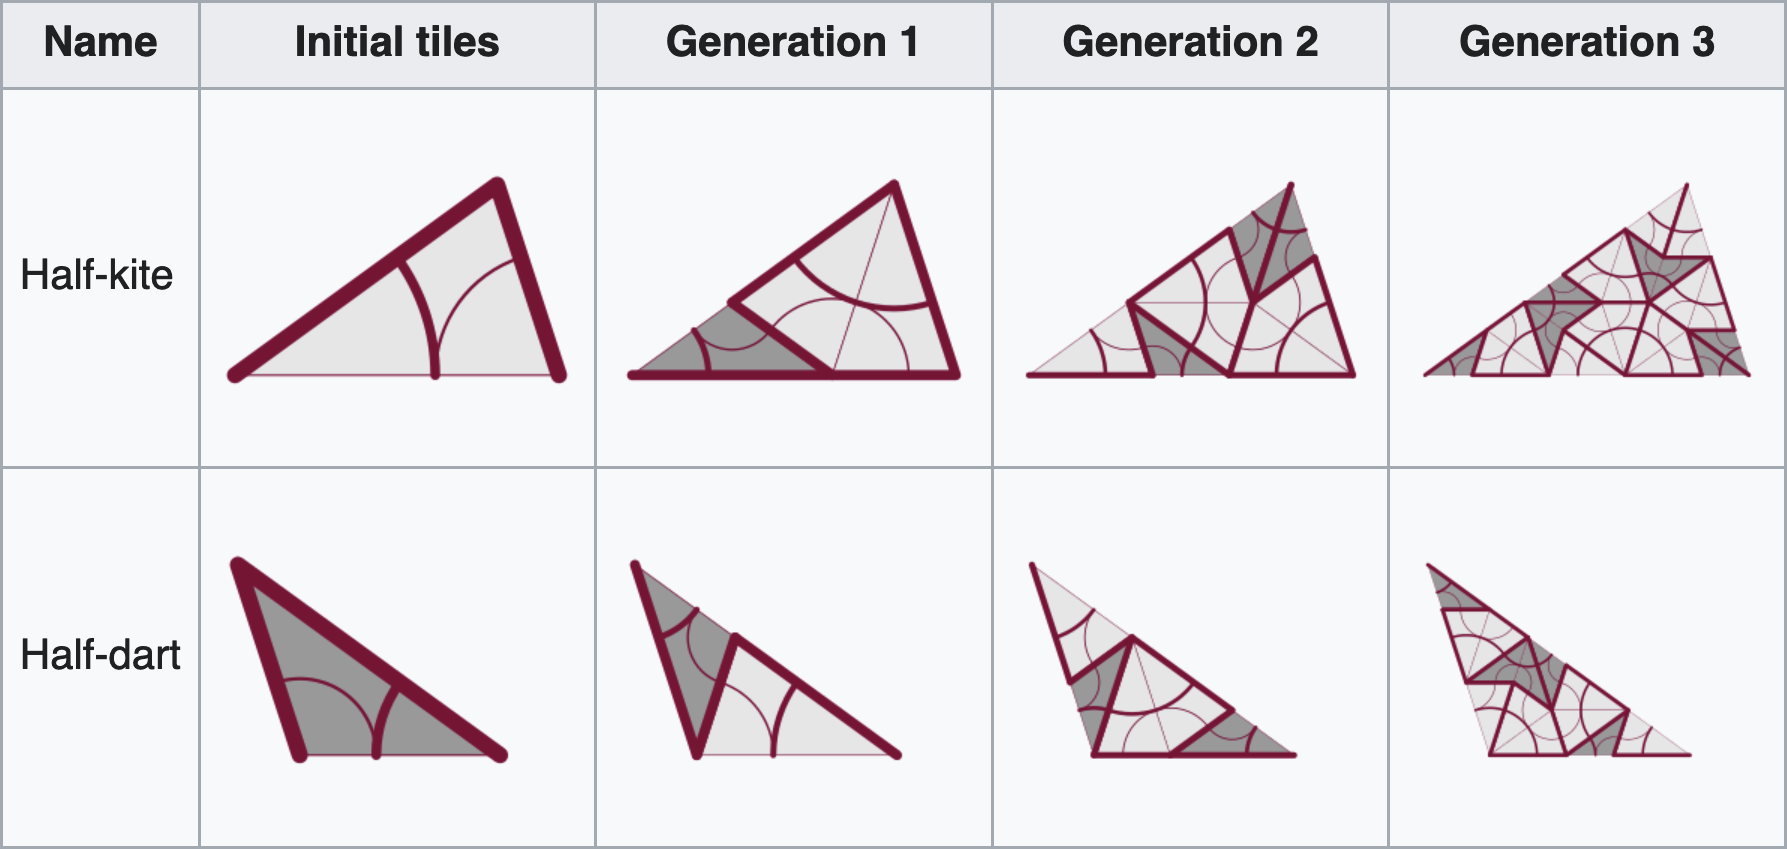
In the animation, you can see the central “sun” of 5 kite shapes evolving into a detailed tessellation that consists of both yellow kite shapes and orange dart shapes. The tiling can be generated using a pair of subdivision rules:
-
Each half-kite is replaced by two half-kites and a half-dart.
-
Each half-dart is replaced by a half-kite and a half dart.
Or depicted graphically, courtesy of Wikipedia:
If the size of a single kite or dart remains constant, in the limit of infinite iterations, the pattern will grow to fill the entire plane. Shockingly, it does so without repeating: that is, there is no translation that you can apply to the infinite plane tiling to end up with one identical to the original.
February 2021: prototyping
After that initial inspiration from my brother, I decided to try my hand at constructing a slightly different Penrose quilt than the one he was imagining.
Instead of cutting out entire kite or dart shapes, my “eureka” idea was that by basing my design on the P2 half-tiles and subdivision rules, I could avoid tricky corners and machine-sew all of the pieces together along straight seams.
I began the project by cutting out some half-tile templates on my desktop CNC mill.2
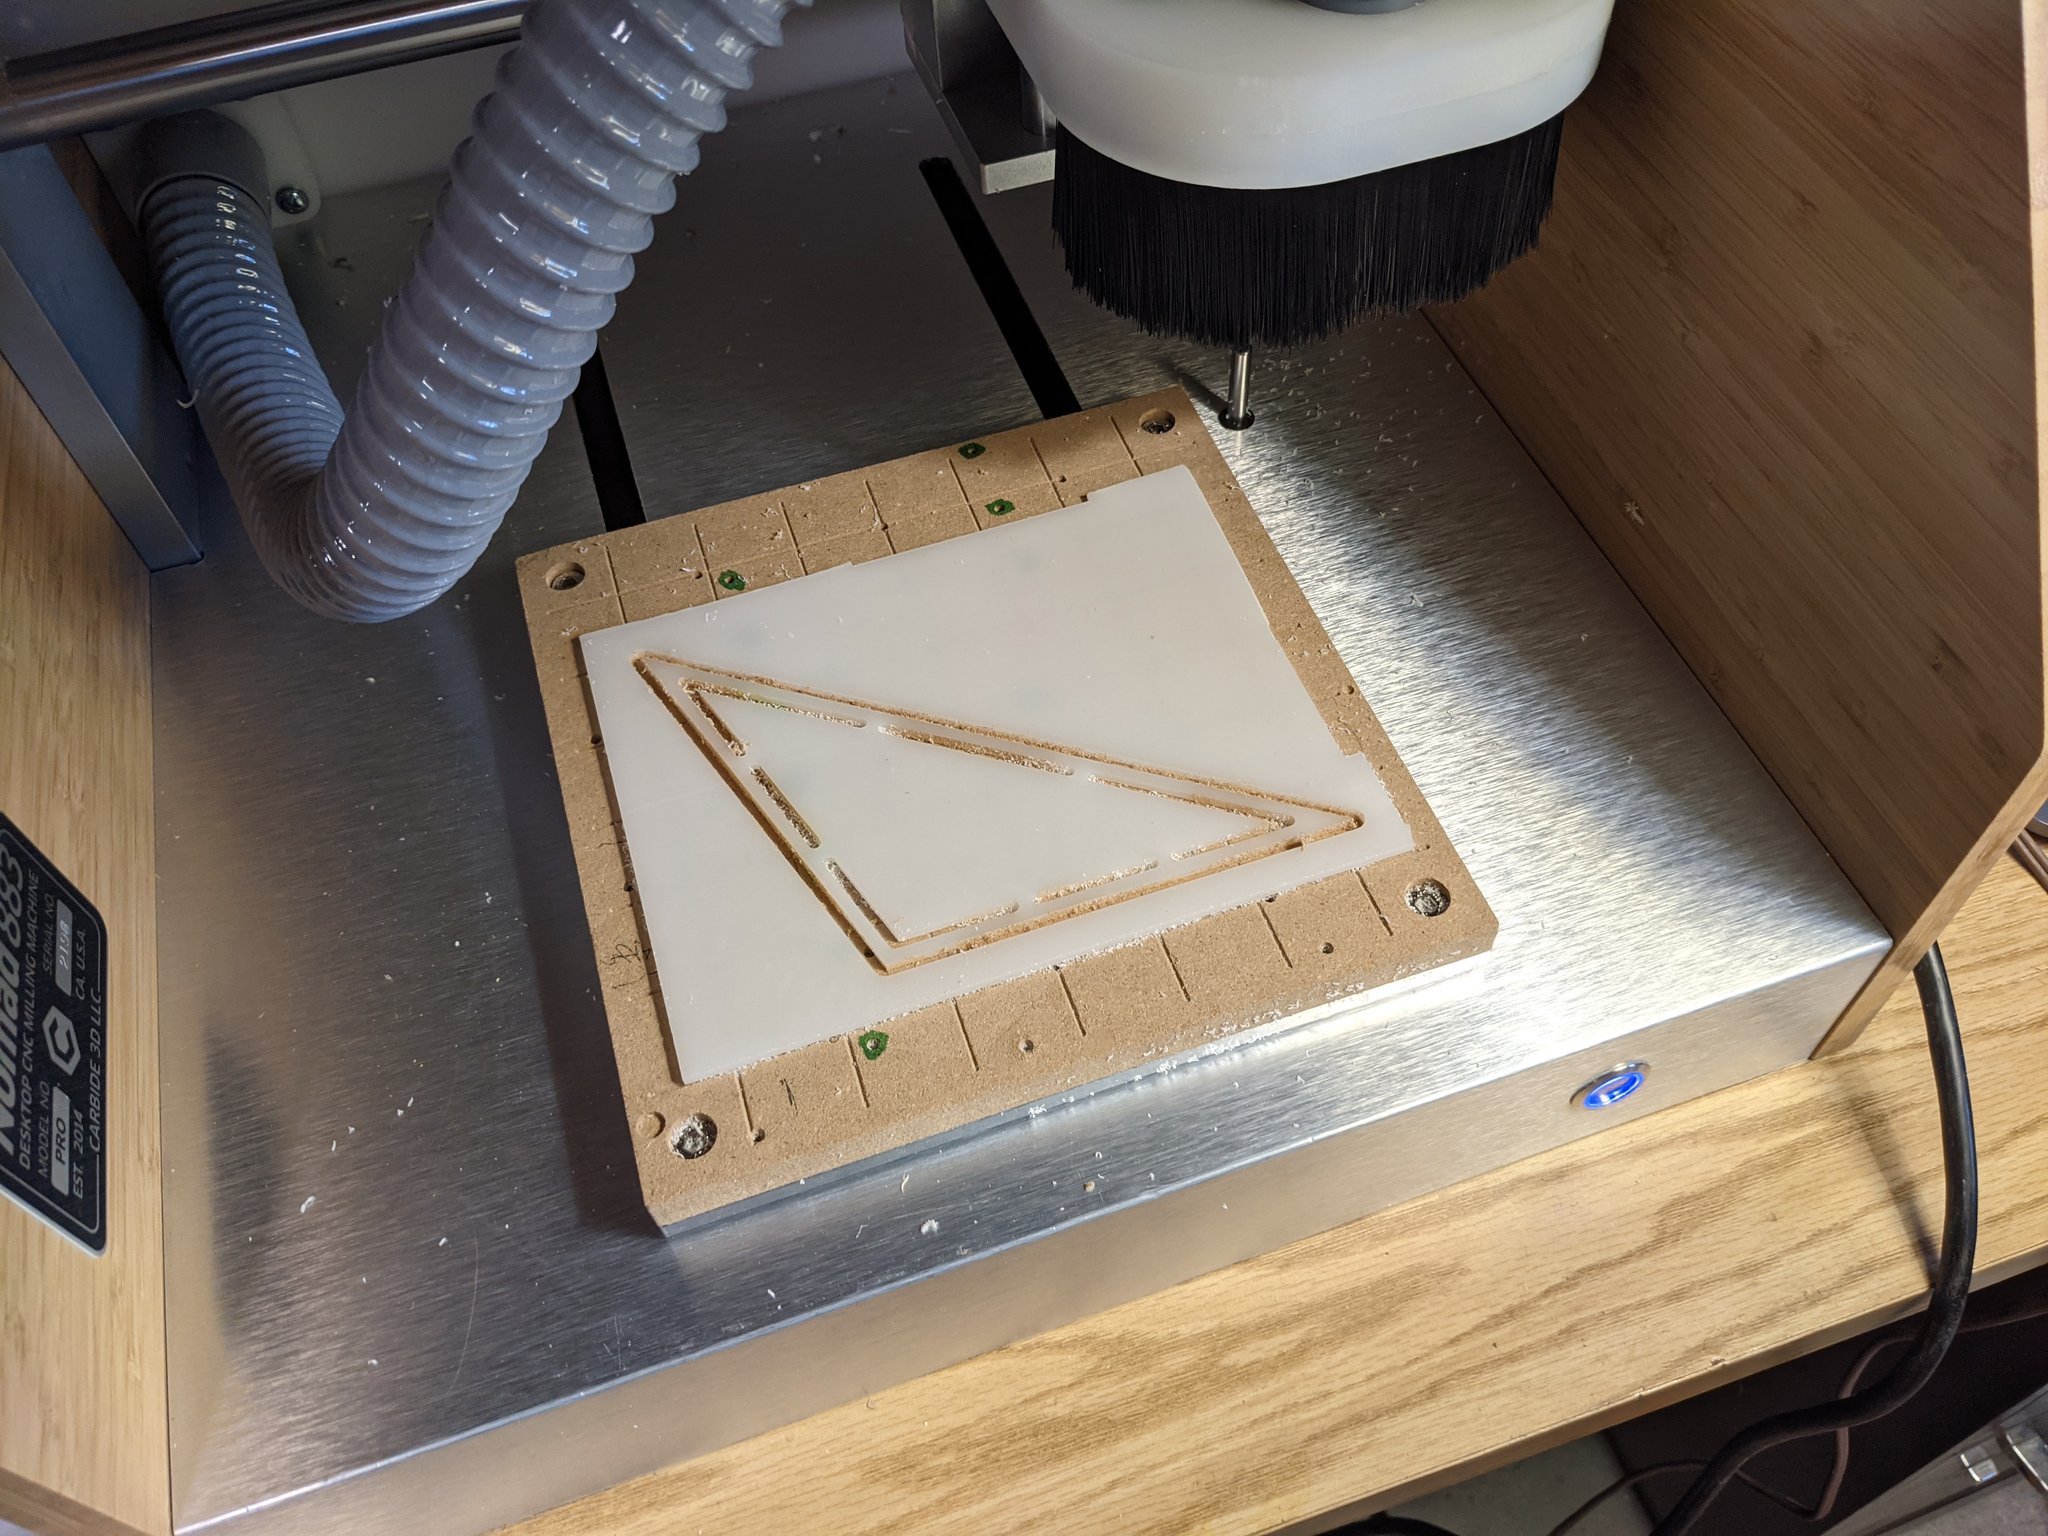
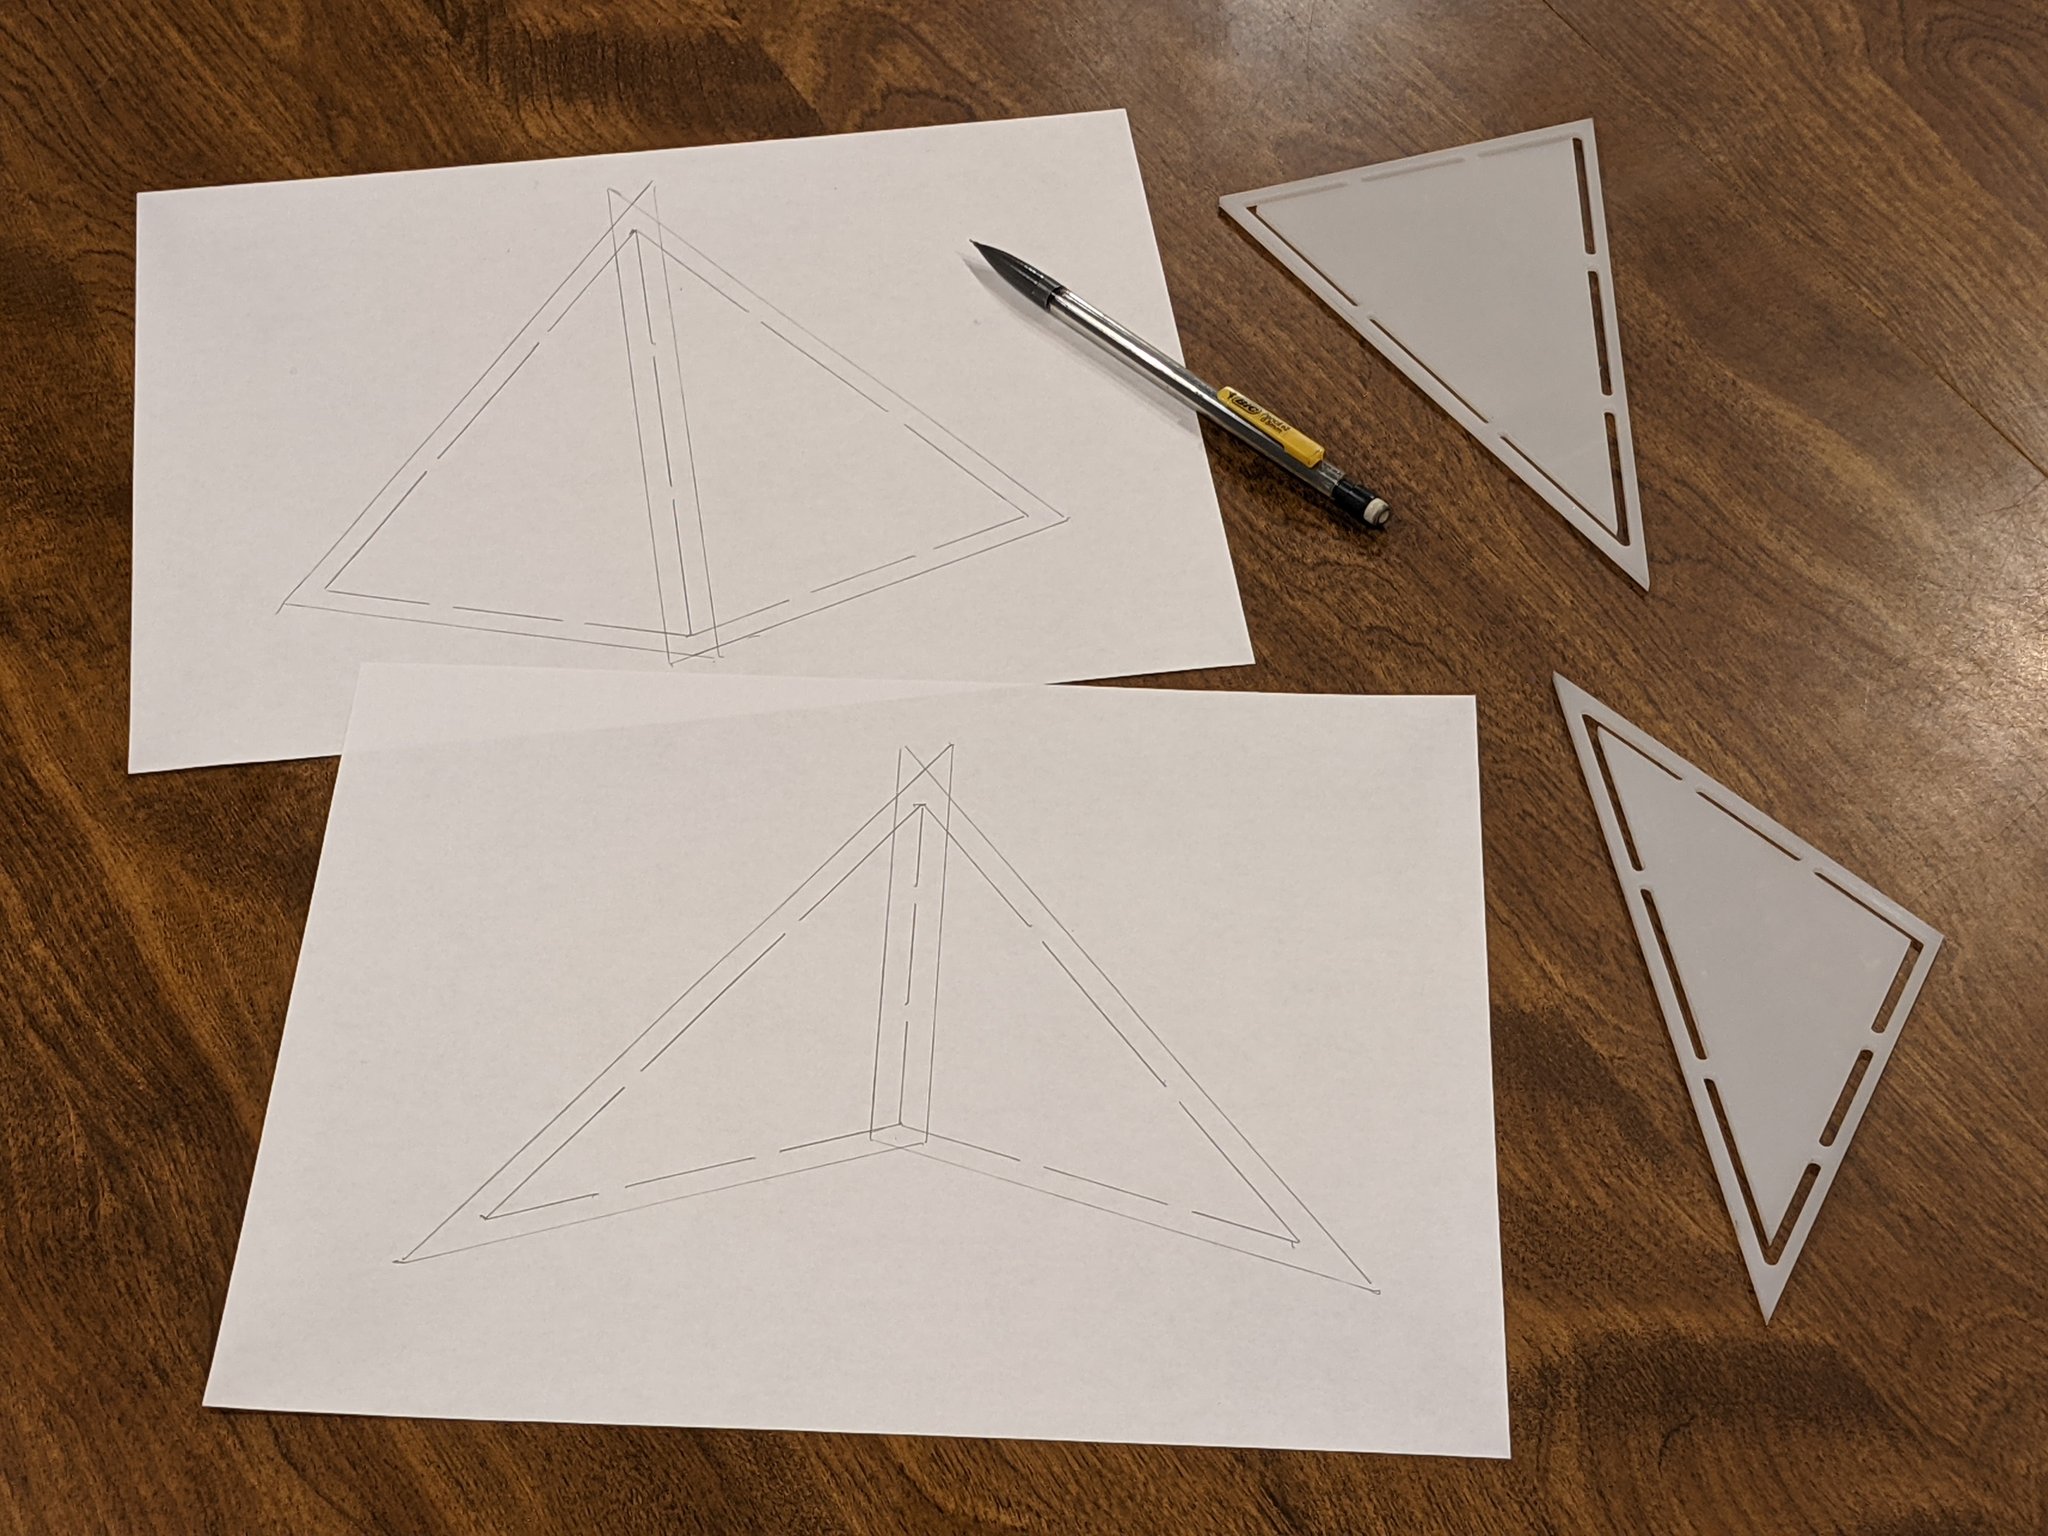
The templates had holes to let me trace the seam lines onto fabric underneath, and were sized to cut out the shapes with a ¼” seam allowance. Here’s me demonstrating the concept with pencil and paper:
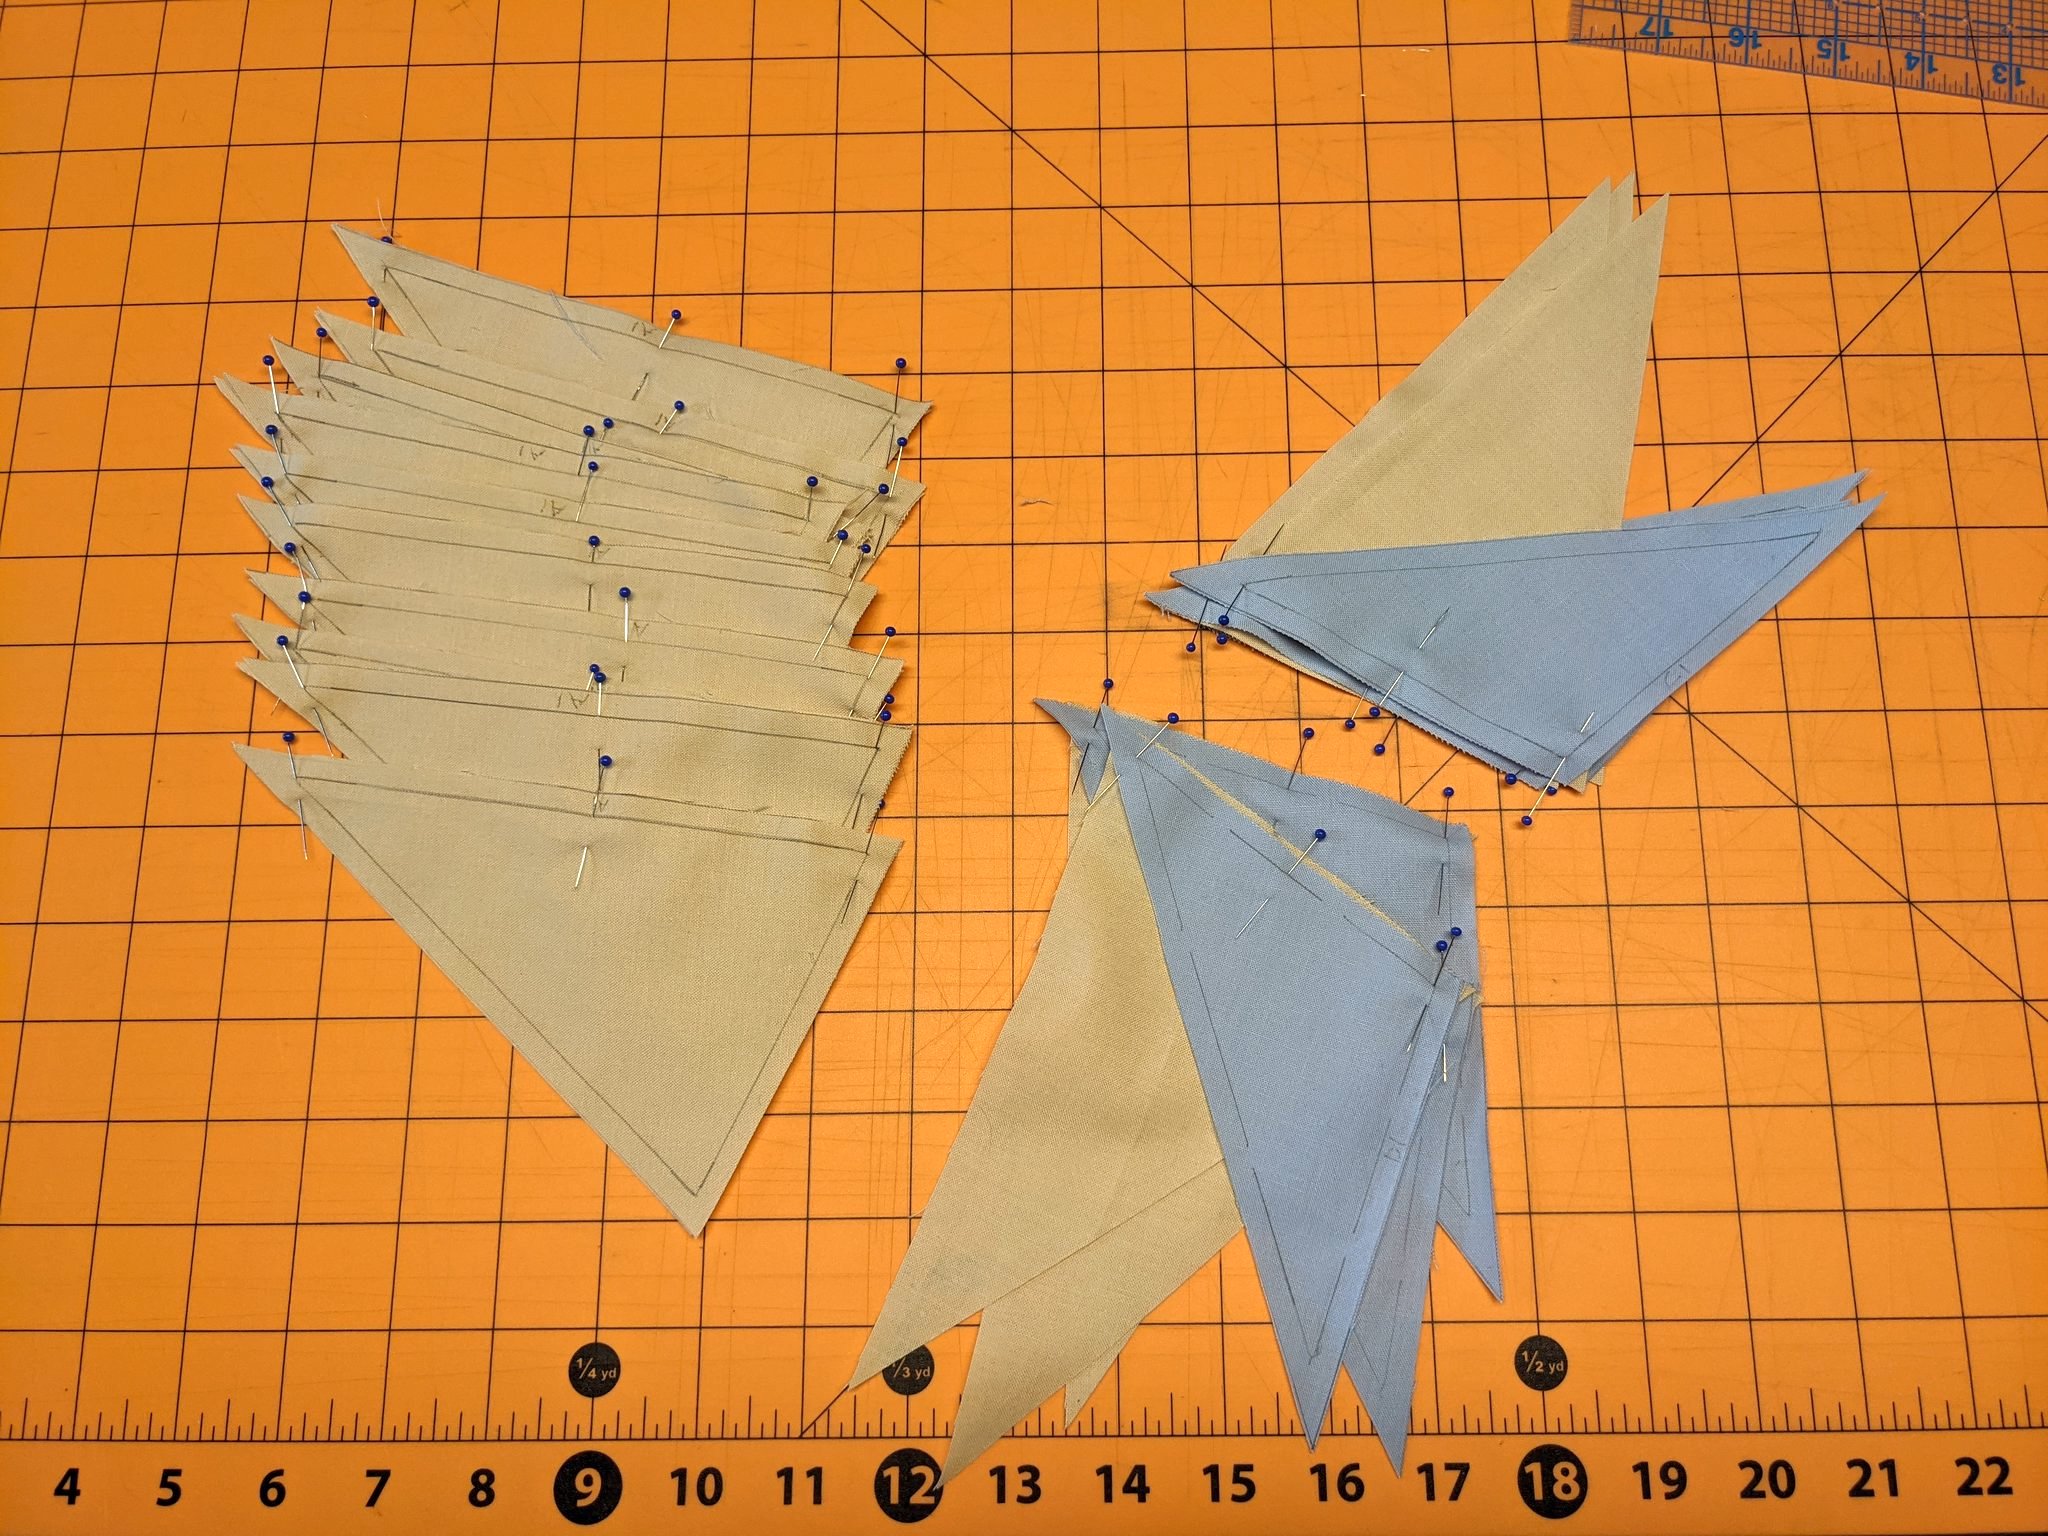
Then it was just a matter of cutting the shapes out of actual fabric and sewing them together. Here’s my first batch of triangles pinned and ready to sew:
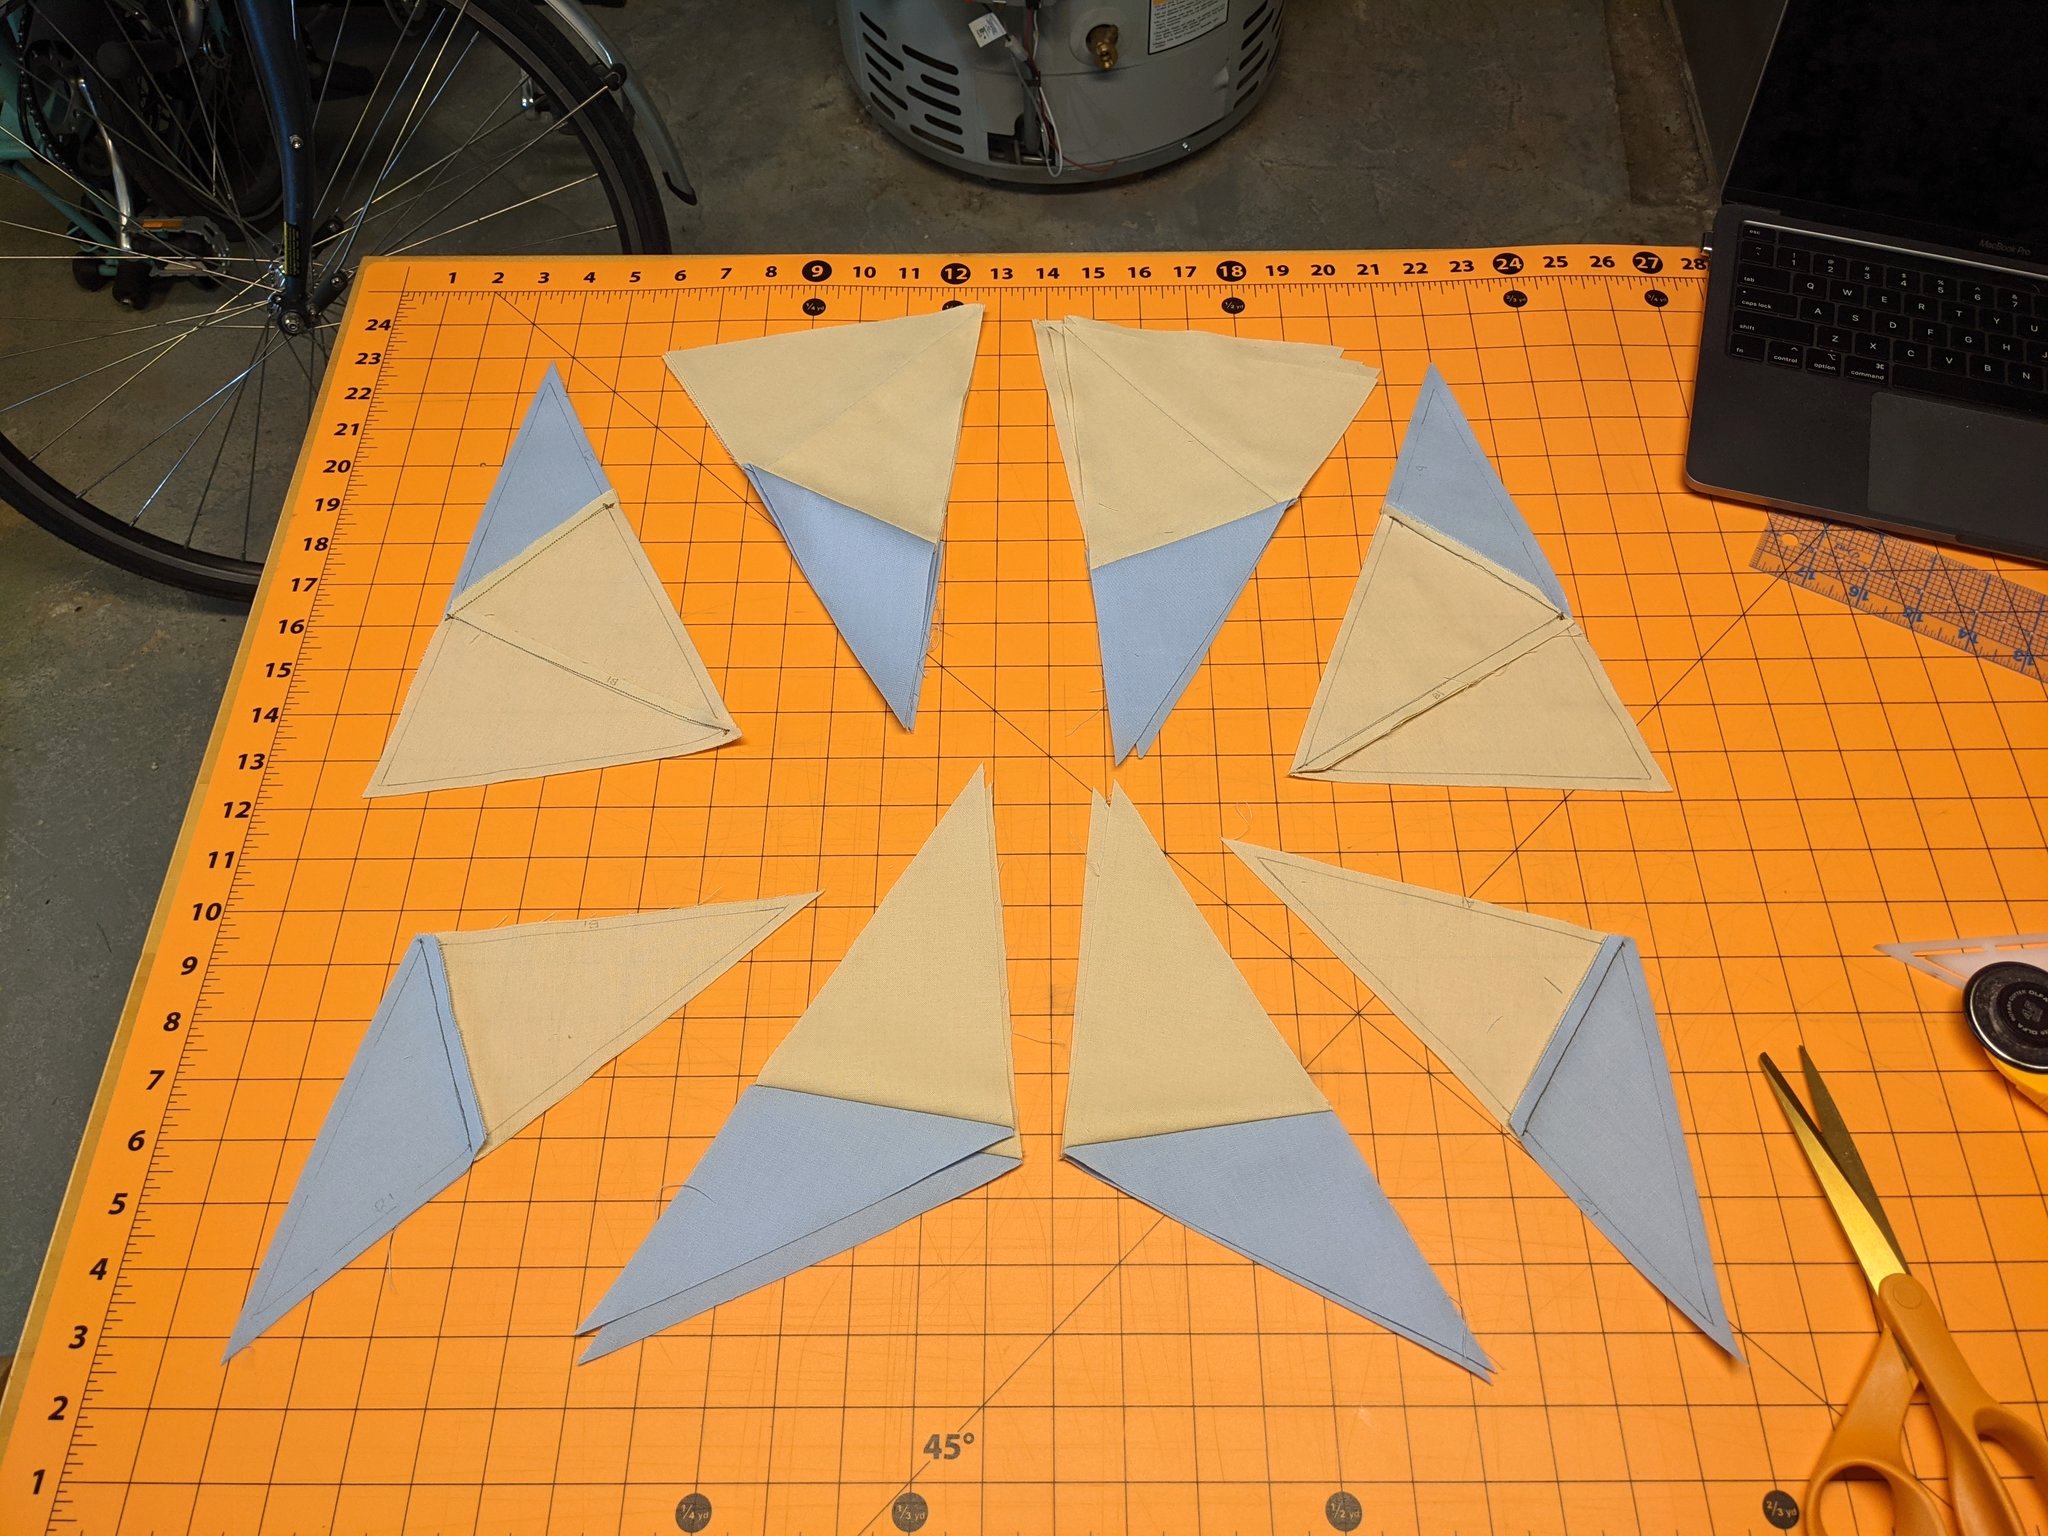
After a few seams, I ended up with some half-kites and half-darts at the first level of subdivision:
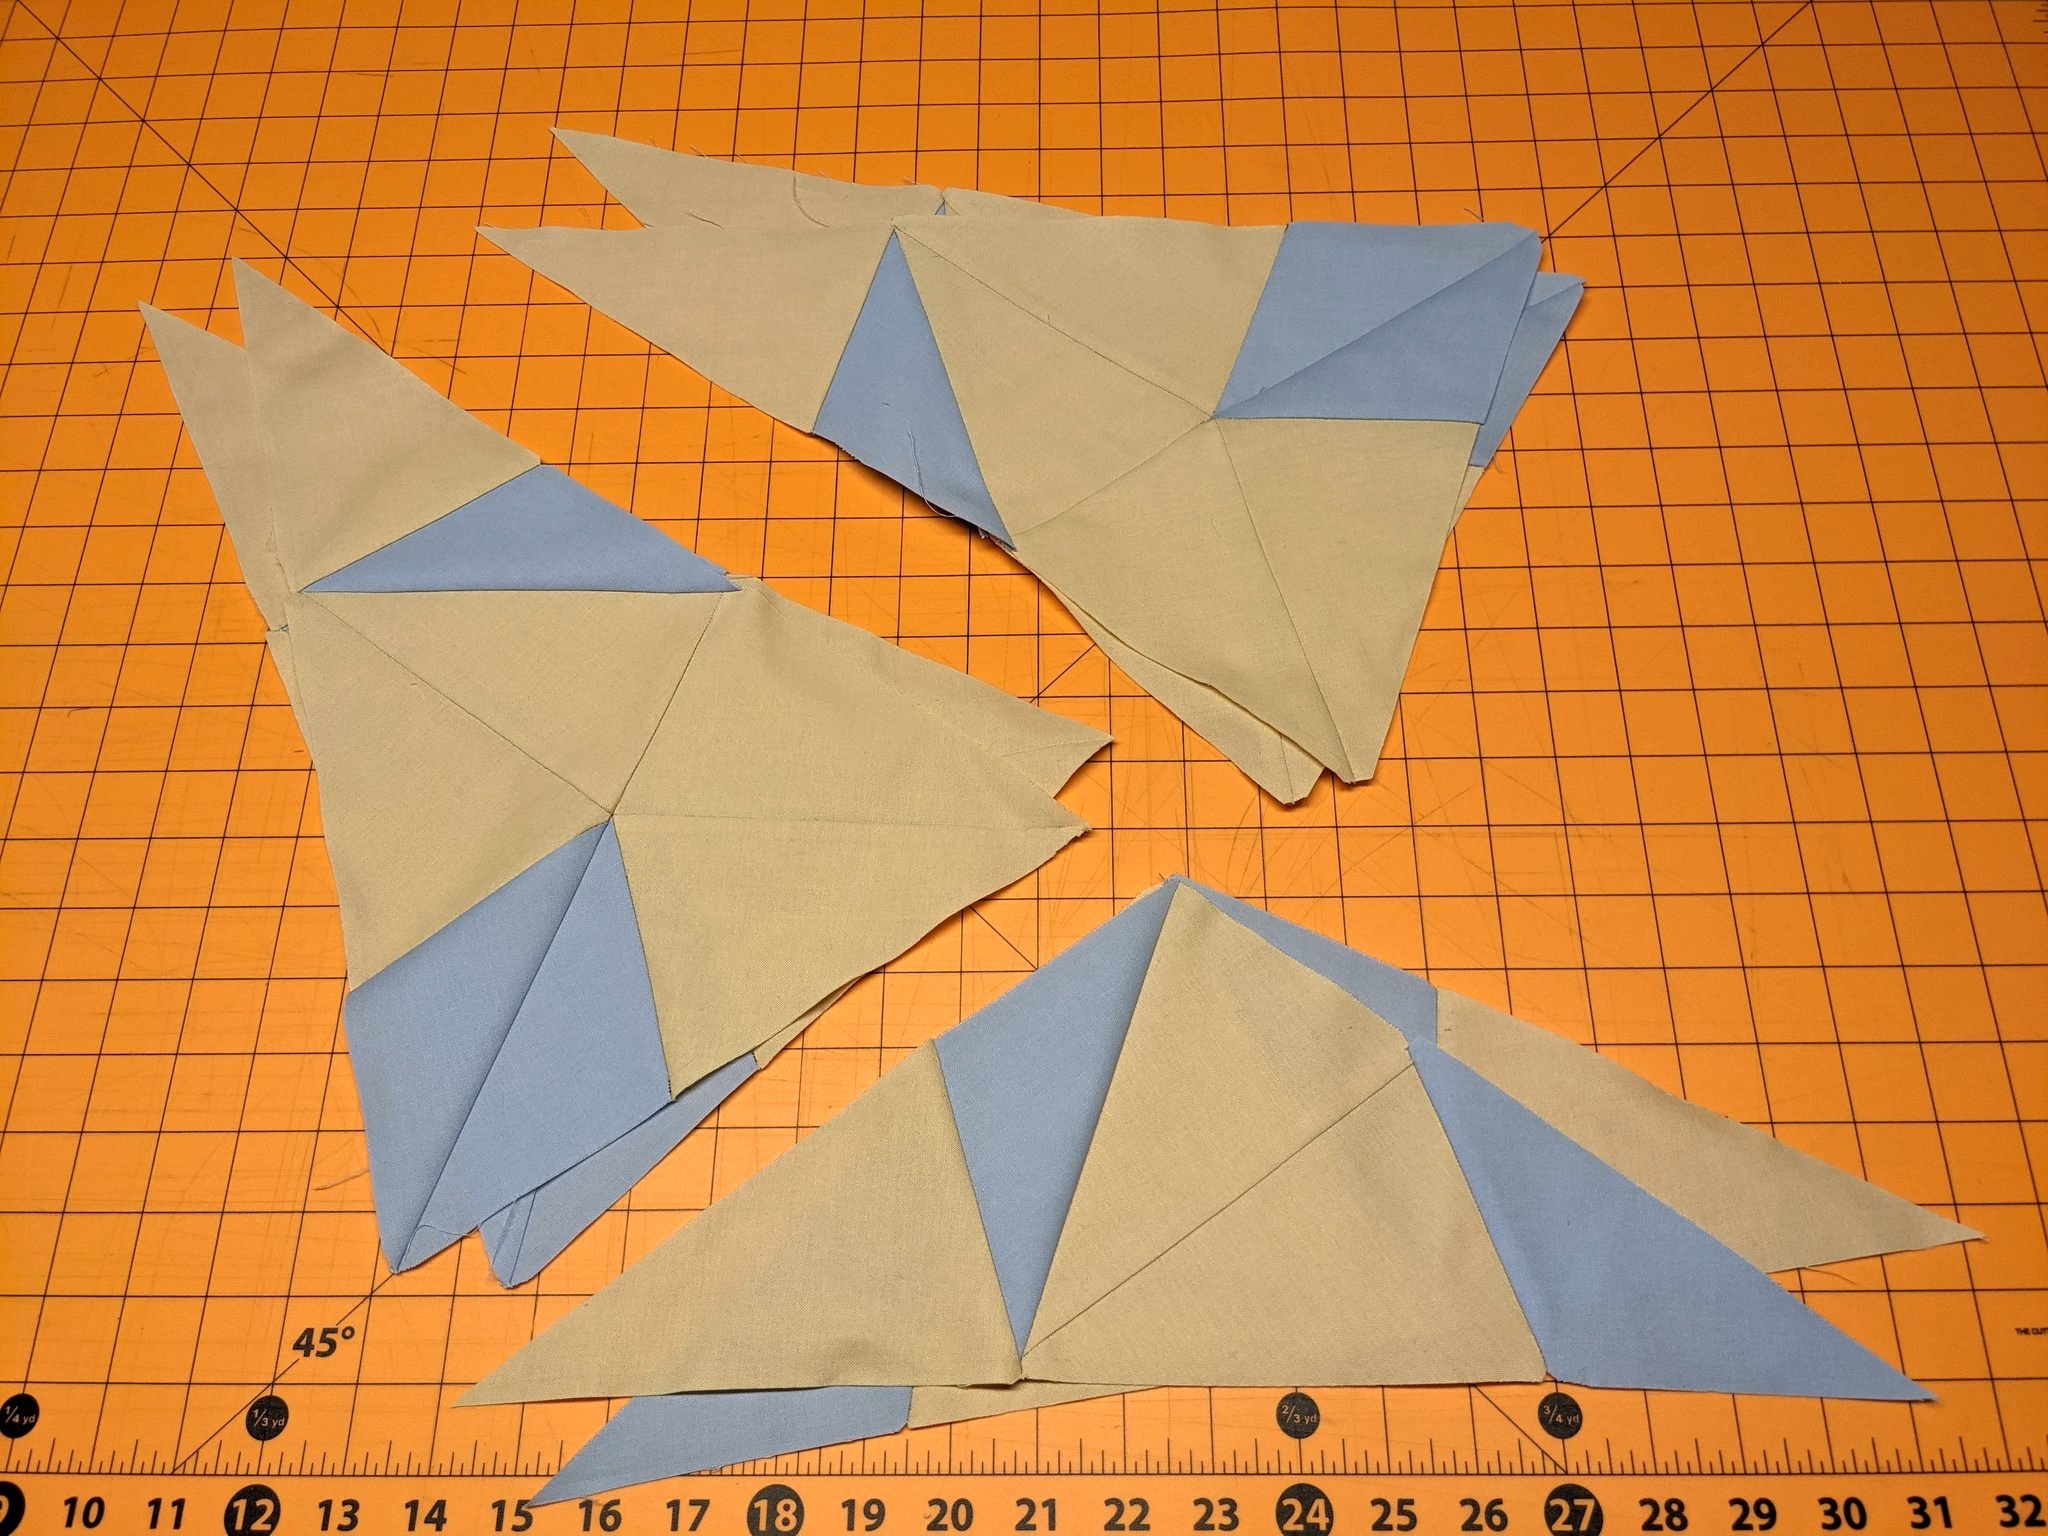
Then, after a few more seams, the second level of subdivision:
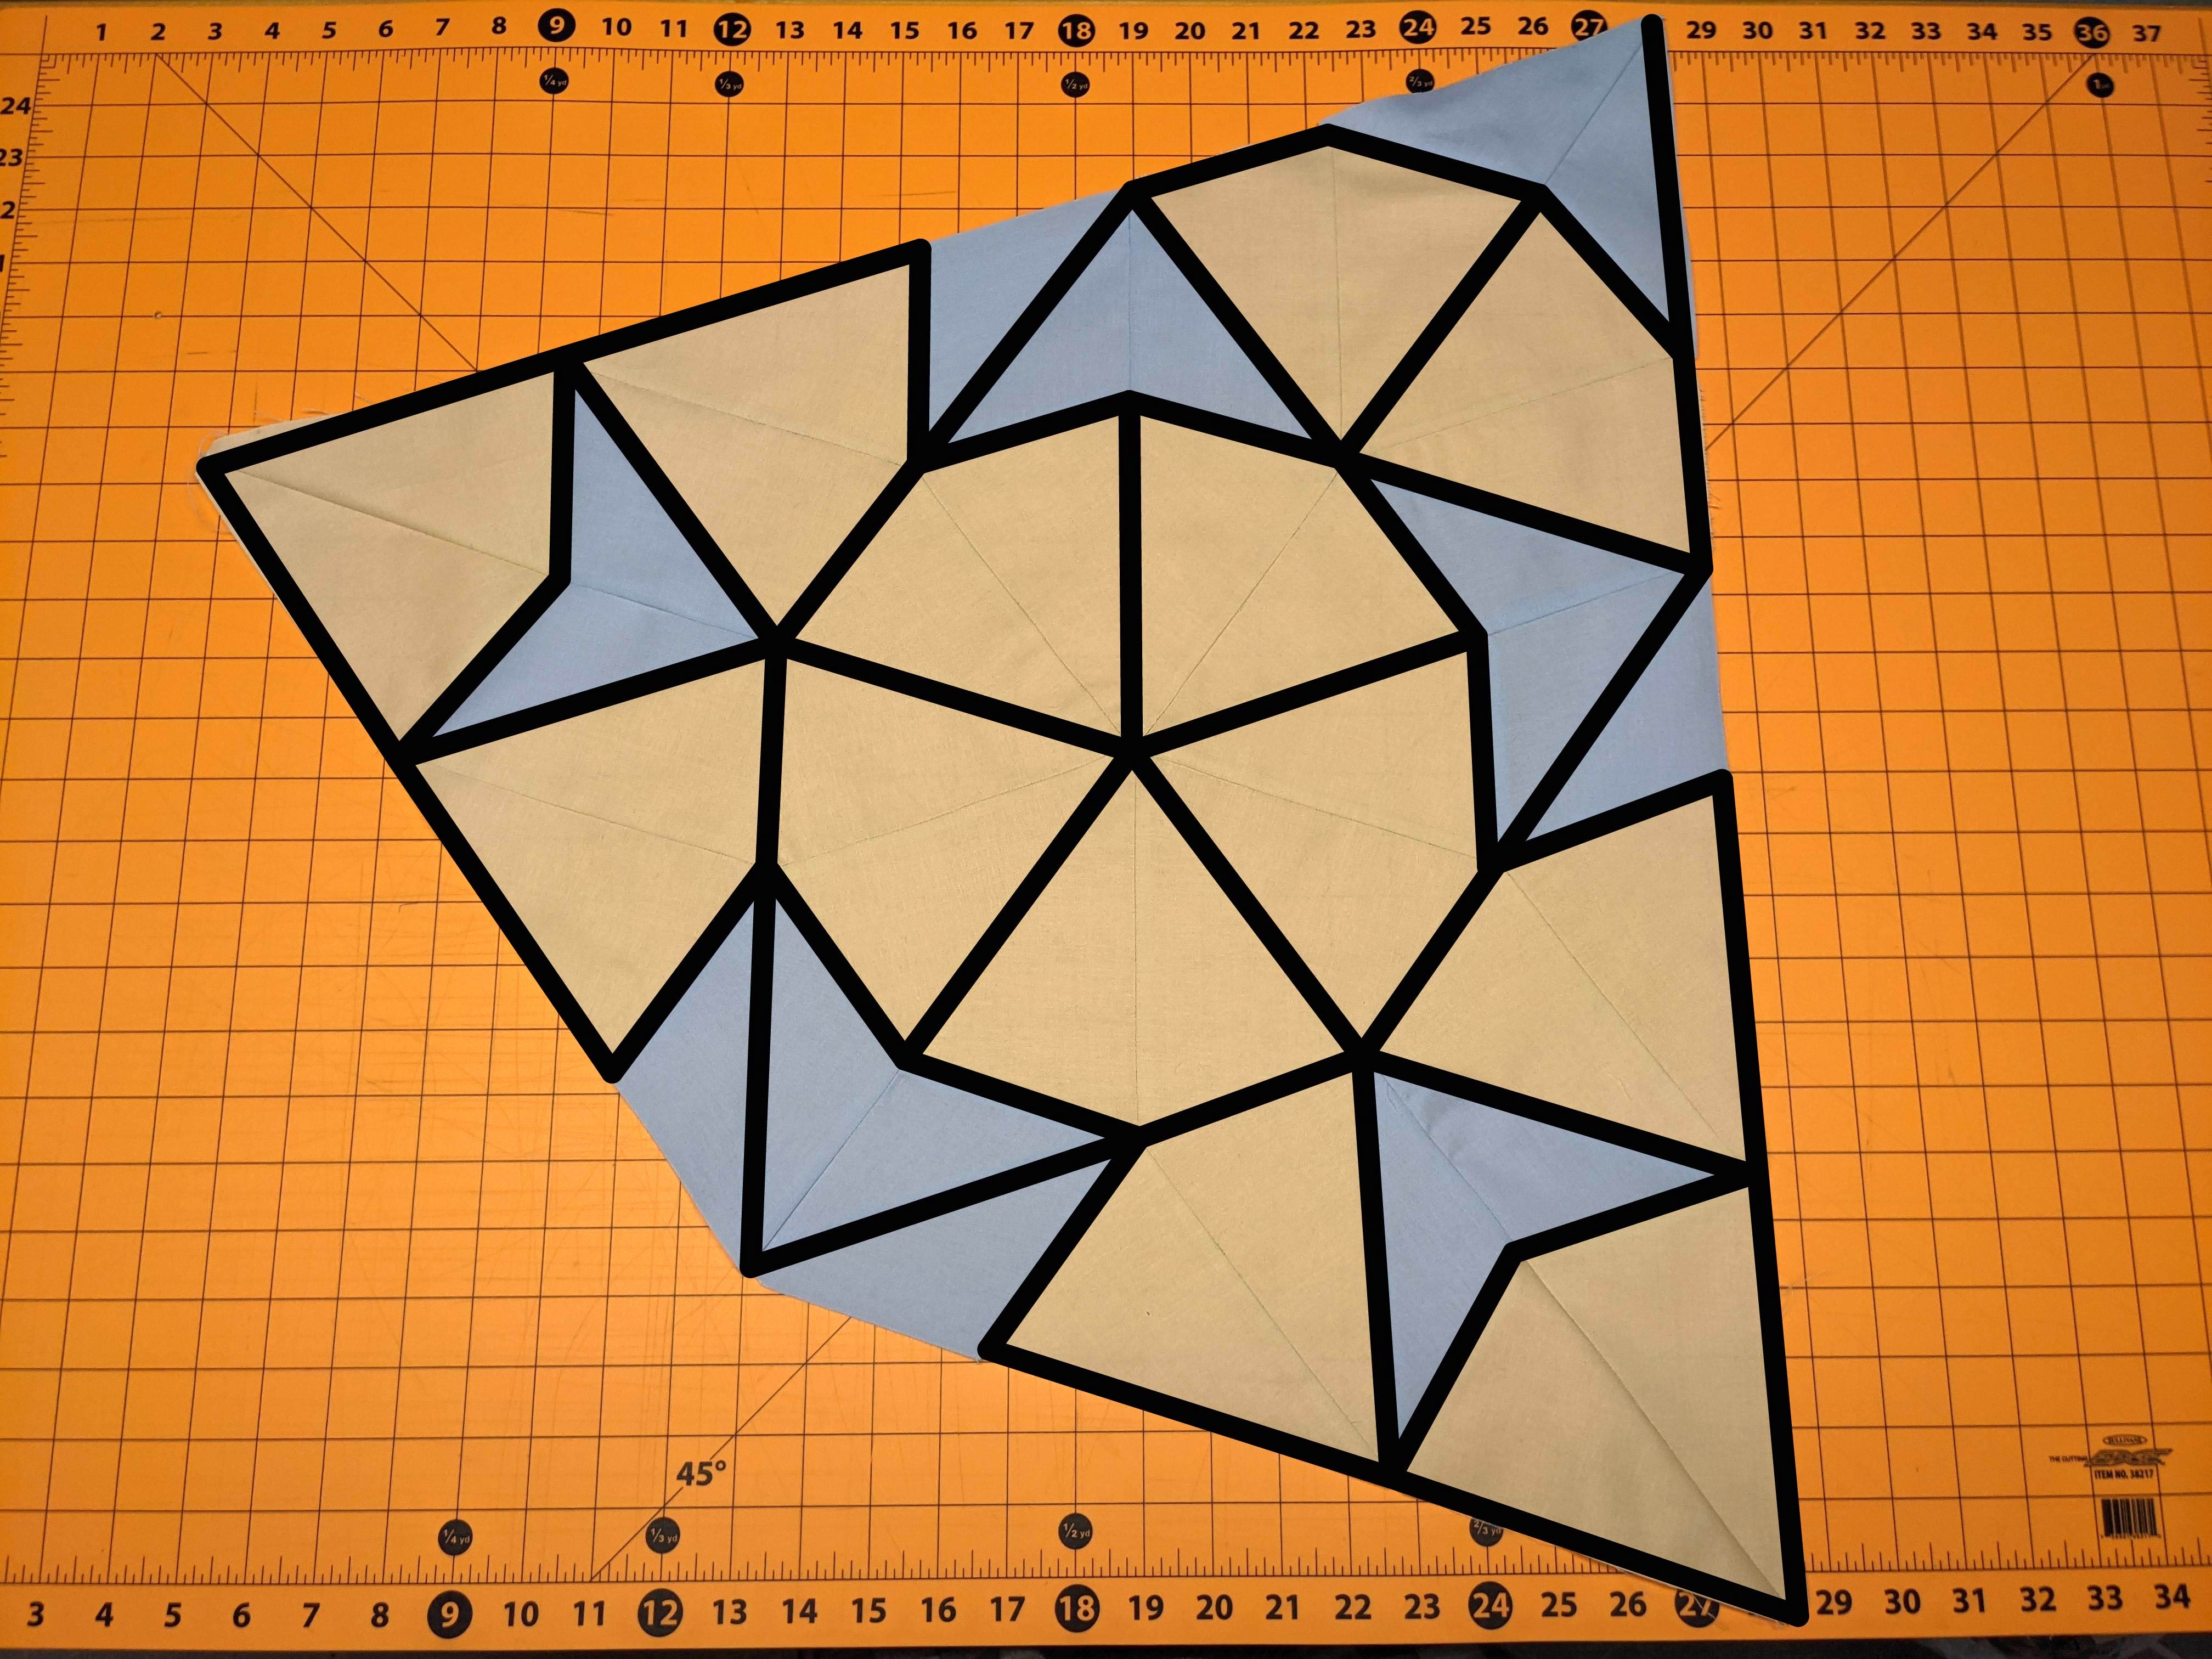
And here’s the giant kite shape I ended up with at the end of my first round of prototyping efforts. Despite the complexity, it was indeed possible to machine-sew everything along the straight edges of half-kite and half-dart modules – a successful validation of the “eureka” idea.
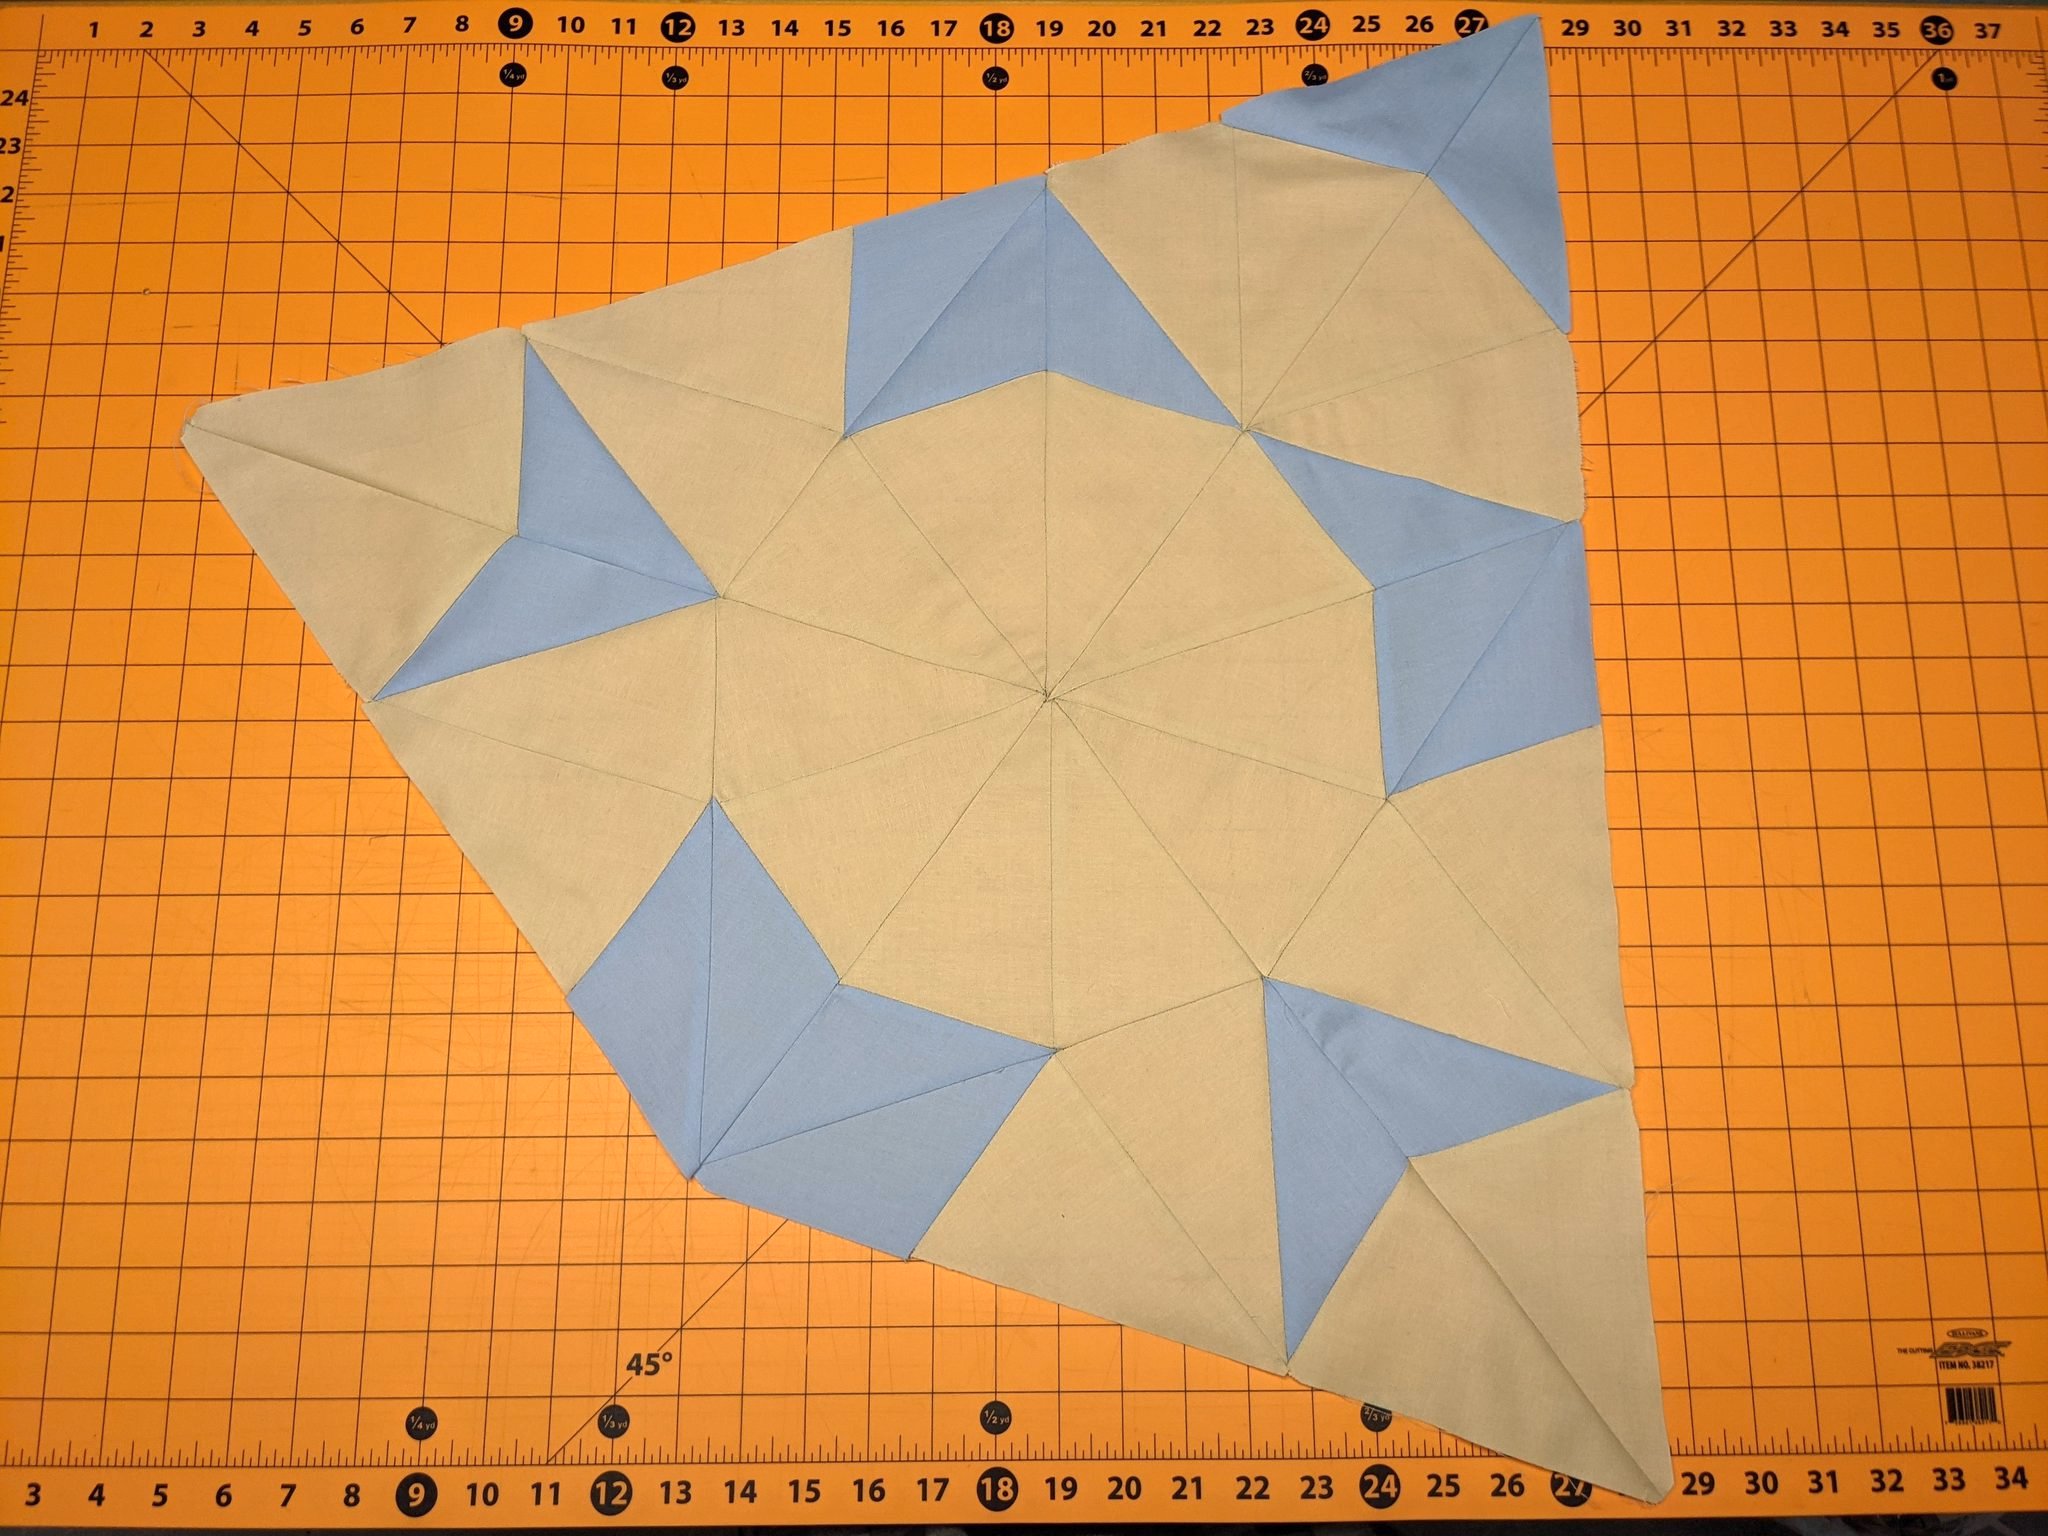
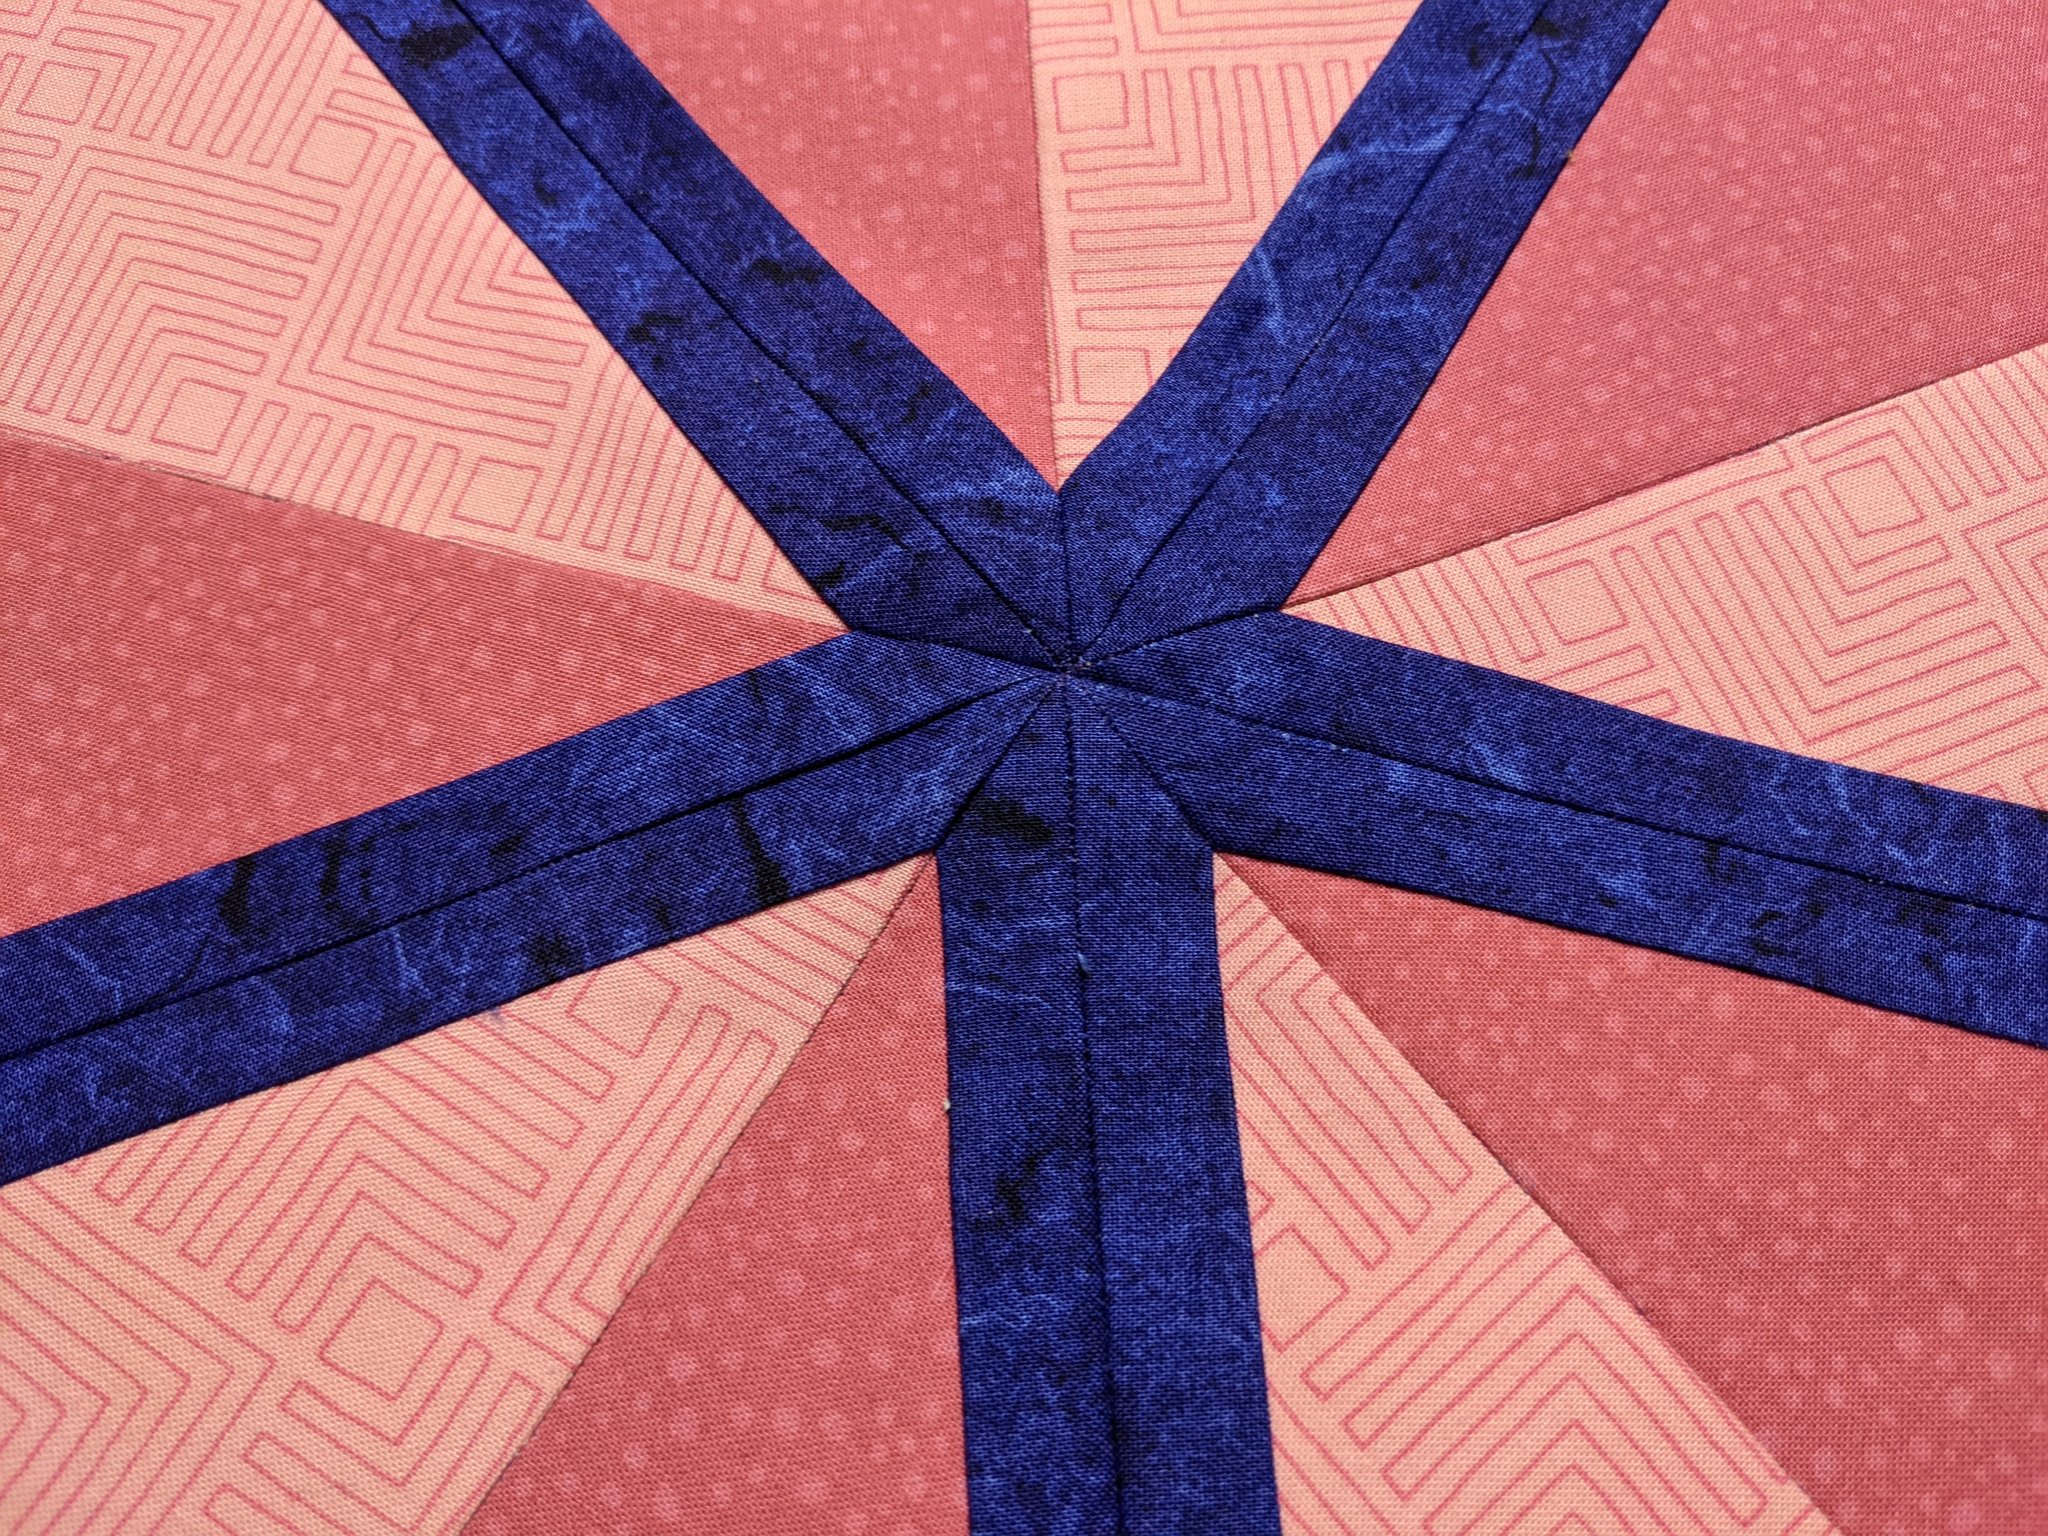
On the other hand, my novice sewing skills were not yet up to tackling a pattern this complex. I felt a lot of frustration at my inability to get ten seams to meet at a single point.

At the time, I believed that I just needed to get better at pinning and sewing consistently.
As it turned out, I was also missing out on a crucial quilting technique, discussed below, which would help me up my precision game considerably.
The other major area for improvement was in composition. I decided that it was important to introduce distinct outlines around each kite and dart tile in my quilt, with each neighboring half-tile contributing half of their width. Without the outlines, it was hard to tell whether the composition was a true Penrose tiling. But with them, I thought the composition would really pop. Here’s a mock-up I did to in Illustrator to convince myself:
Speaking of composition, I didn’t love the obvious bilateral symmetry and clear, central, focal point that I saw in the test piece. Even with further subdivisions, those attributes would lend a static, rote aspect to the design that I would try to avoid in the future.
One other thing that did go well with this prototype was writing a Python program to plan assembly. Here’s some sample output from an early version:

Not only did the program tell me how many of each base half-tile to cut out, it also graphically depicted the process for assembling them together into larger modules. With some further refinements, those ideas ended up proving really useful for the final product.
March 2021: prototyping round 2
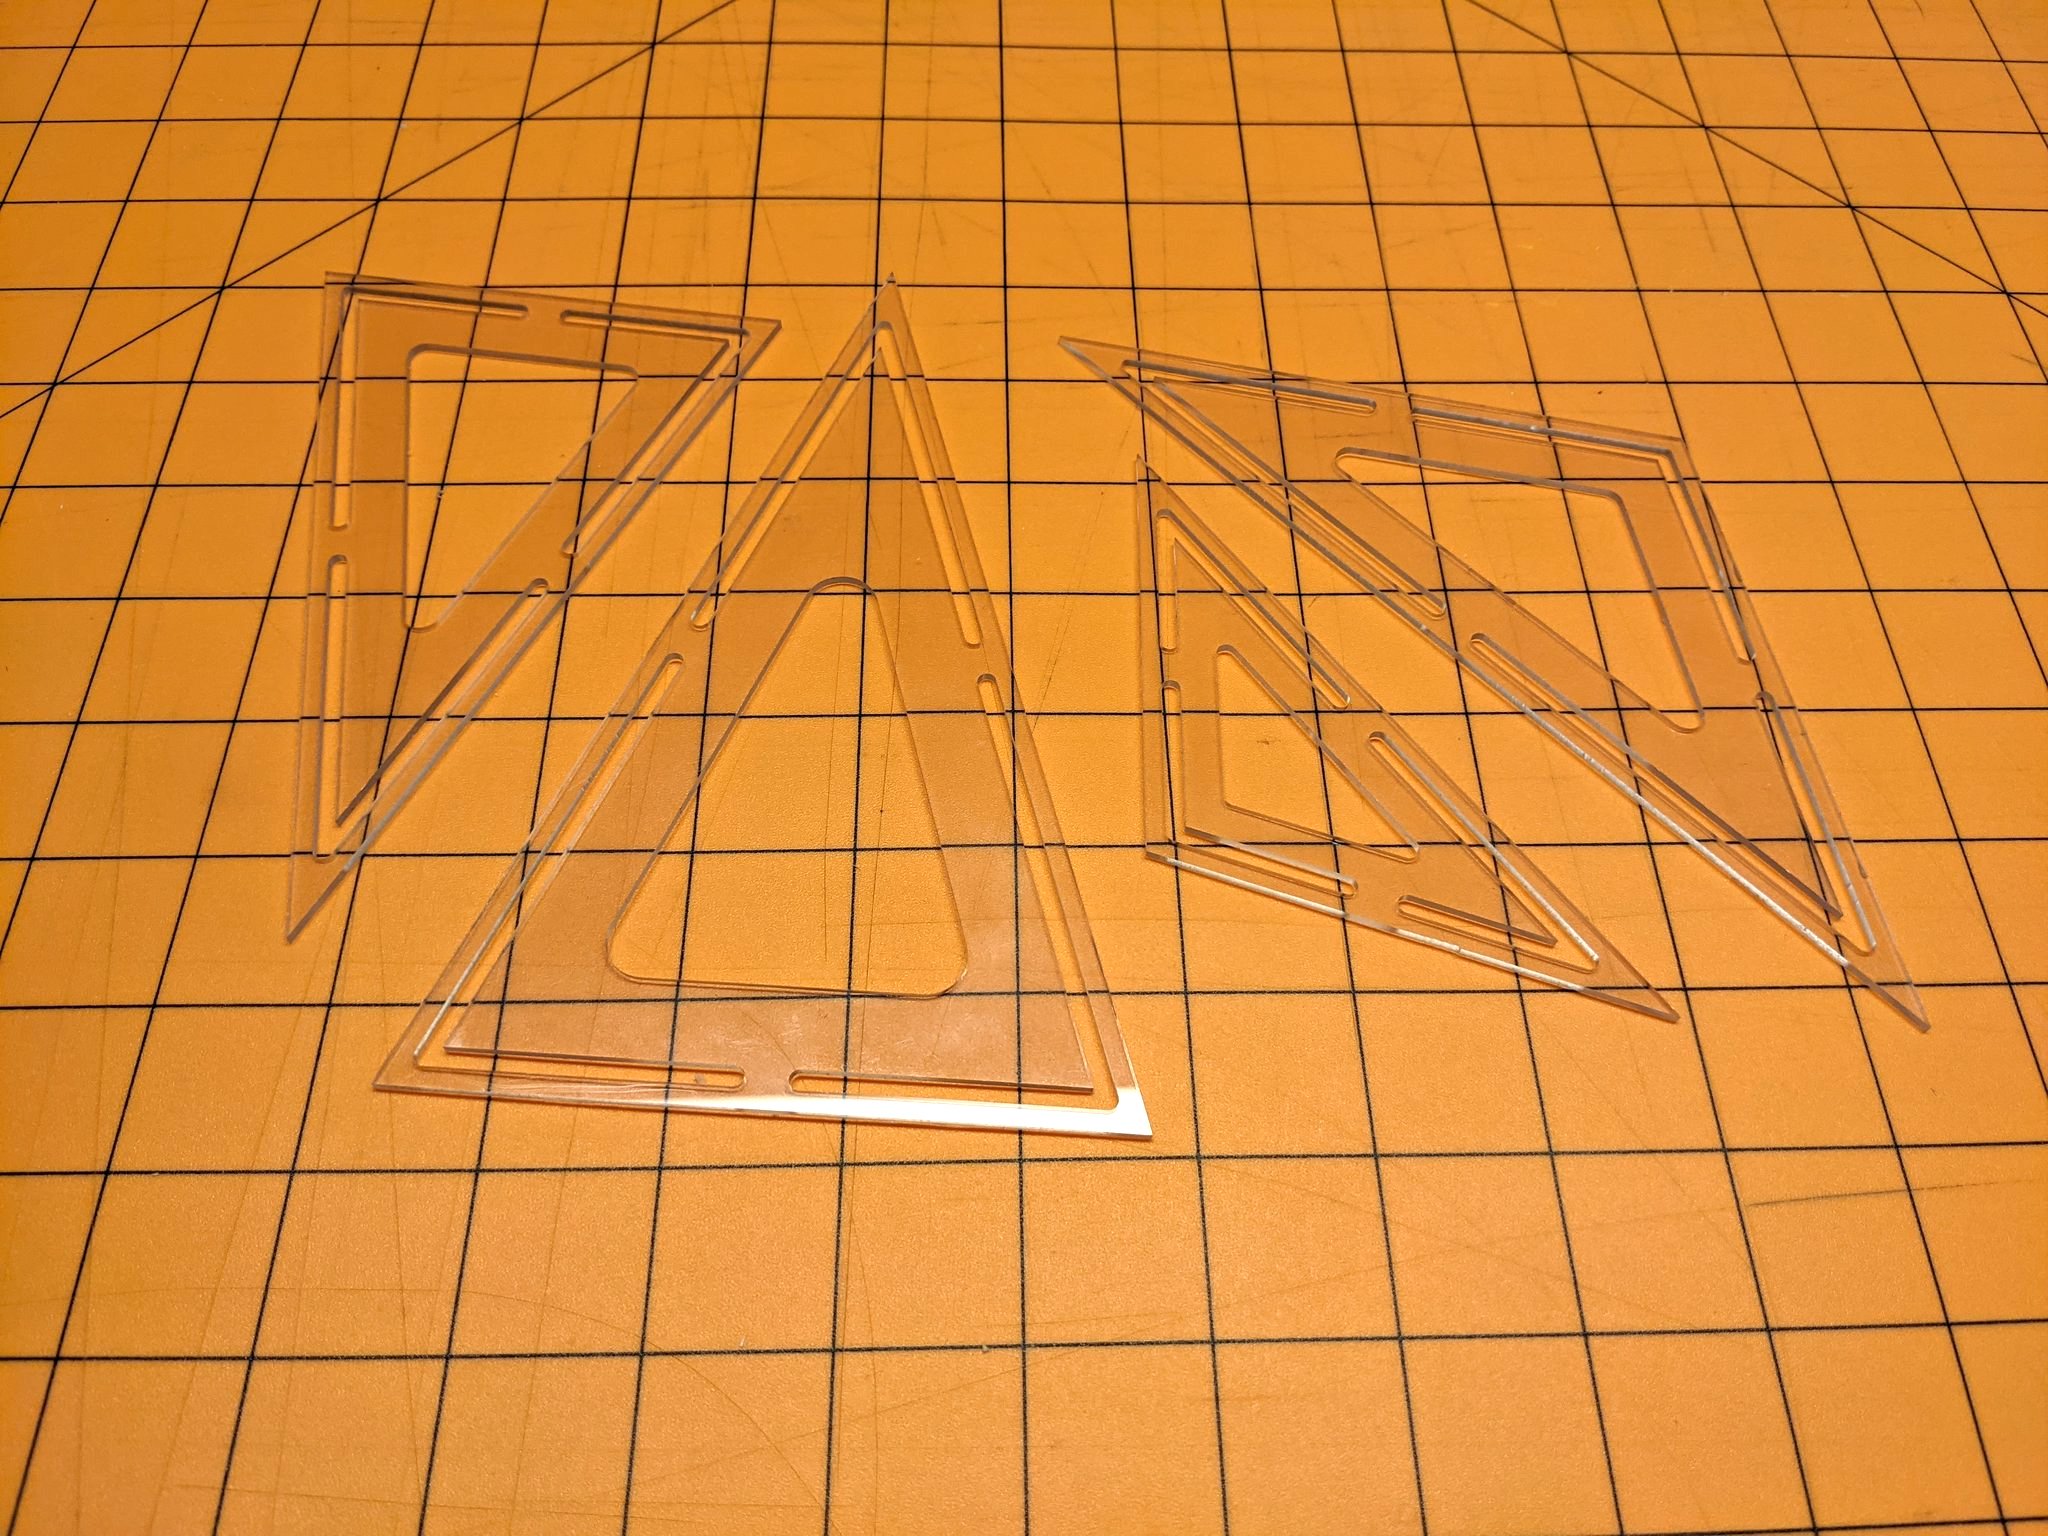
I kicked off my next test piece by updating the templates. There were now two pairs of them at different sizes, for half-tiles both before and after adding on half-outlines. Compared with the first ones, the new templates were made from thinner, transparent acrylic, and had holes added in the middle, so they were easier to place, manipulate, and hold steady on the fabric.
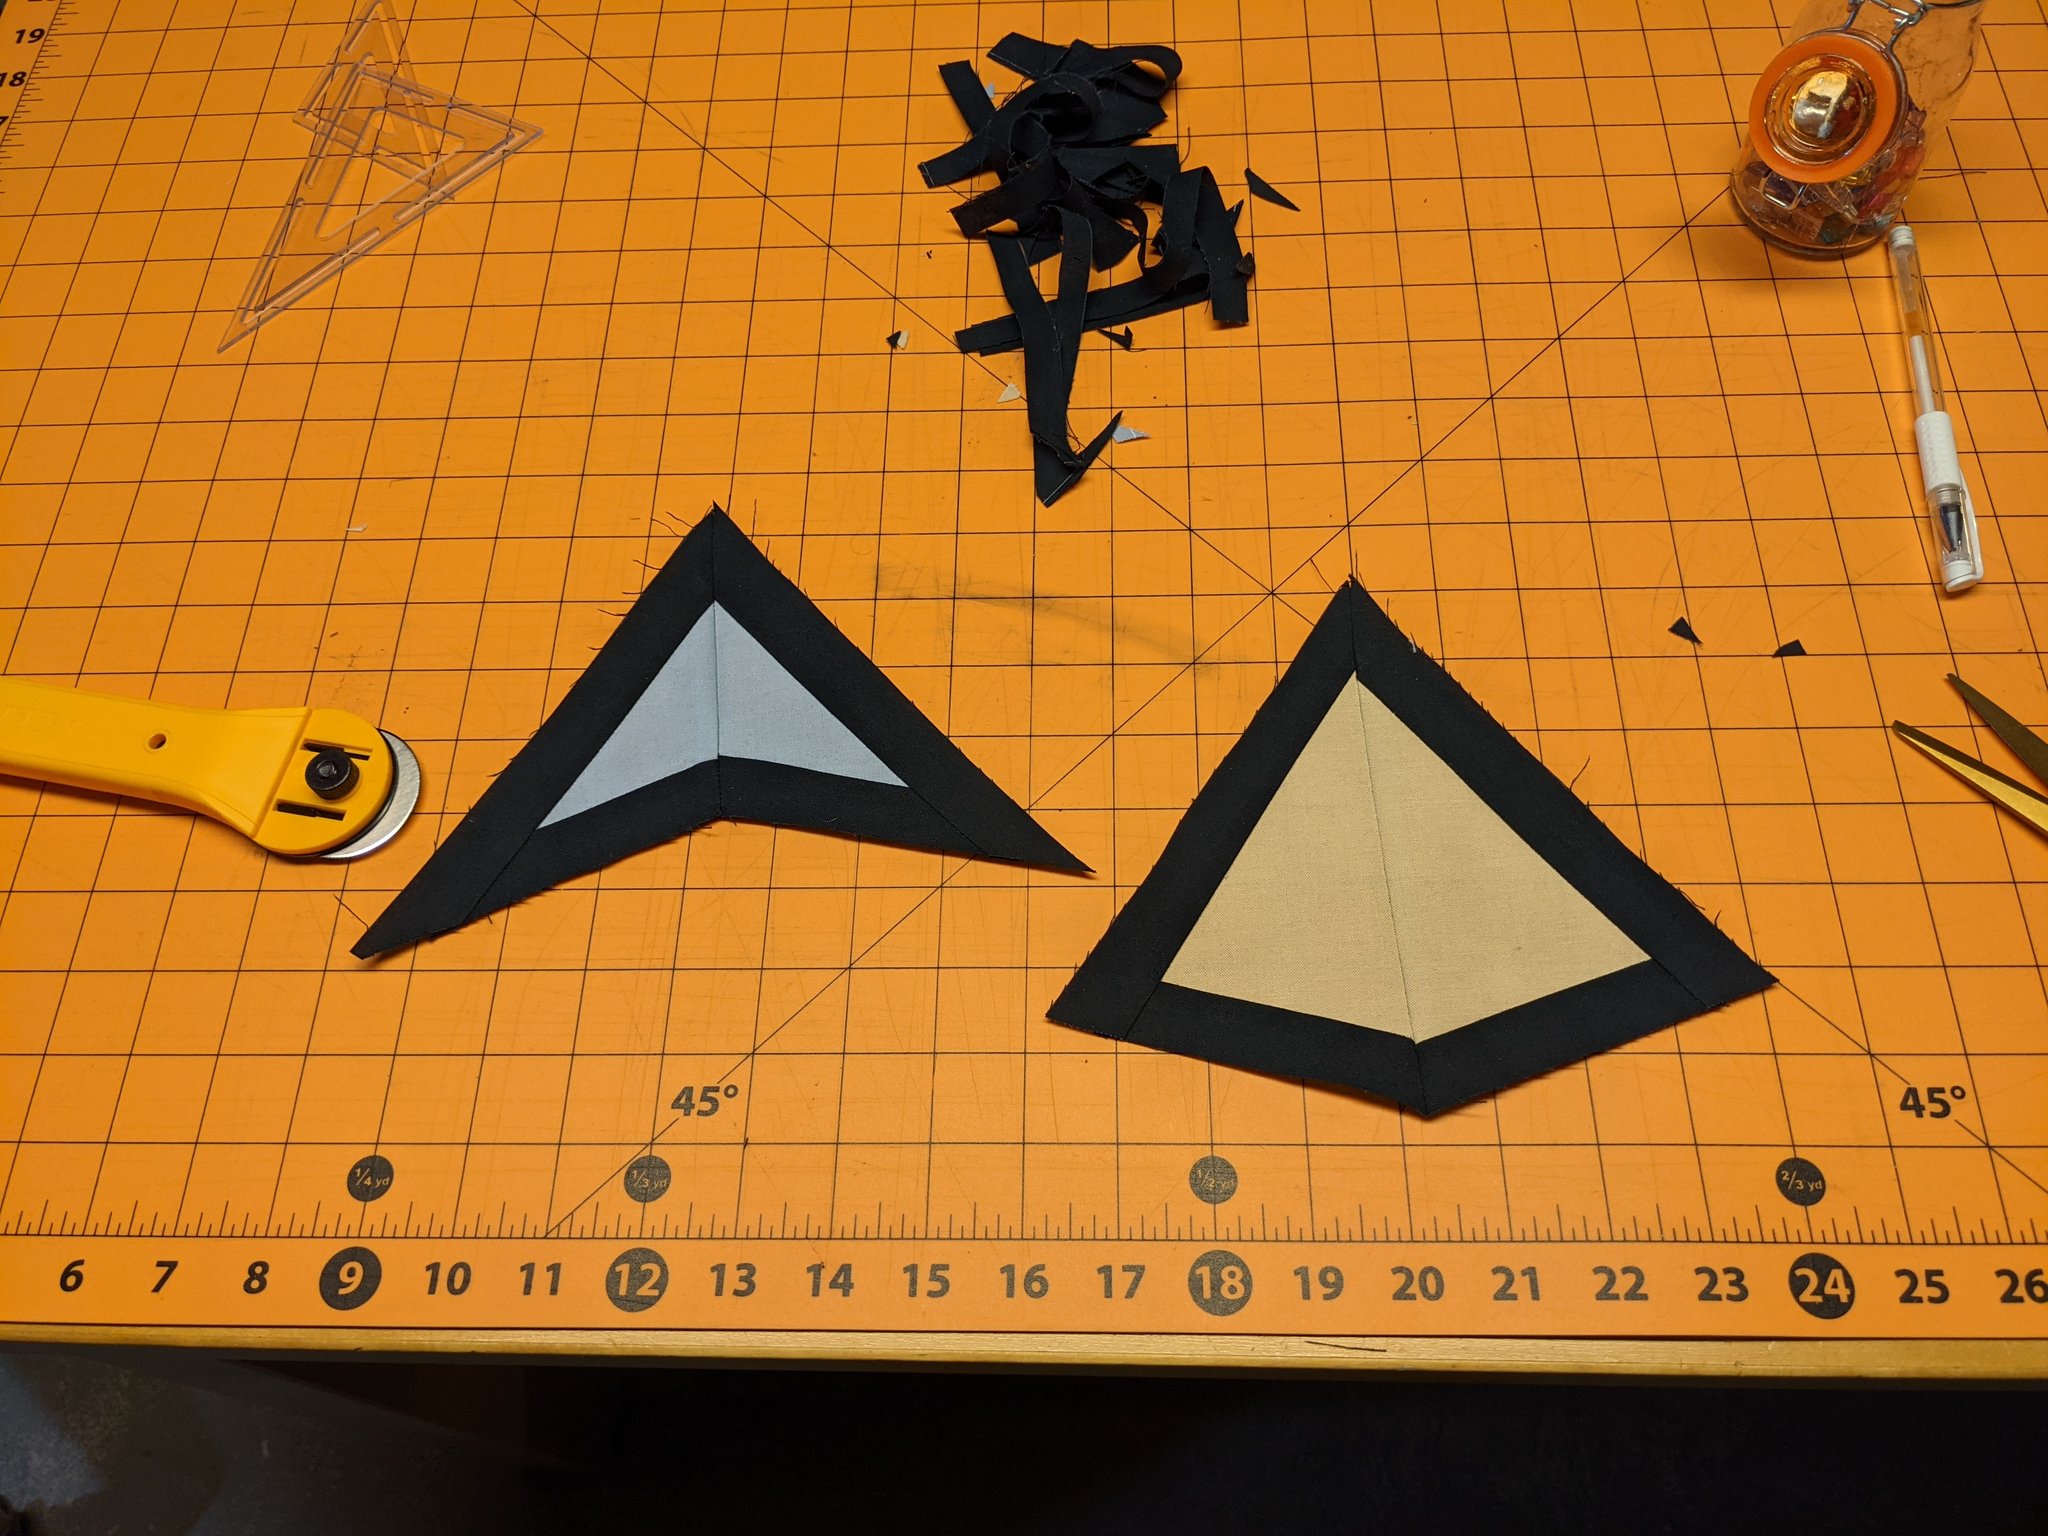
The new templates made it possible to sew tiles that had clearly delineated outlines.
Because I wanted to learn the Rust language, I ported my pattern-making program over to it from Python. Then I began making further improvements, especially for coming up with the type of dynamic-looking compositions I wanted.
Based on the lessons learned from my first test piece, my ideal design would have no single focal point, and no clear lines of symmetry running through it.
To enable this, the program starts with an initial half-kite, subdivides it to a predetermined depth, and then extracts a rectangular region of interest to form the final composition.
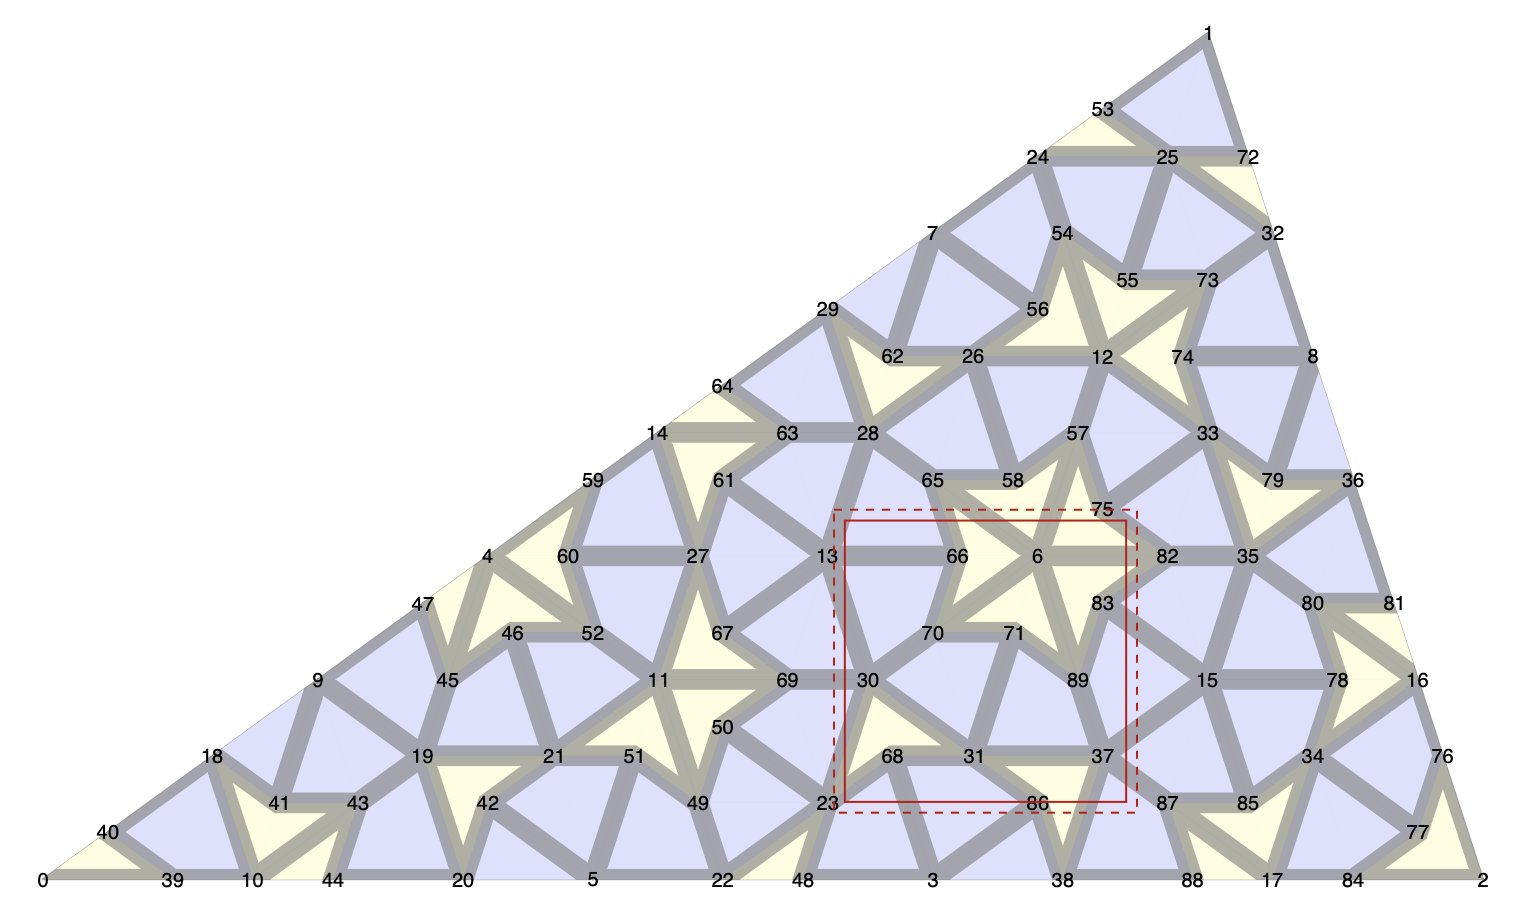
Once the region of interest is specified, the program determines what modules it overlaps, and then creates an assembly plan by building a binary tree structure in which every parent node corresponds to the seam joining the sub-assemblies comprised by its two child nodes. The root of the tree is the entire assembly, and its leaves are the half-dart and half-kite modules created at various subdivision levels.
The resulting assembly can be 100% machine-sewn by joining up sub-assemblies along straight seams. For example, seam number 16 joins two sub-assemblies comprising the left and right parts of the design. On the right-hand side, seam number 6 joins the top part to the bottom part.
The solid red square in the image above denotes the boundary where the composition will meet the quilt borders, and the dotted red square indicates a ½” seam allowance.
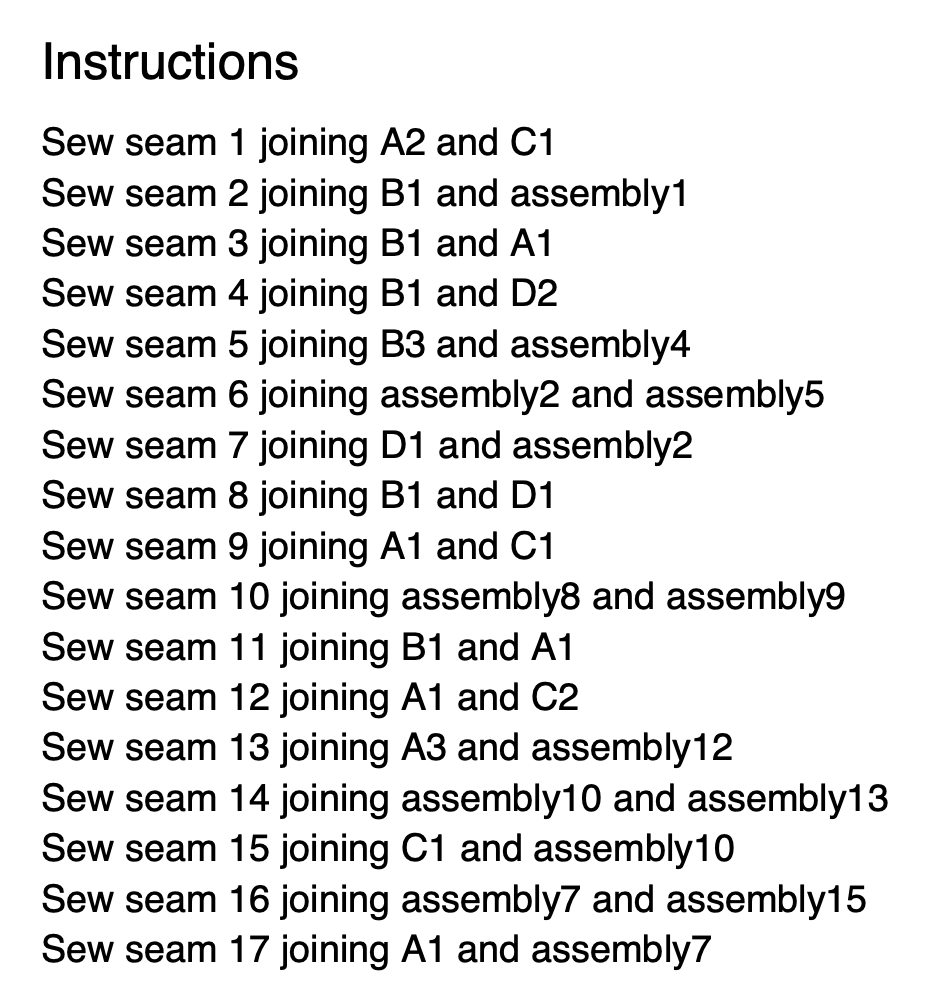
The program output also includes instructions for assembly:
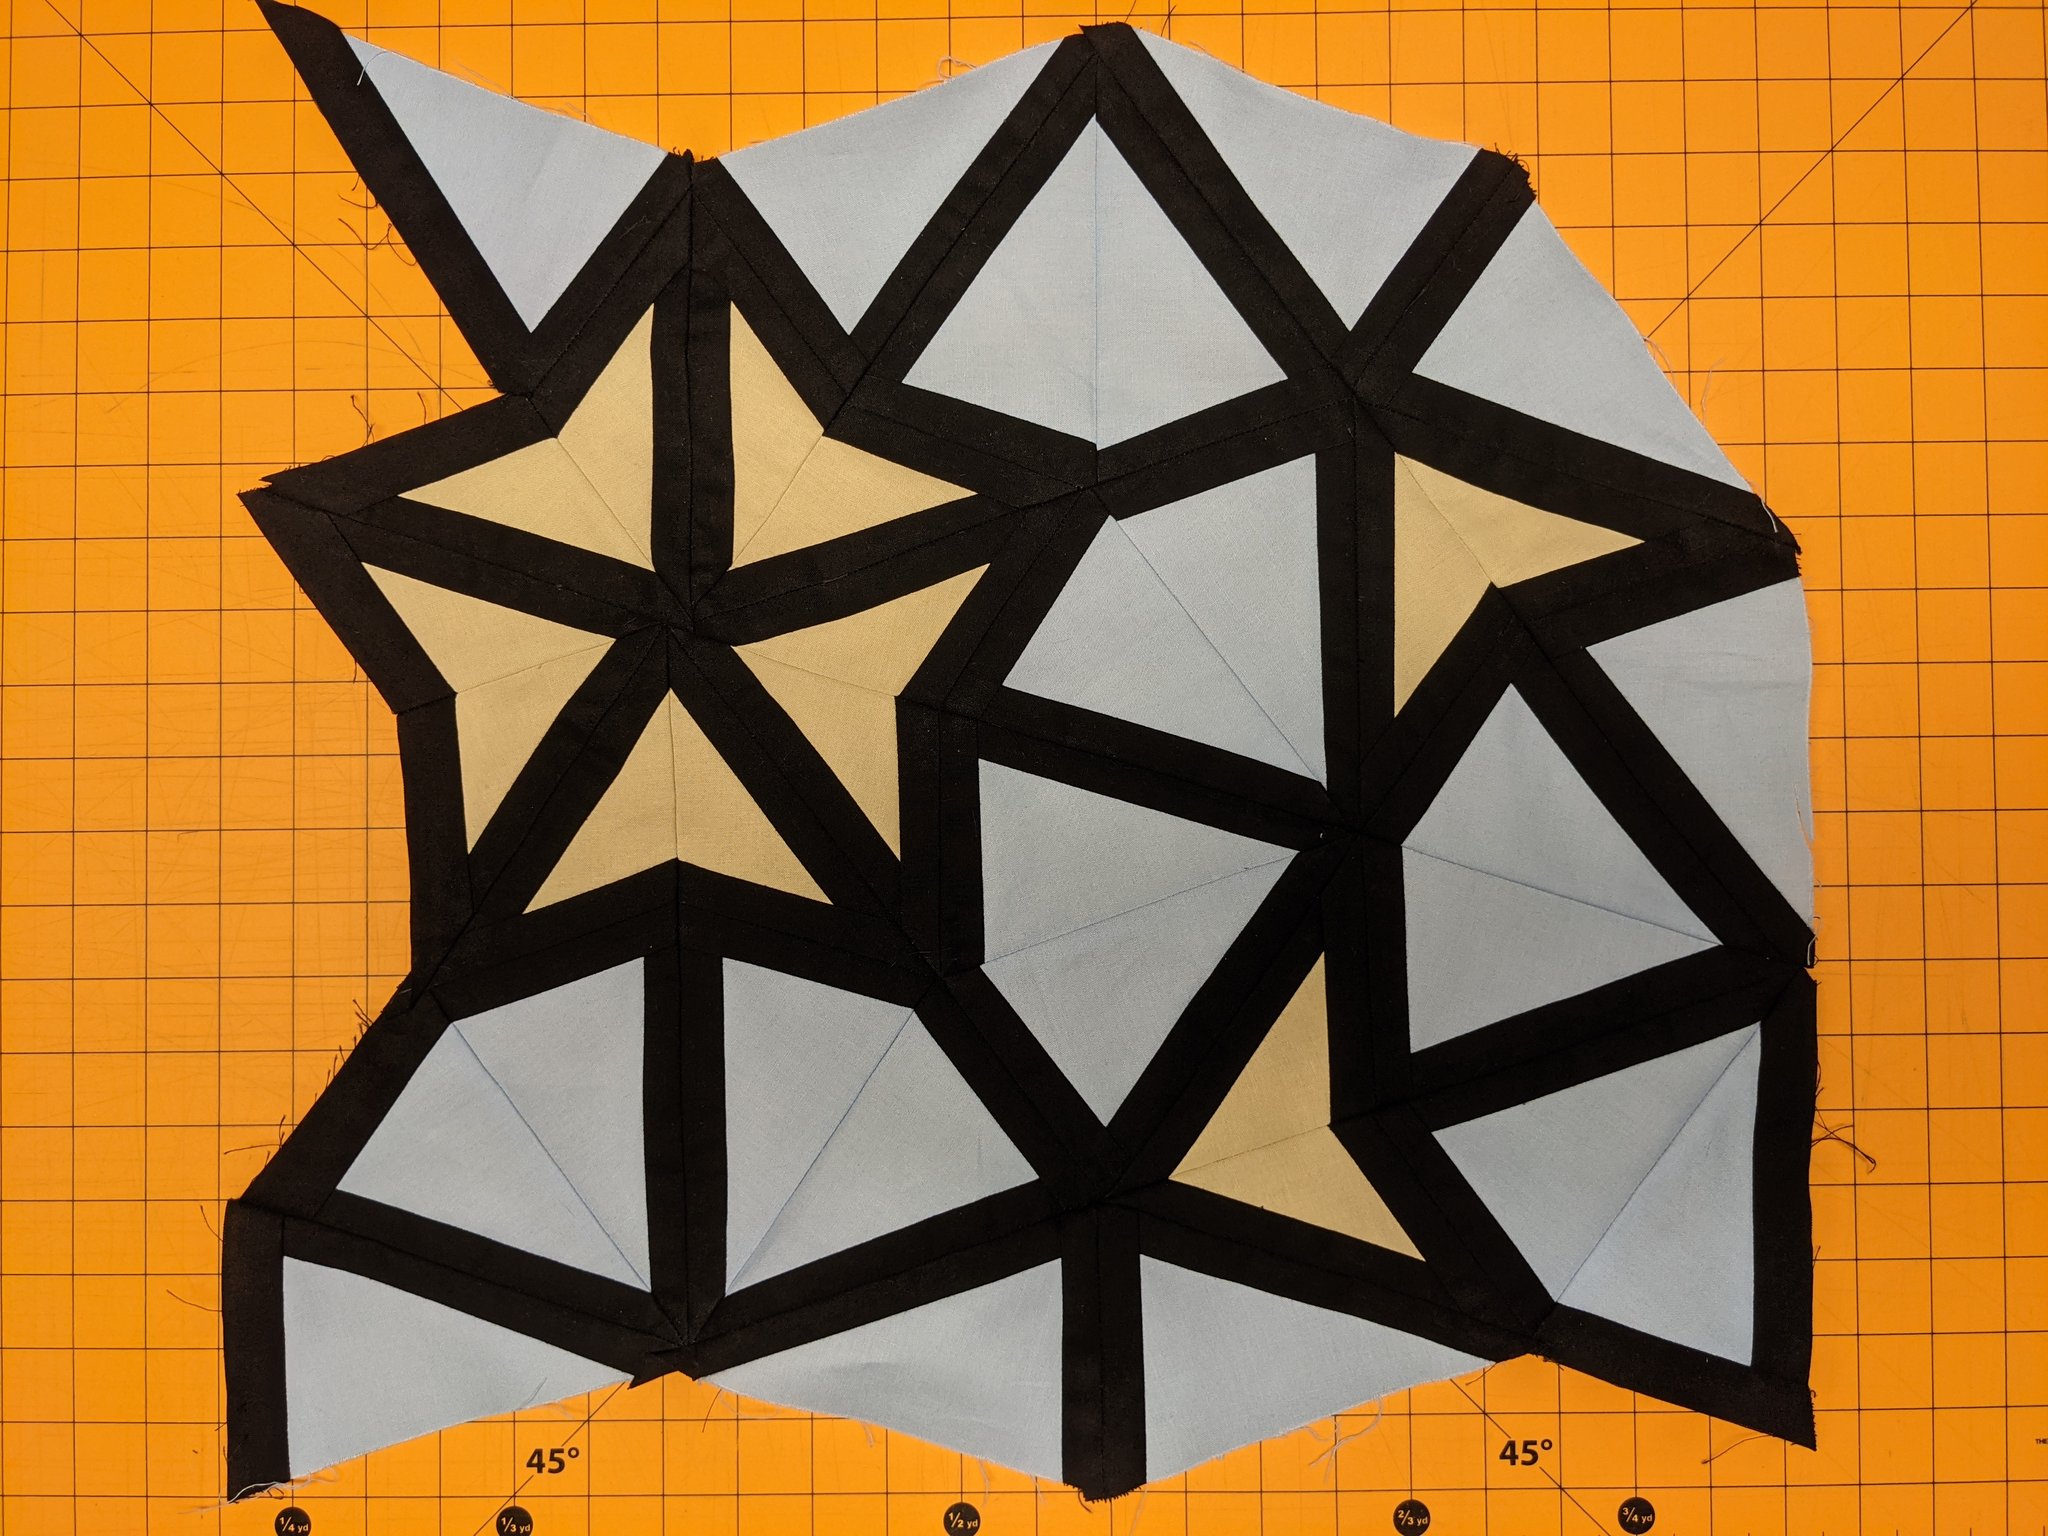
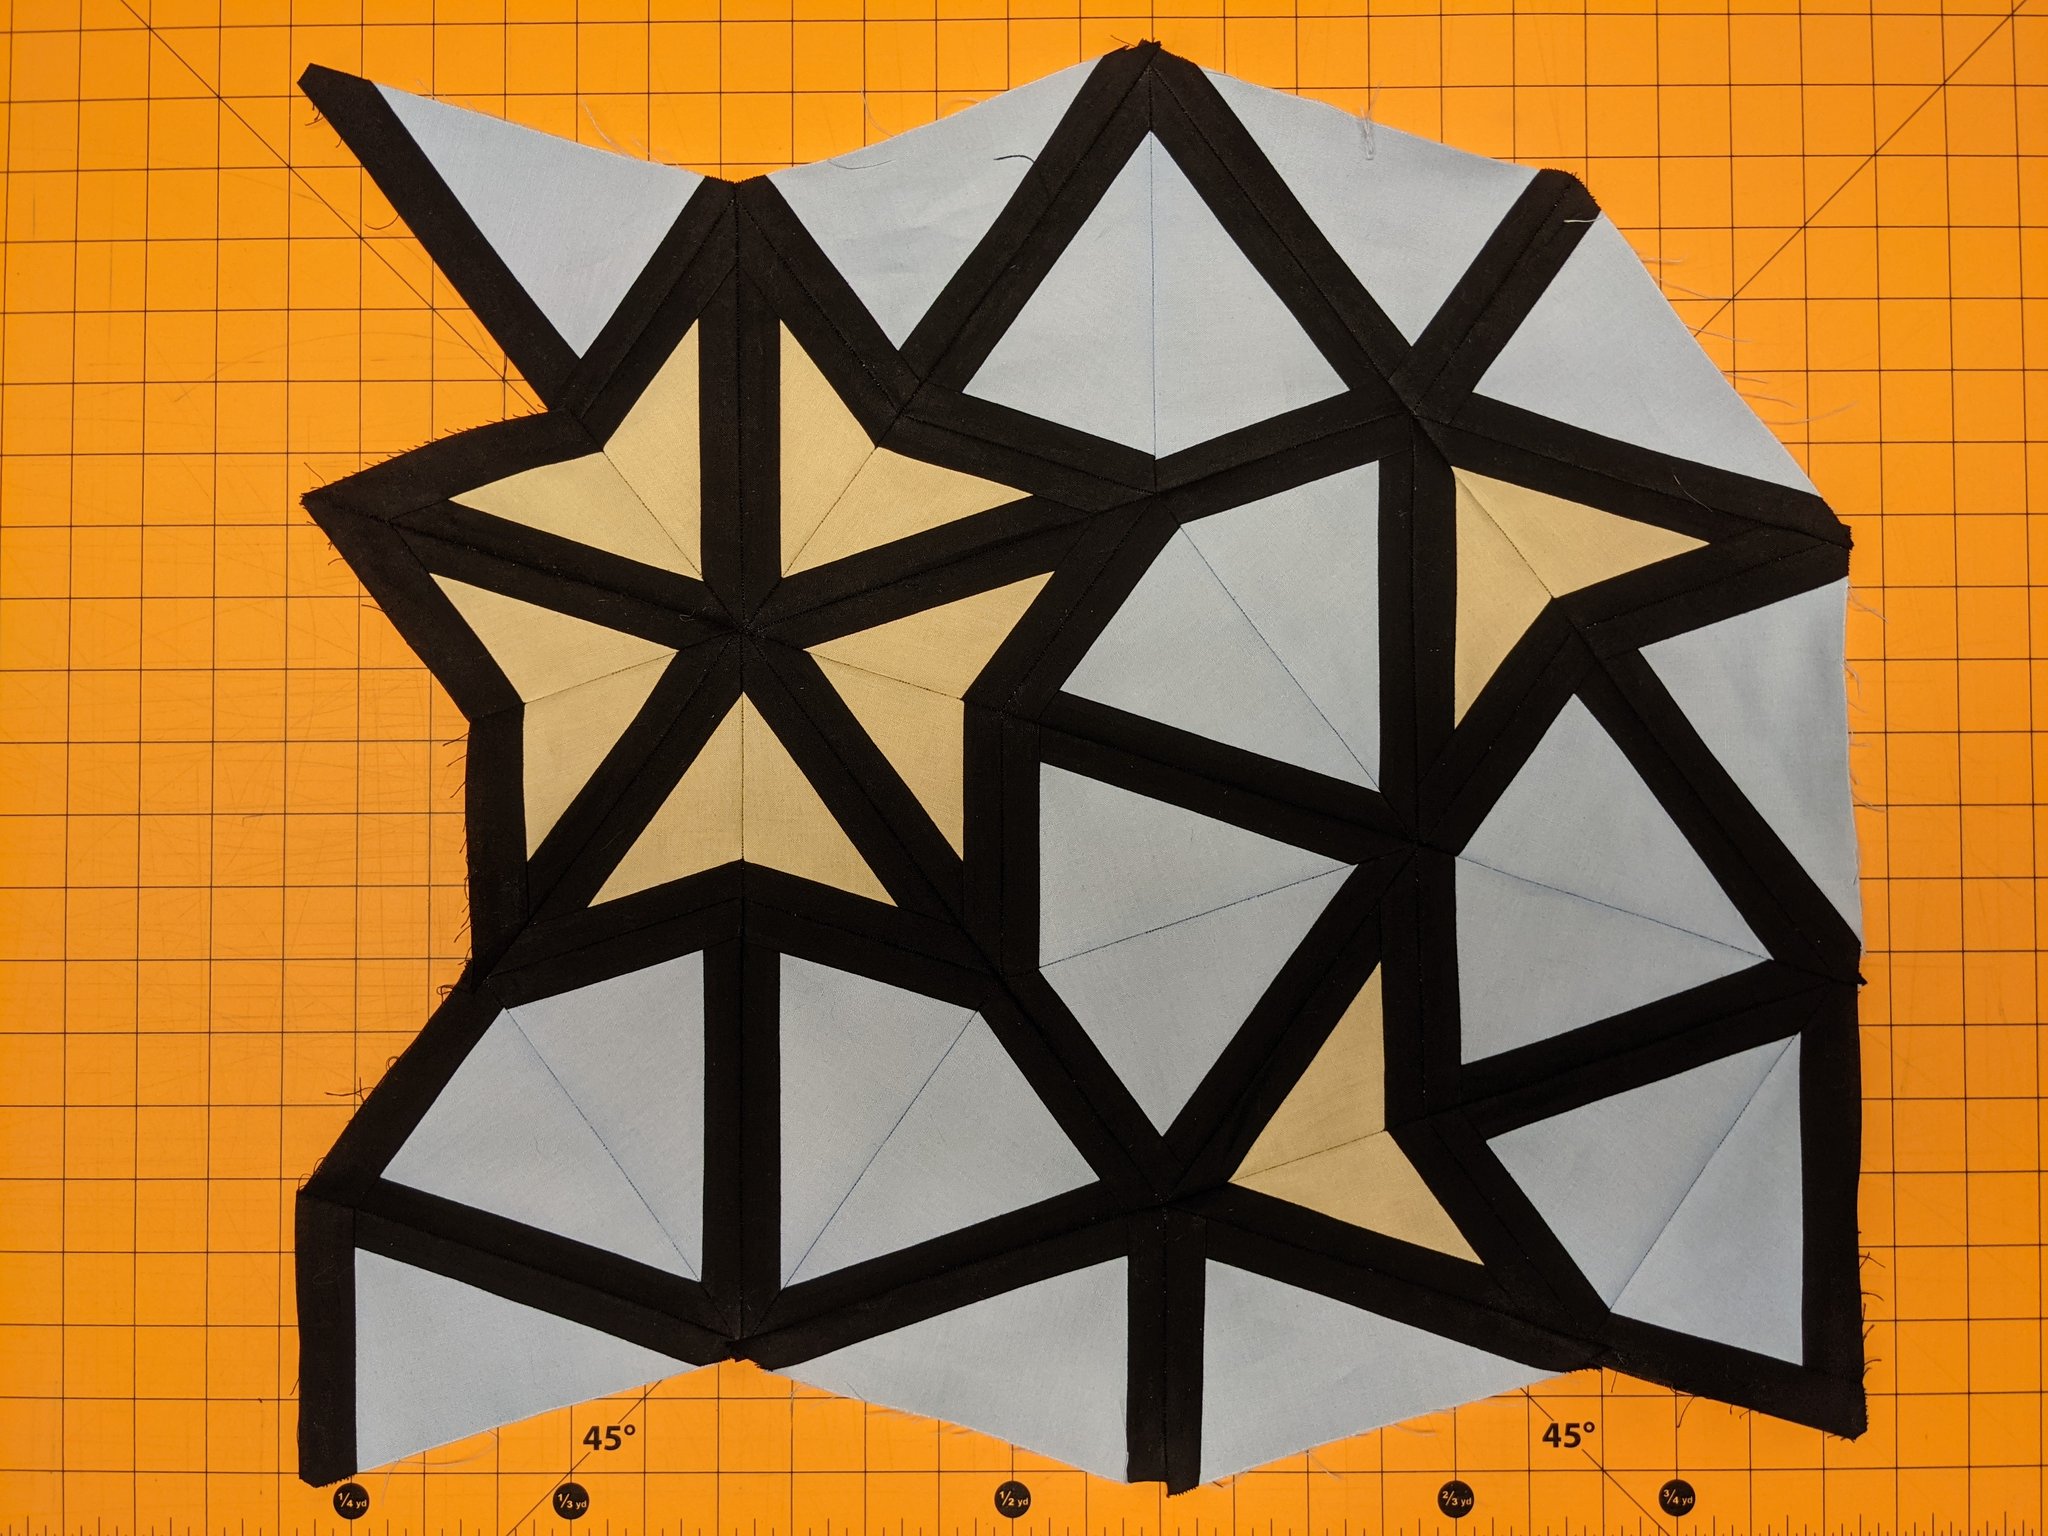
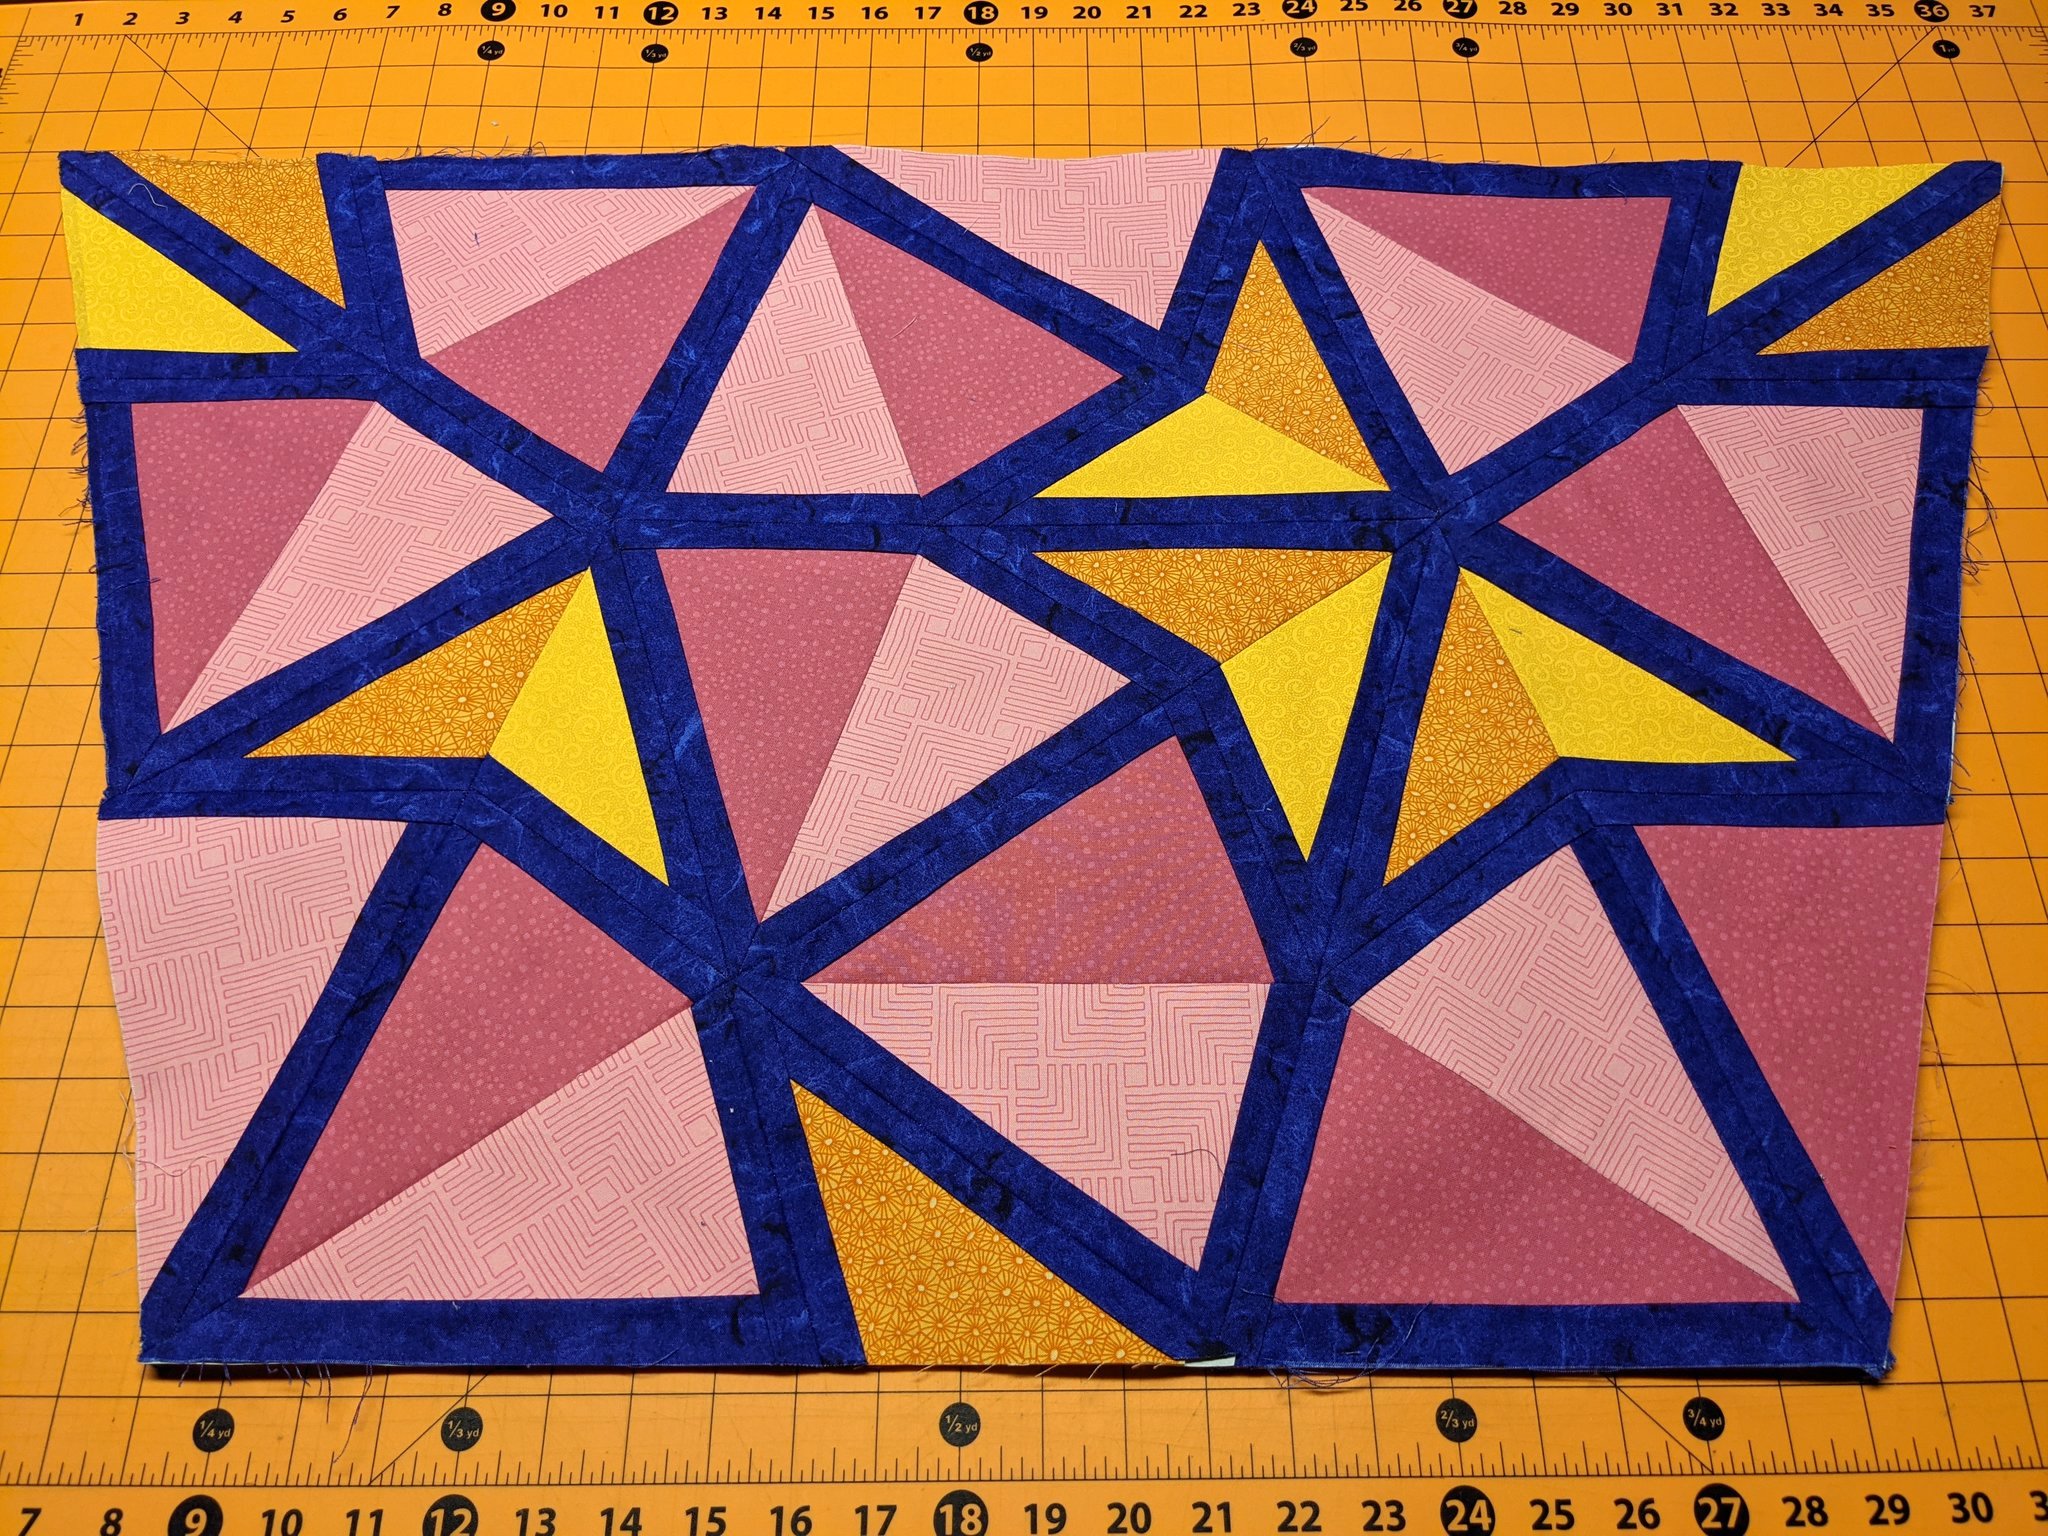
Here’s all of the half-tile modules during an intermediate phase of fabrication (viewed from the back, hence the visible seam allowances):
Sadly, the result after sewing them together was kind of underwhelming.
The borders gave me clearly-delineated kites and darts, but despite my best efforts to carefully pin and sew straight lines, the seams still didn’t meet up neatly at the high-degree vertices. There were also several cases of obvious misalignment between the adjoining halves of kites and darts.
At that point, my mother-in-law – an experienced quilter – advised me to look into the foundation paper piecing (FPP) technique, so I hopped onto YouTube dot com and watched a procession of nice old white ladies explain it to me in copious detail.
The big idea behind foundation paper piecing is making tiles using paper templates through which you machine-sew fabric. After sewing on and then gluing down each piece of fabric, the work piece gets precisely trimmed with the help of seam allowance rulers and cut lines on the template itself. The glued-on paper templates can stay with the fabric until the piecework is finished. Along the way, they serve to stabilize the work in progress, resisting the stretching and shearing deformations that can lead to imprecision when sewing.
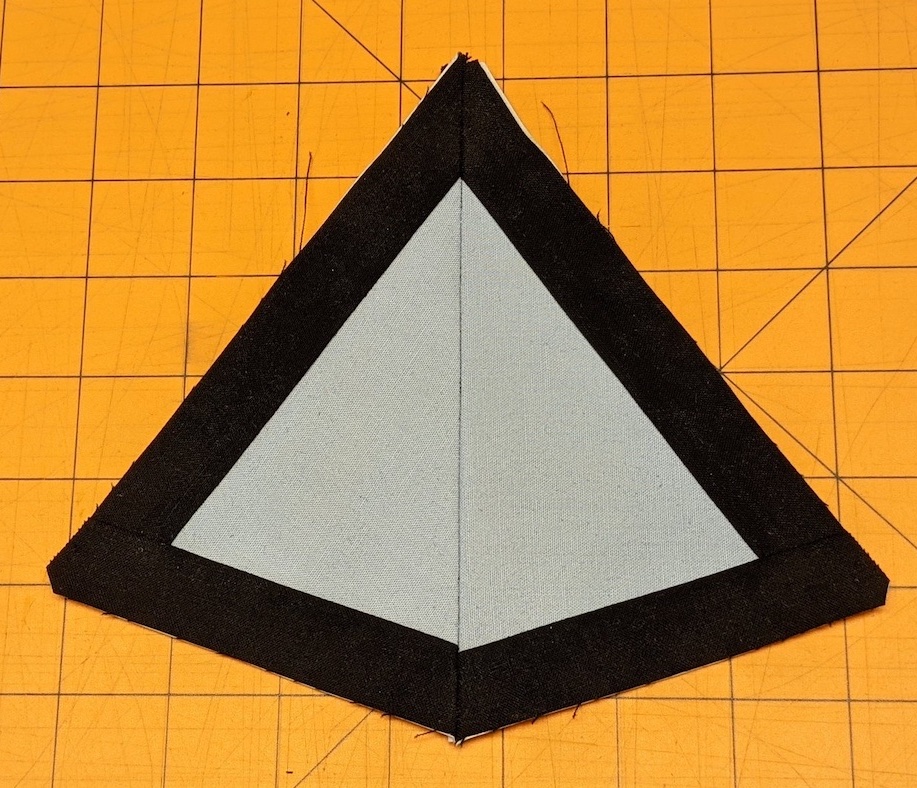
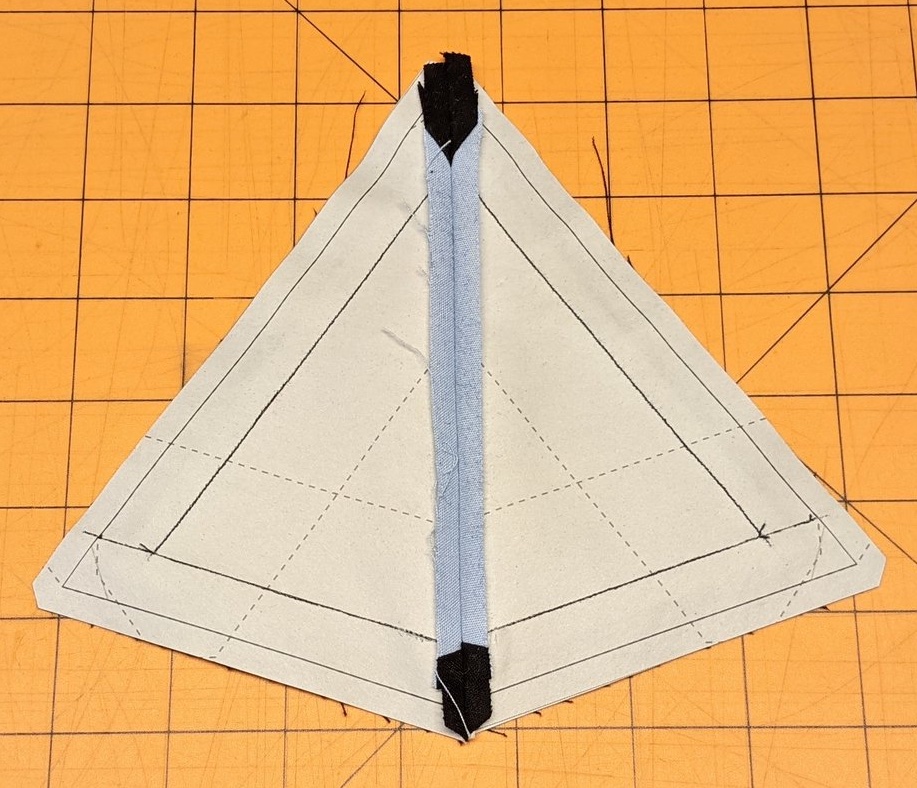
I decided to redo my entire prototype using FPP. Here’s the front and back of a kite I made for practice, so you can see the paper template on the reverse side:
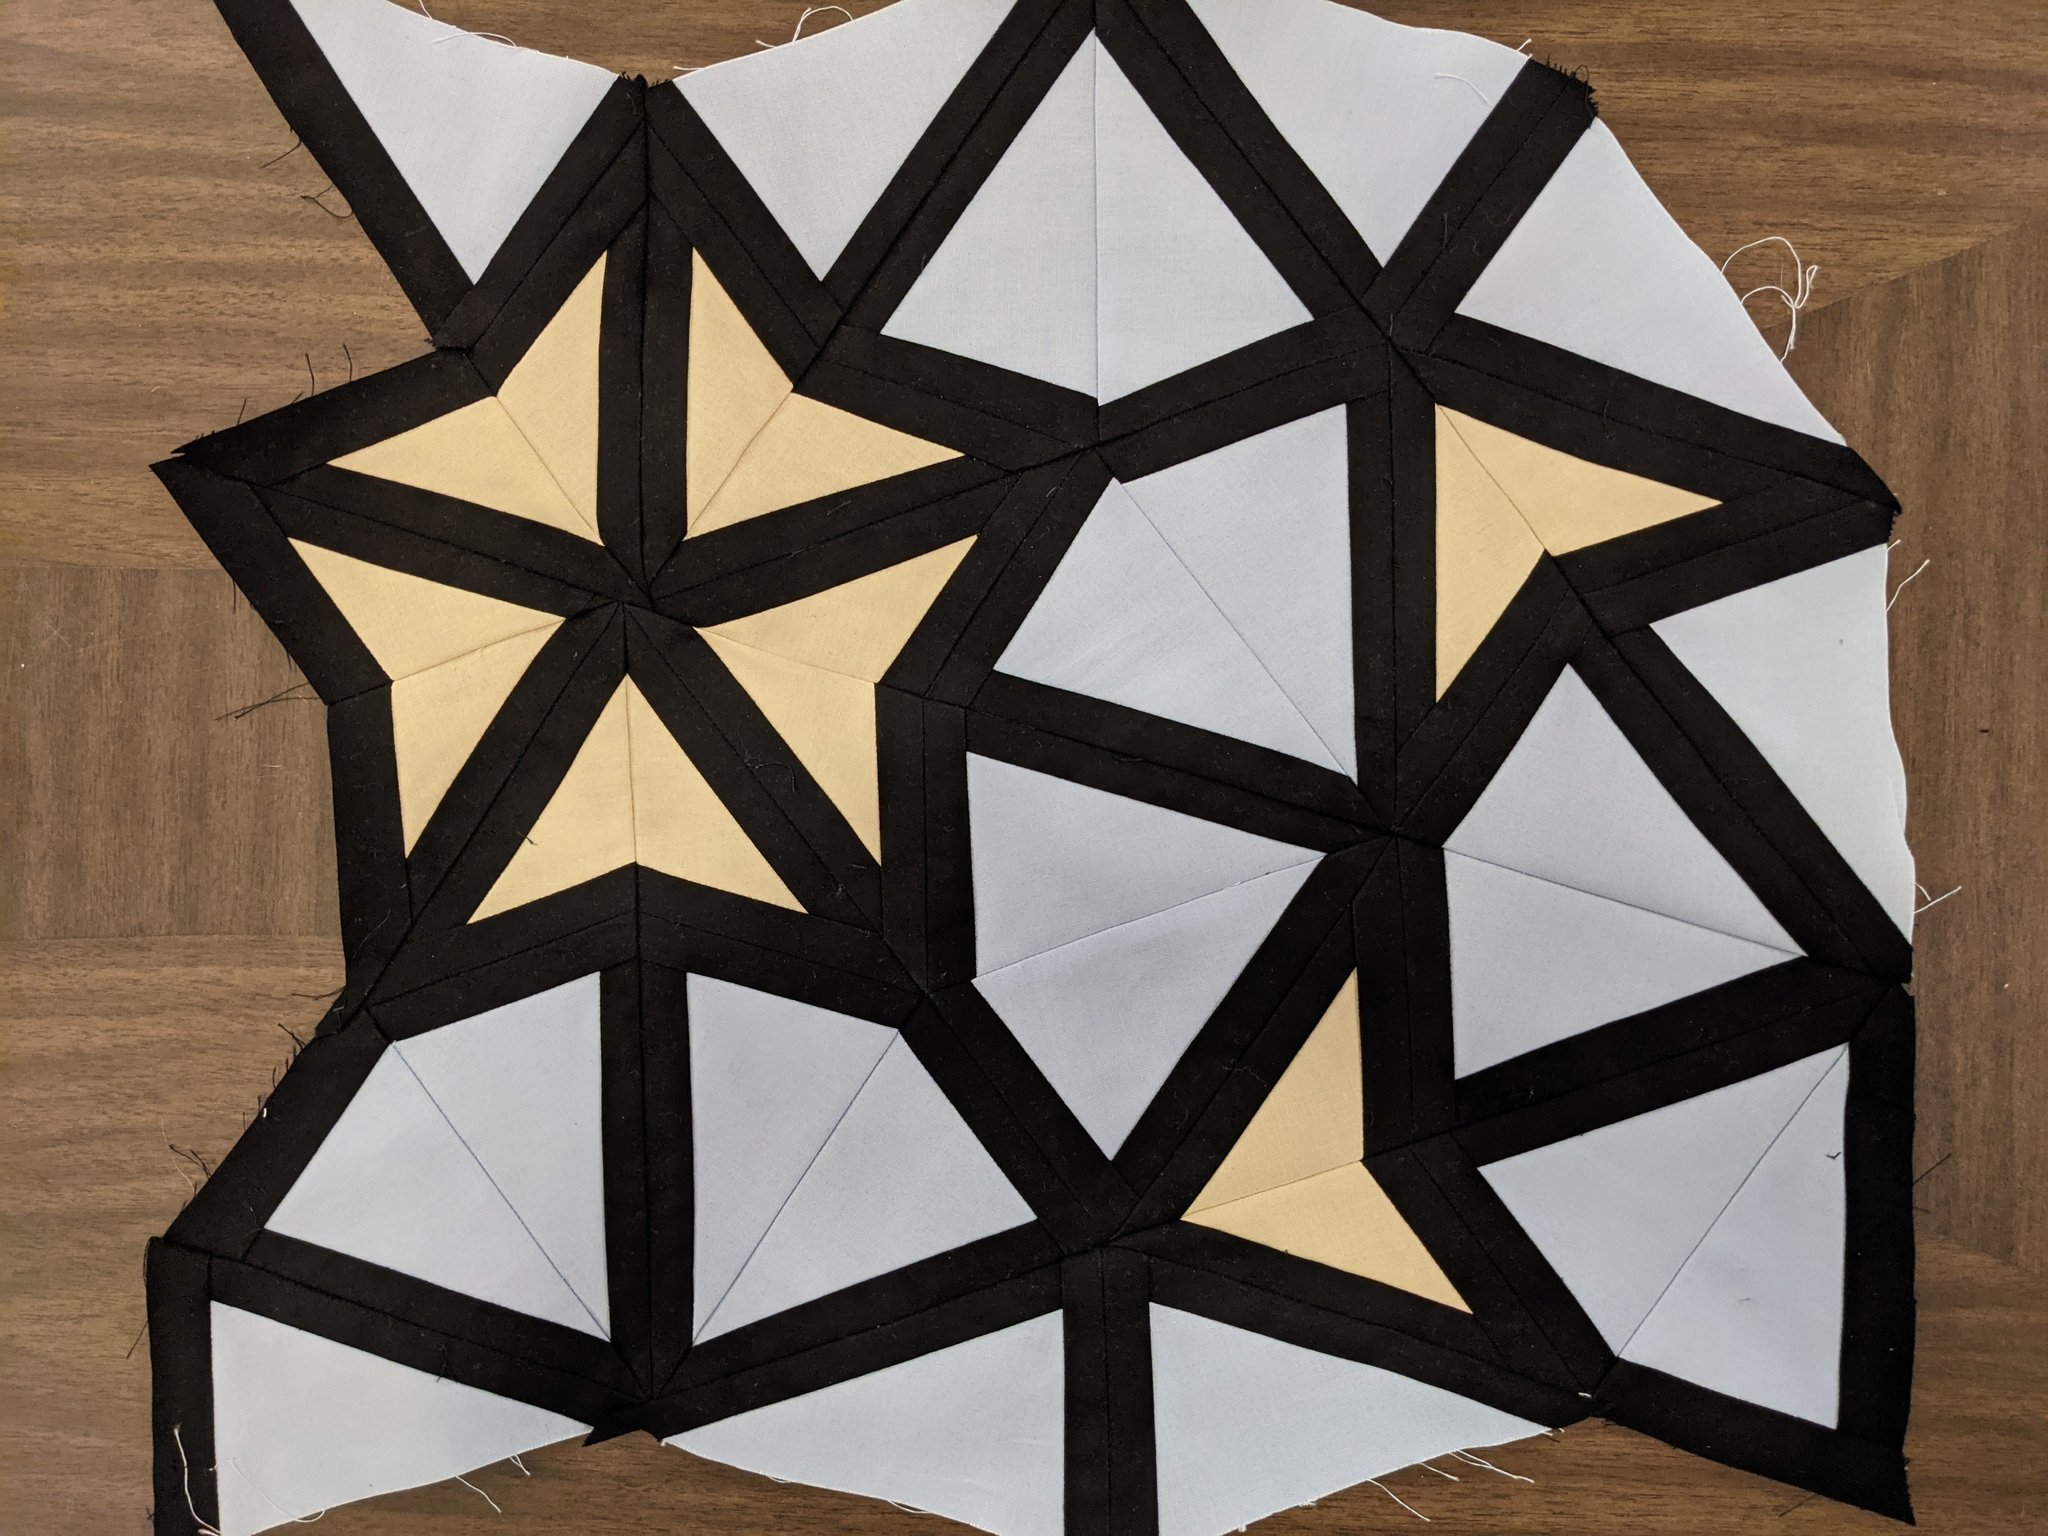
And here are images of the two prototype assemblies, first made without, and then with FPP:
Although by no means perfect, second achieves much better precision than the first.
After a few weeks, a fair amount of YouTube, and a number of mother-in-law consultations, I also learned how to baste, quilt, and bind a finished quilt. Below, you can see my second attempt, made with the FPP-constructed assembly.3
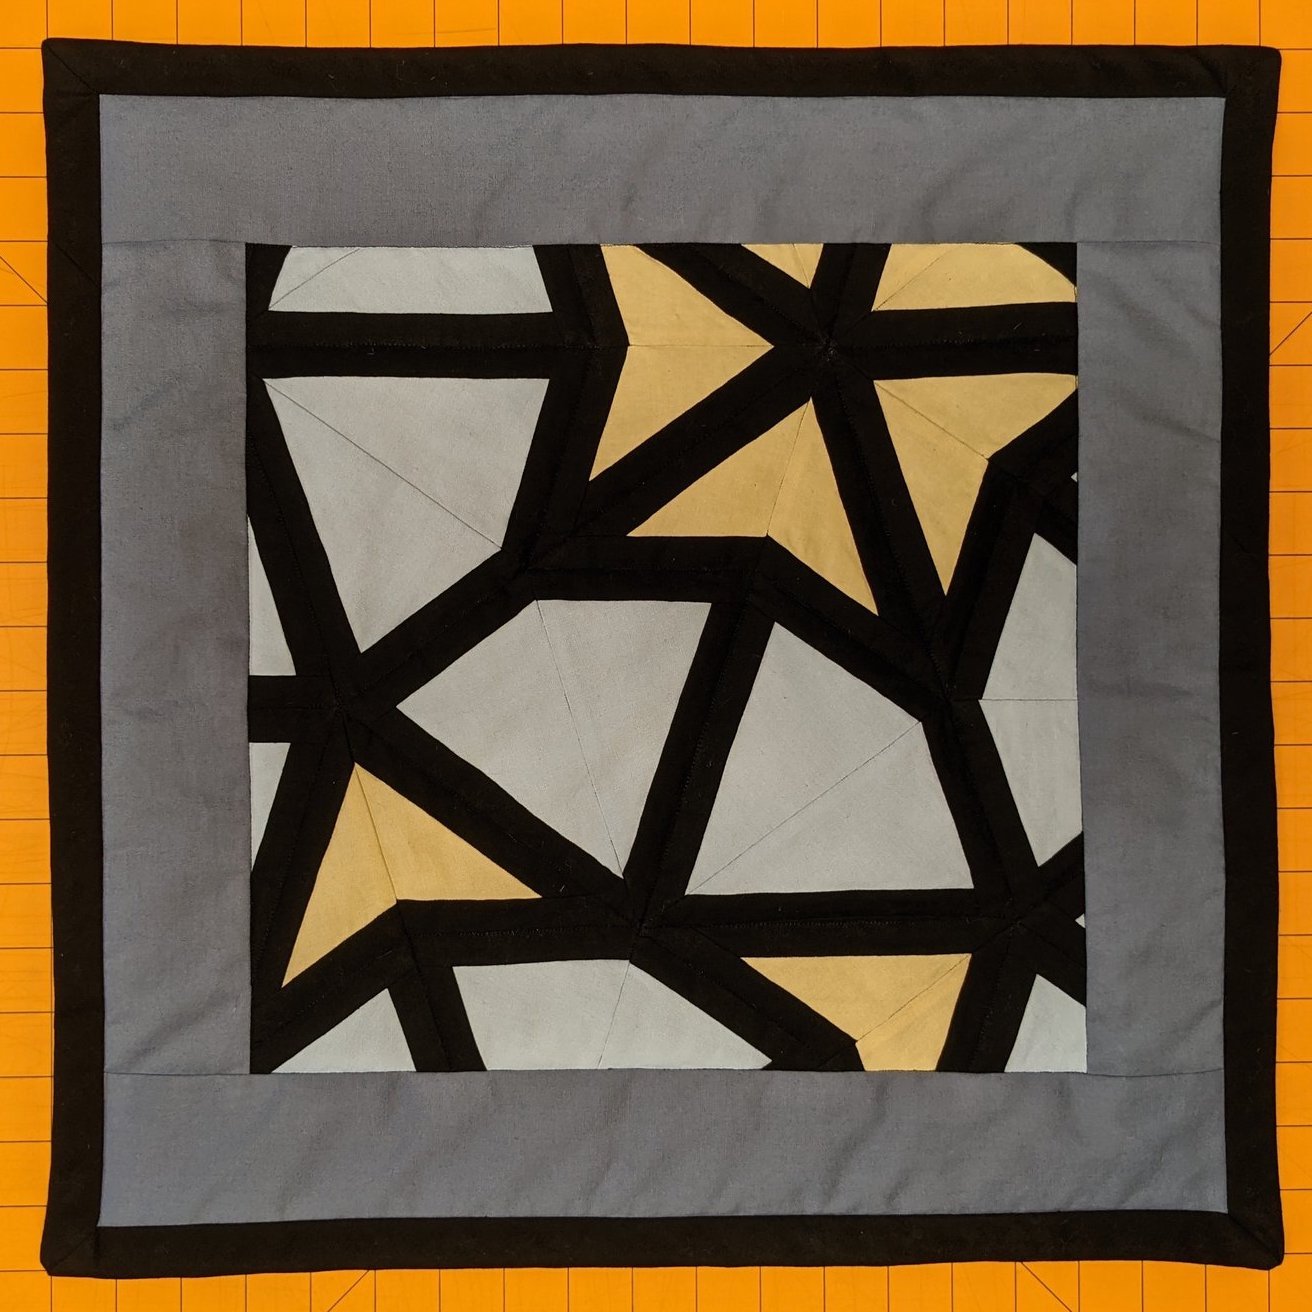
This prototype was a success on a number of fronts:
-
The composition is interesting and dynamic due to its asymmetry and the lack of a clear focal point. The viewer’s eye is encouraged to wander over the entire design.
-
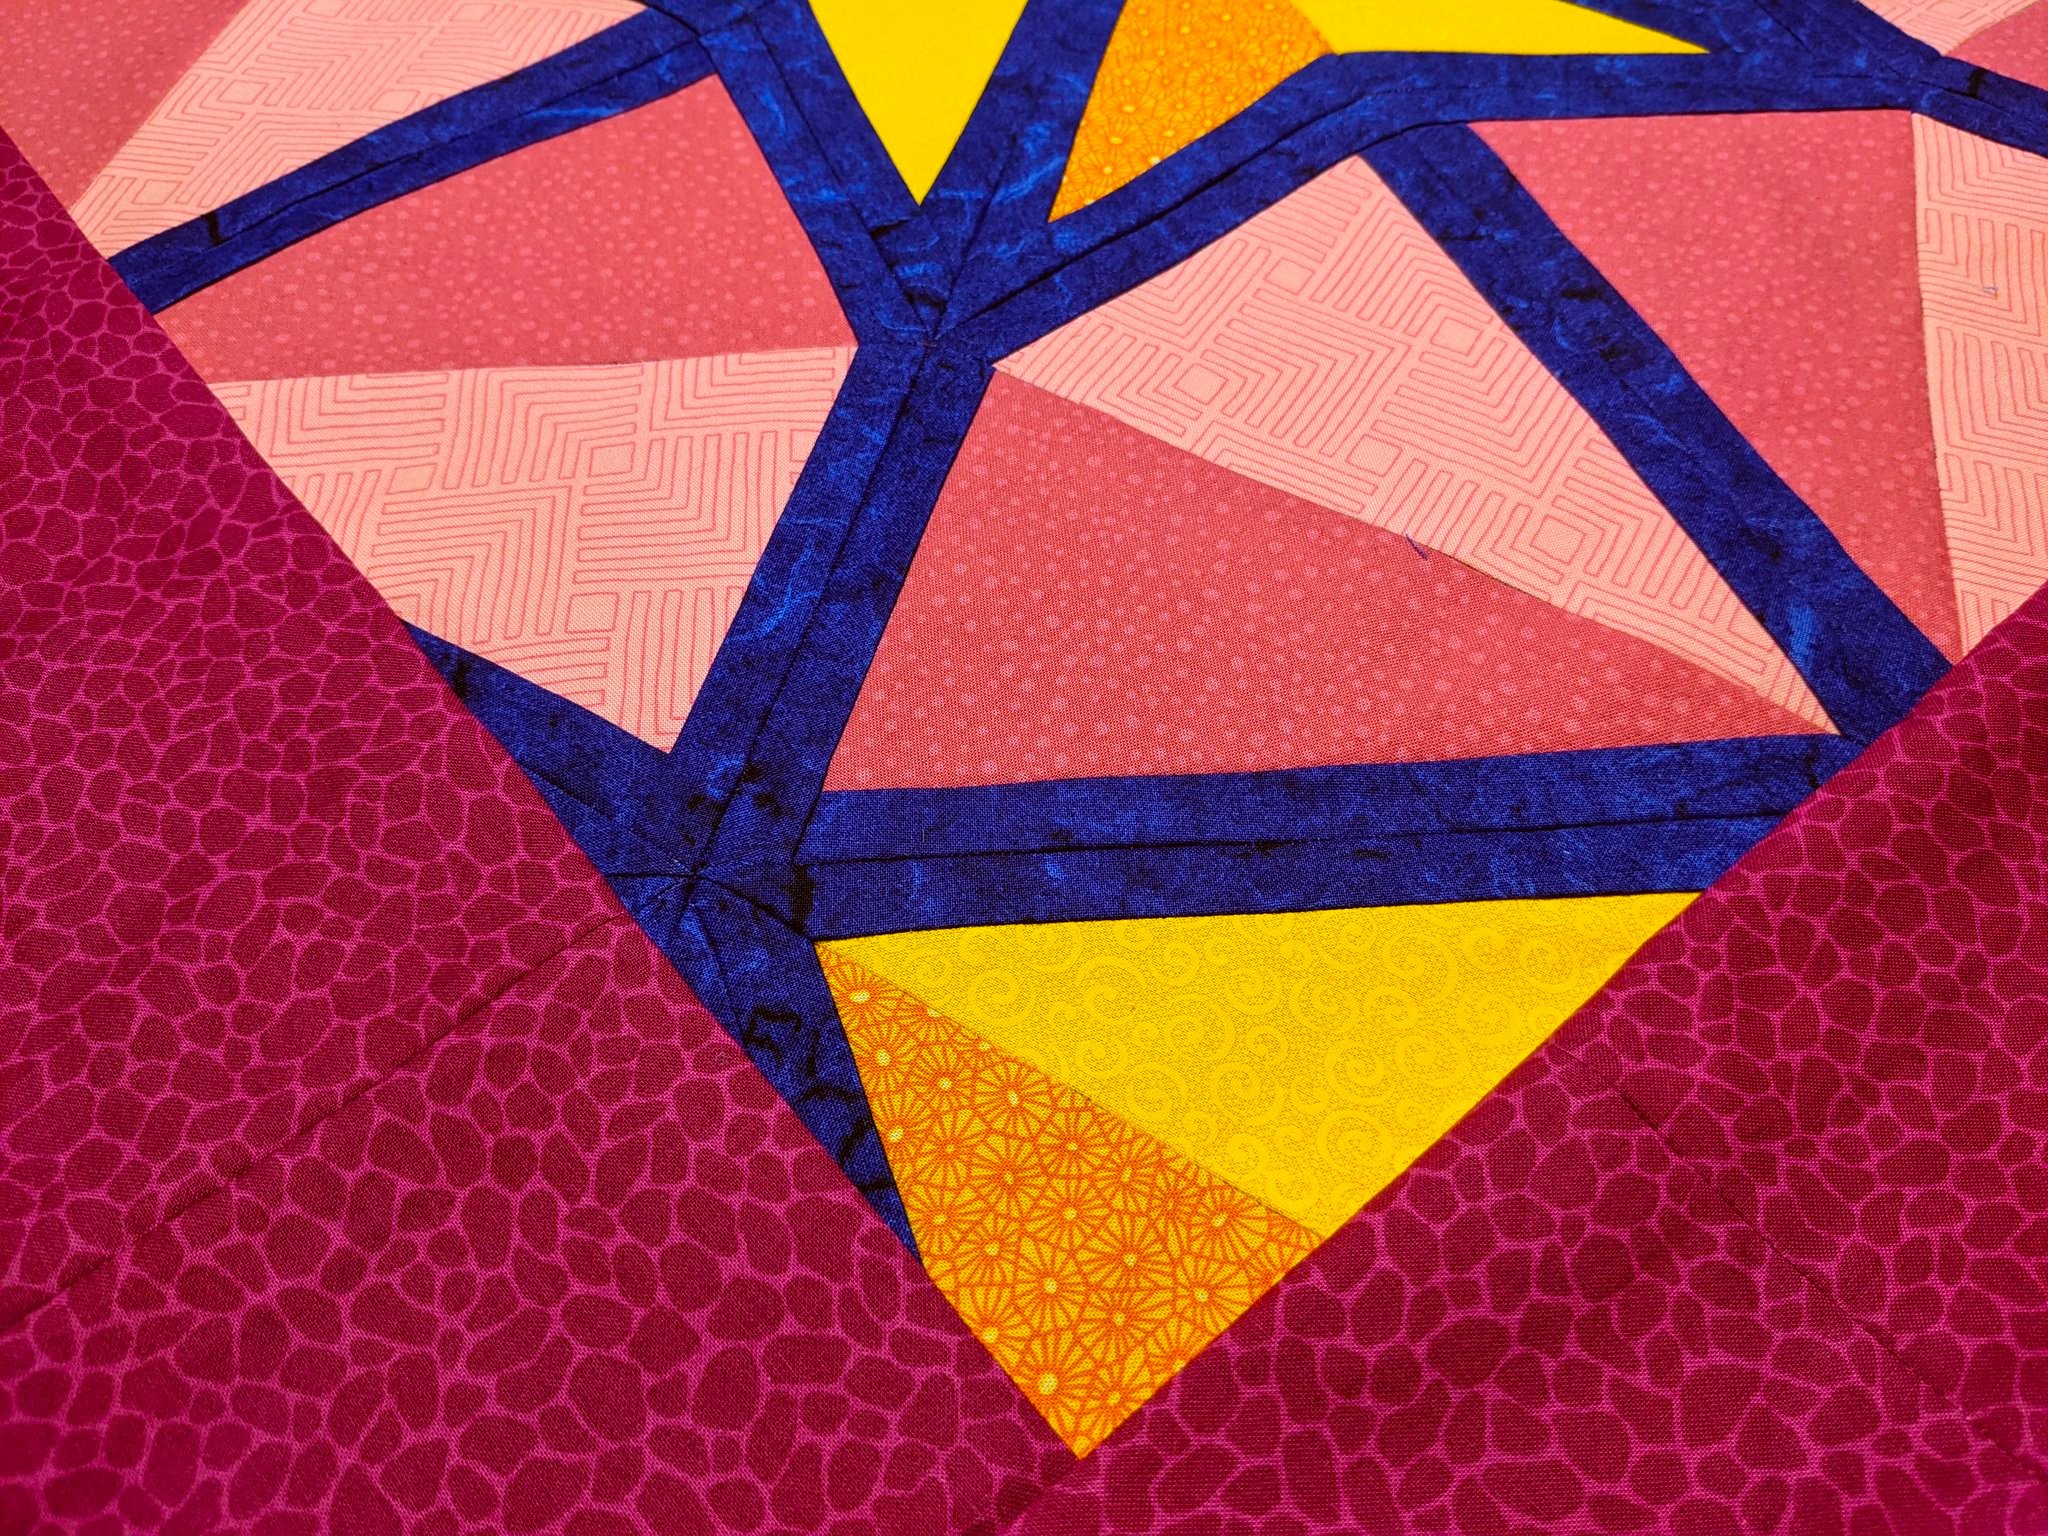
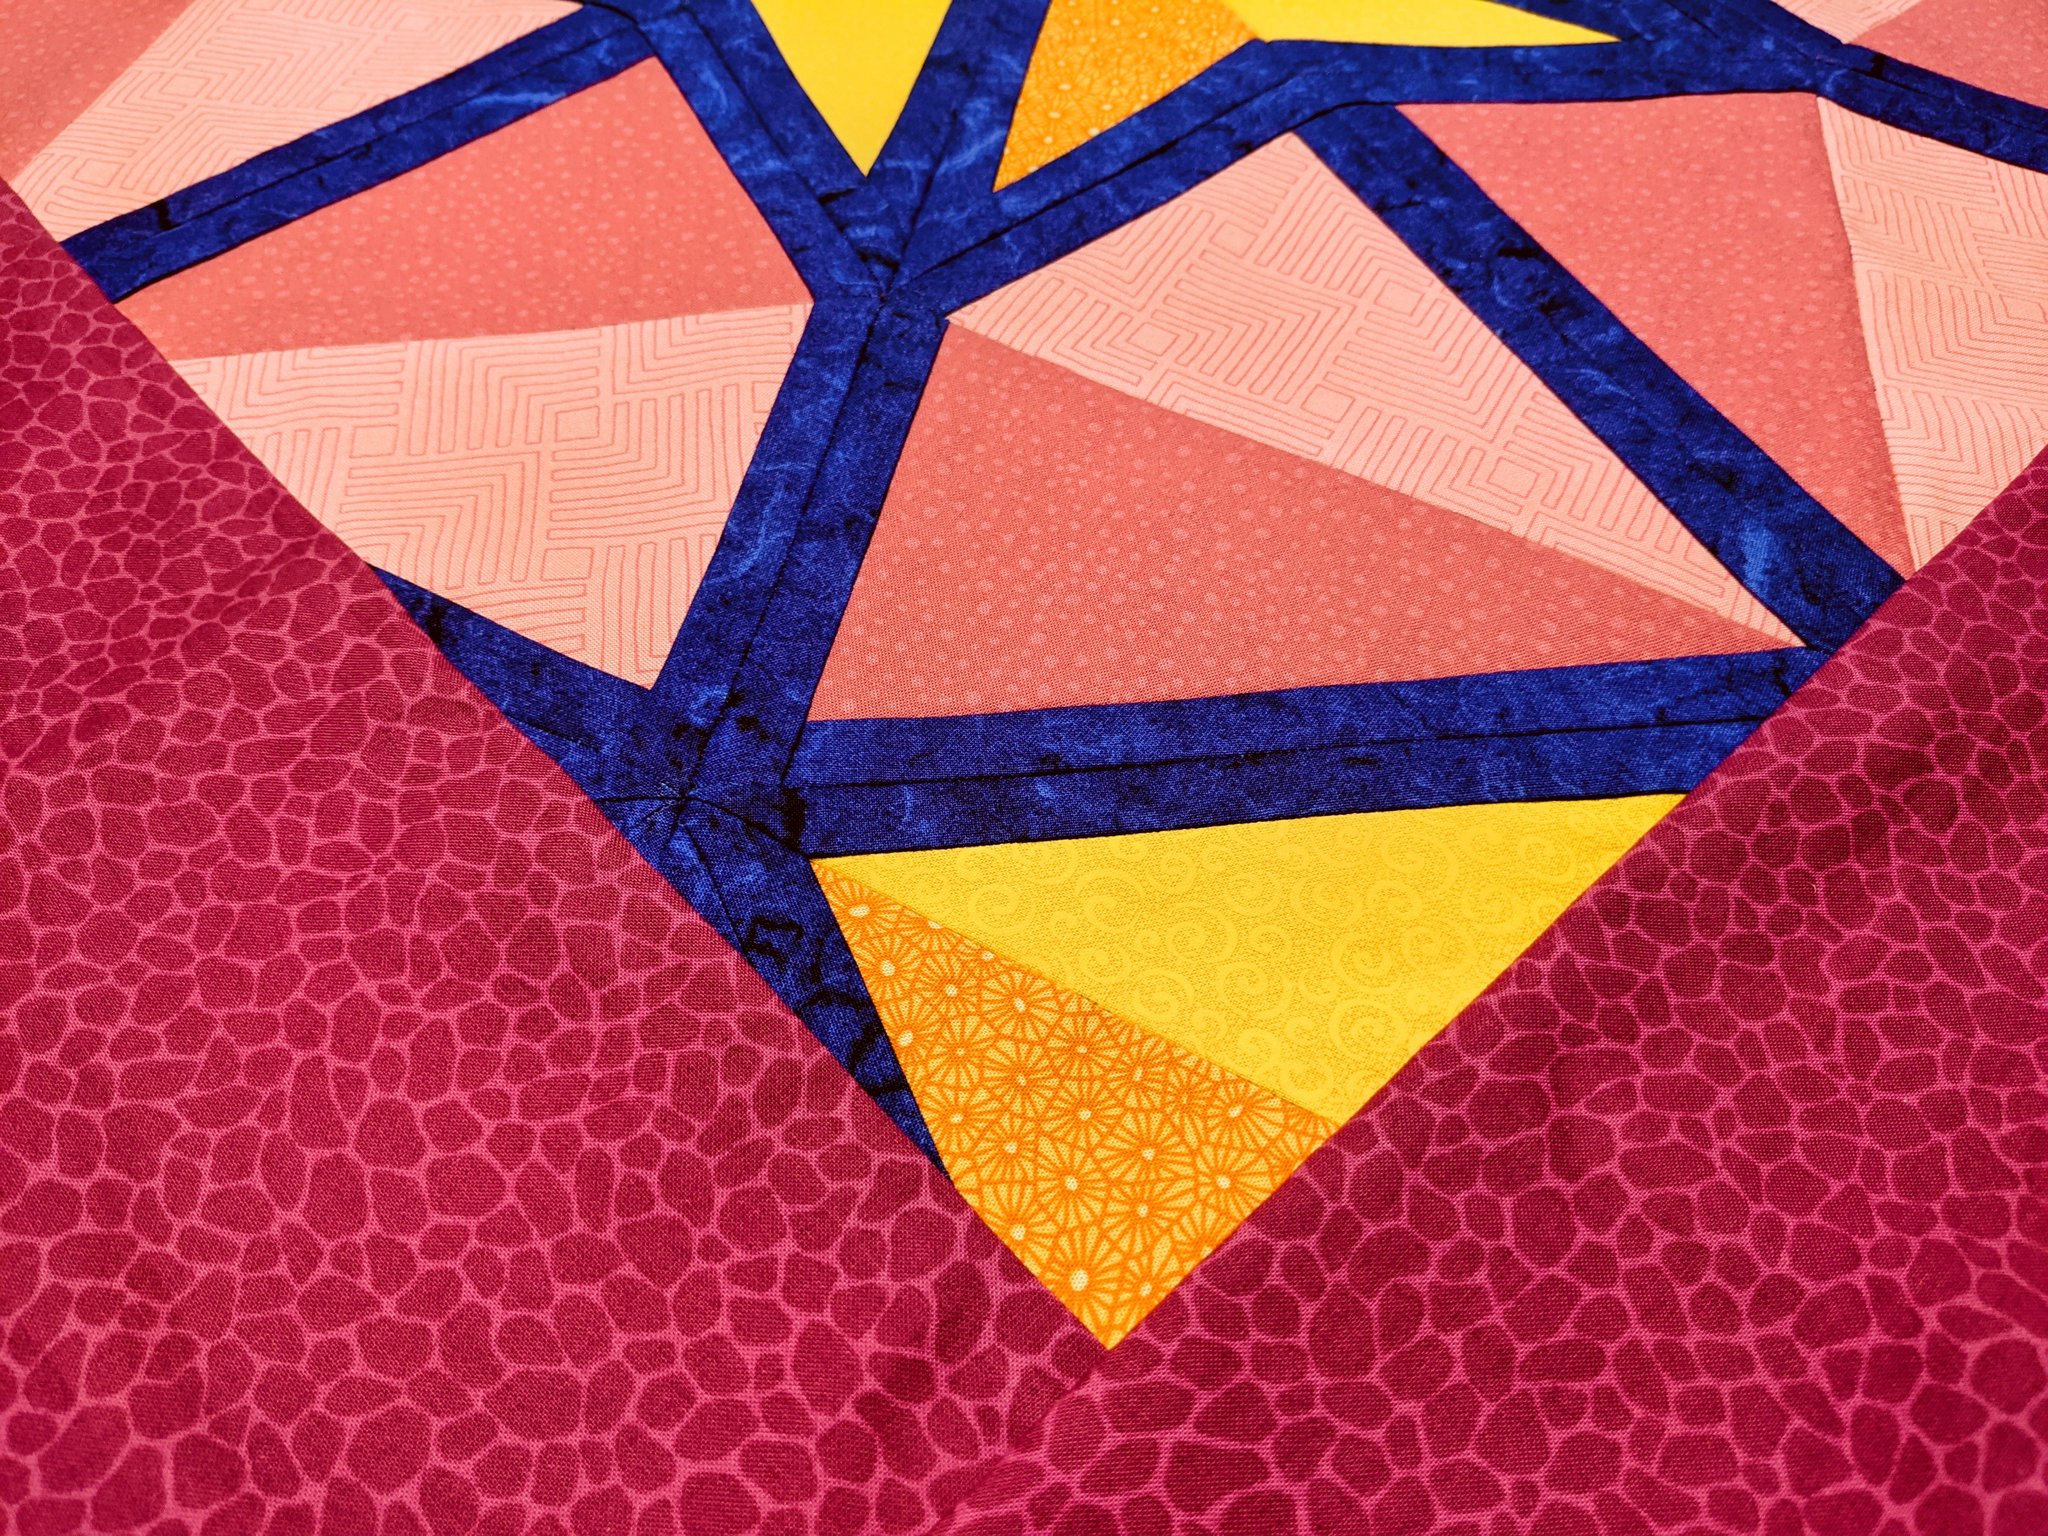
The kite and dart shapes are sharply defined by the black outlines.
-
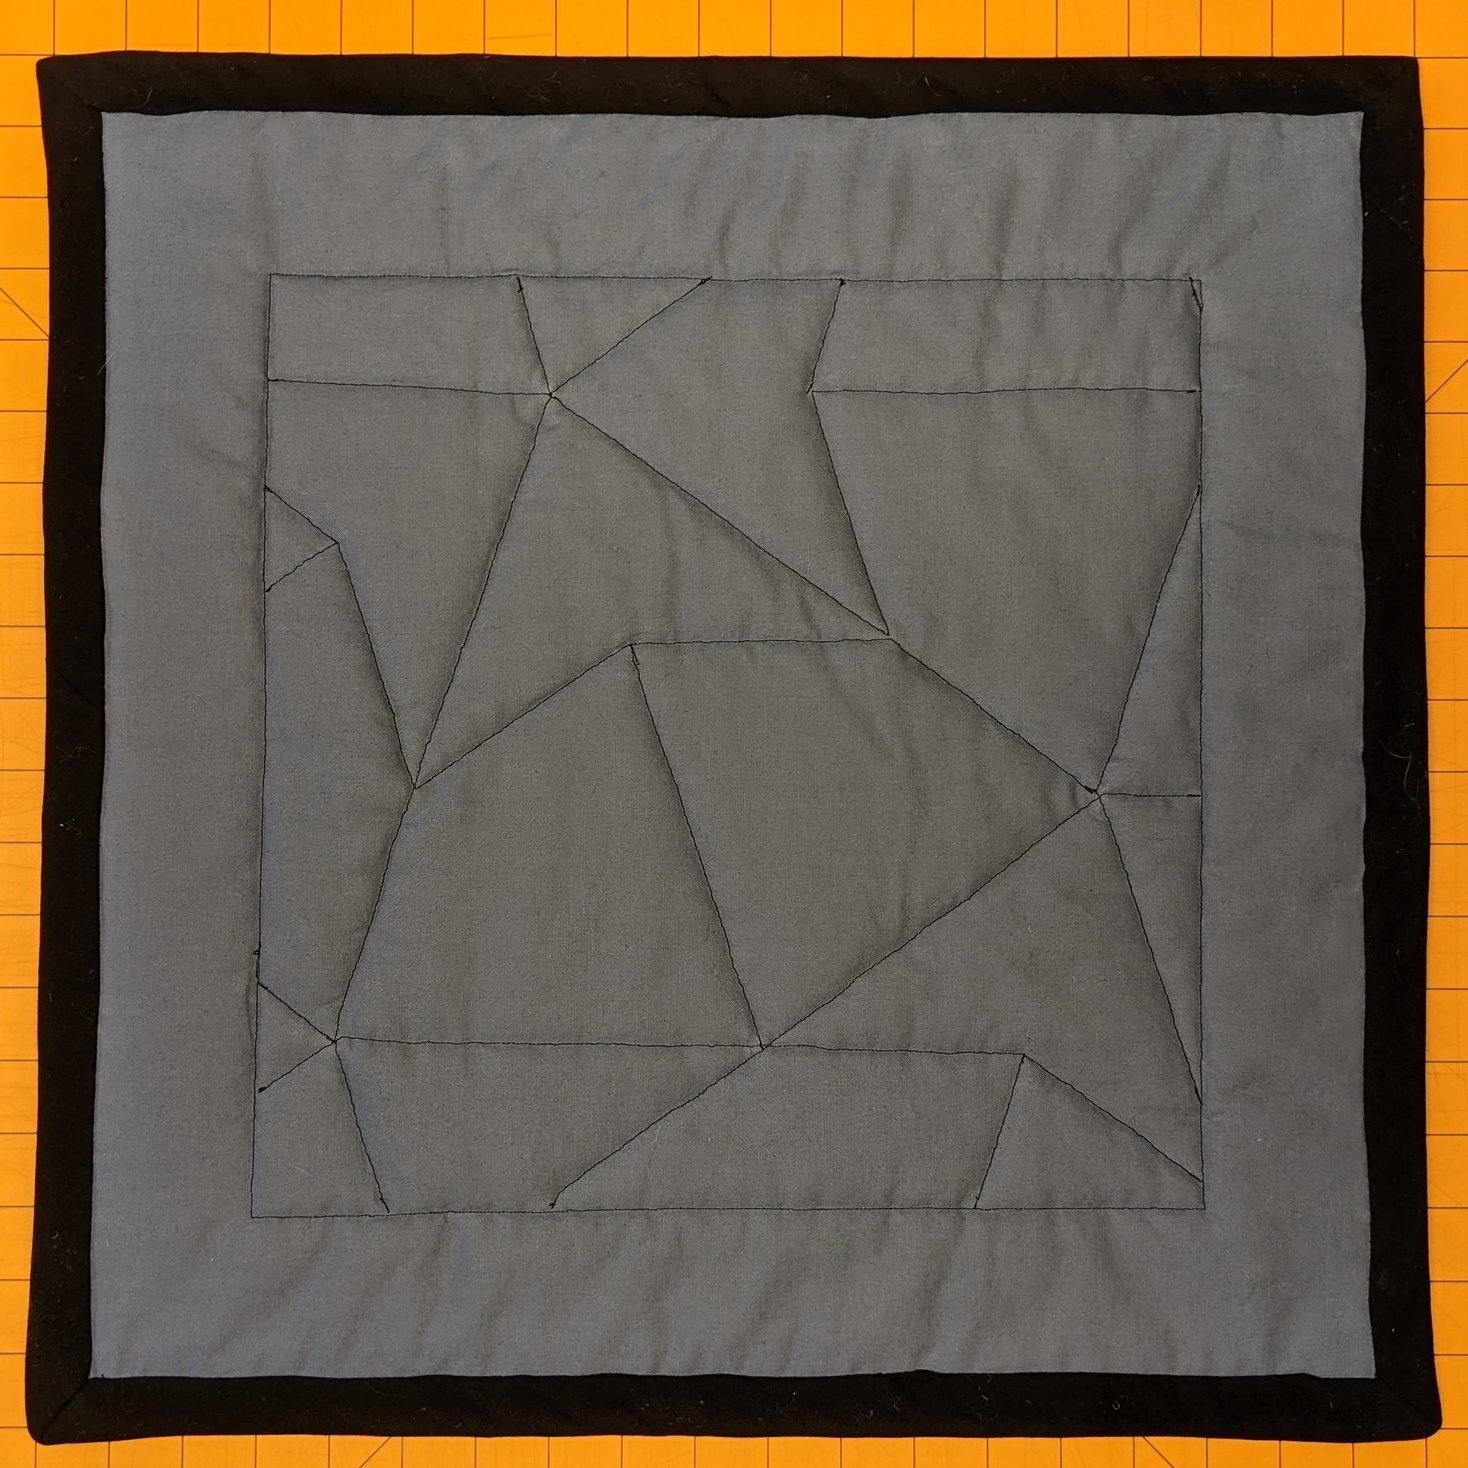
It serves as a technical proof that I could actually make a quilt. It has a border! And a binding! And you can really see the Penrose pattern on the back! Squee!
March 2021: Prep for final fabrication
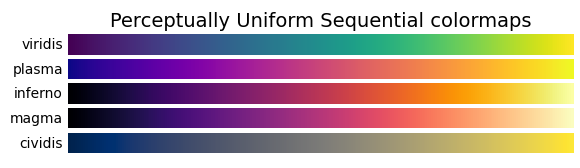
As I was finishing up my prototyping efforts, I further developed my Rust program to compose the design of the final quilt. I decided to aim for a palette based on the “plasma” colormap, one of several designed by Nathaniel Smith and Stéfan van der Walt that now come standard with matplotlib:
I realized I could improve on my flat-shaded prototype and go for a pseudo-3D look by splitting each kite or dart into slightly-contrasting halves colored using nearby entries in the plasma colormap. I browsed for suitable fabrics on the now-defunct fabric.com, and extended my Rust program to visualize the design using fabric swatch photos I had downloaded. By the first week of March, I had finalized my composition:
Satisfied with the design, I began to order fabrics, and hit a snag almost immediately: some could not be found in the warehouse, and substitutes needed to be chosen. Then, to make matters worse, when the fabric arrived, I realized that the photos on fabric.com left a lot to be desired in terms of colorimetric accuracy. Here’s the swatches I grabbed from their website:
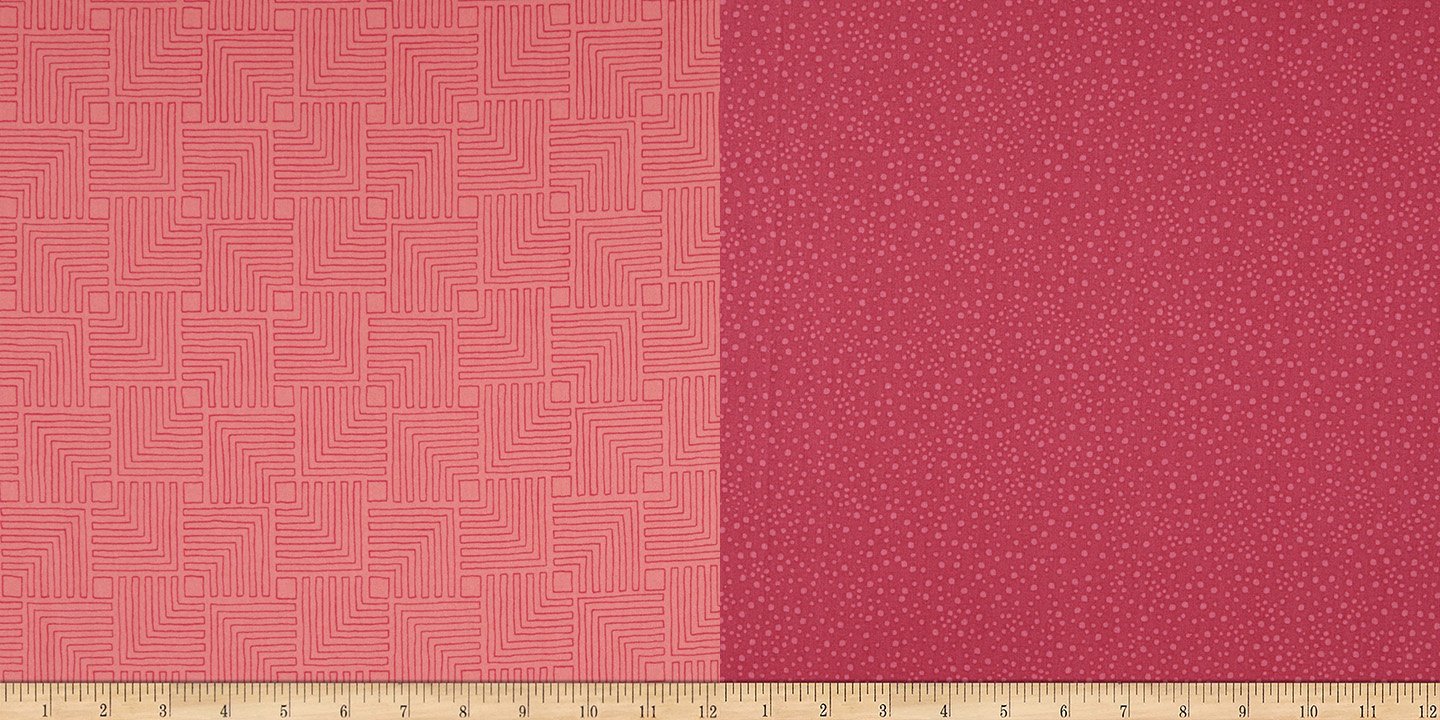
…and here’s what actually showed up at my house – pretty different in terms of both hue and contrast!
Take-away lesson: Never buy fabric online when matching colors is important. You’ll inevitably be disappointed.
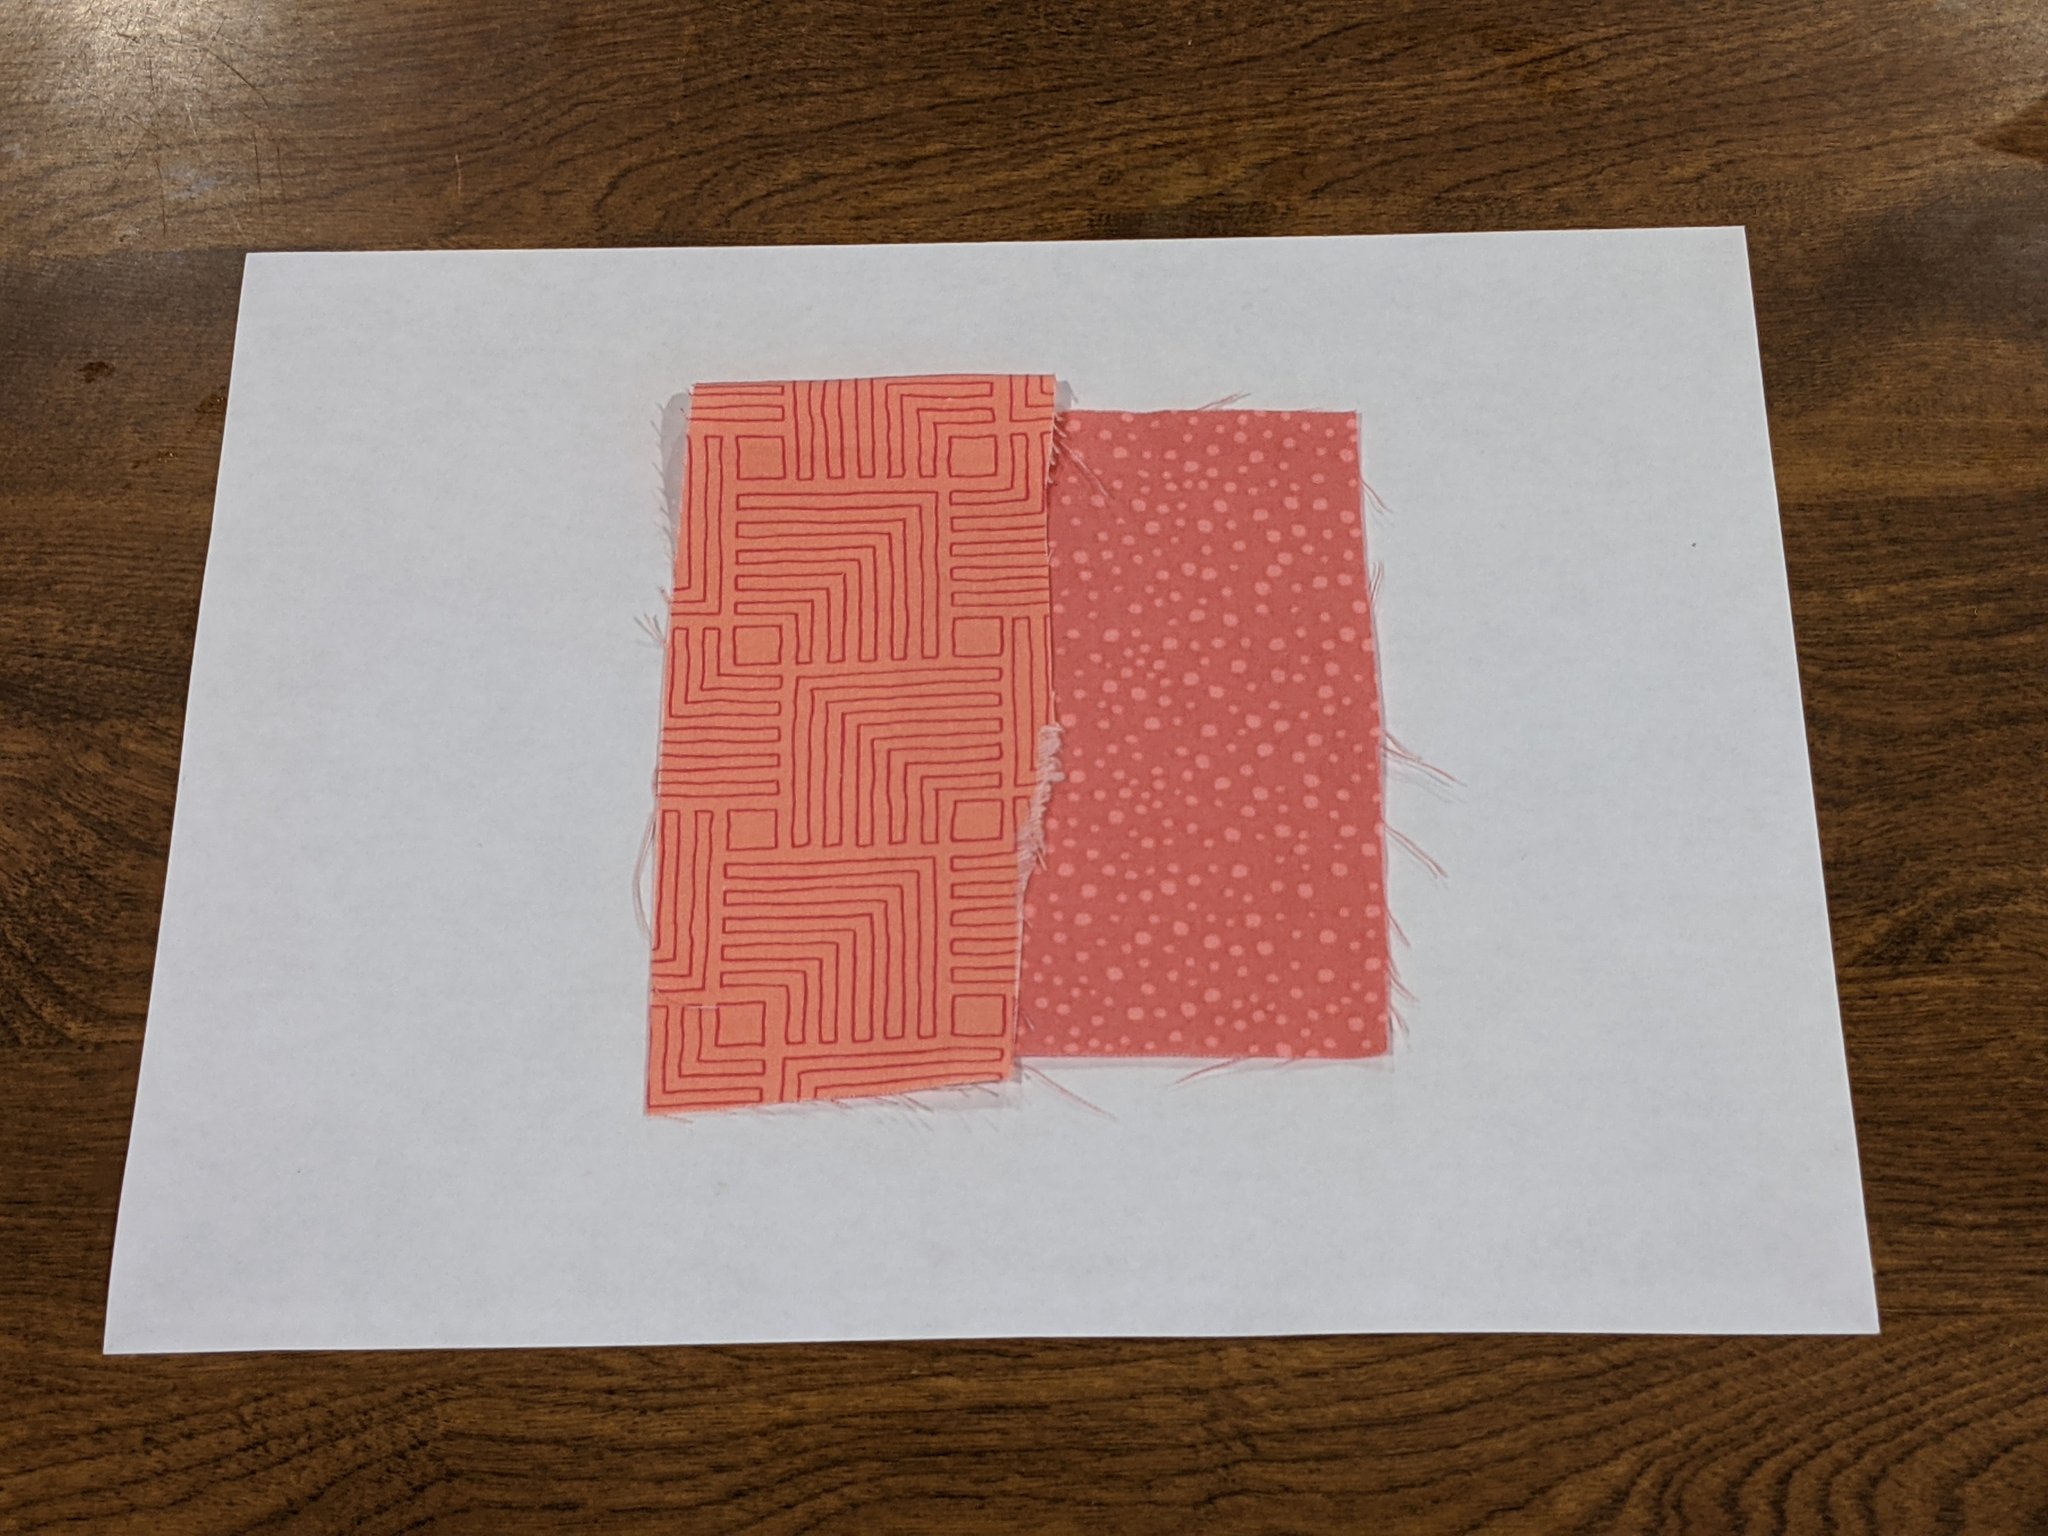
I bleached and dyed the two fabrics to get them closer to the look I wanted. Here’s the result – not exactly what I had first imagined, but a huge improvement over the original:

Then I sewed up a quick little color study so I could tell how the combination of fabrics worked together.
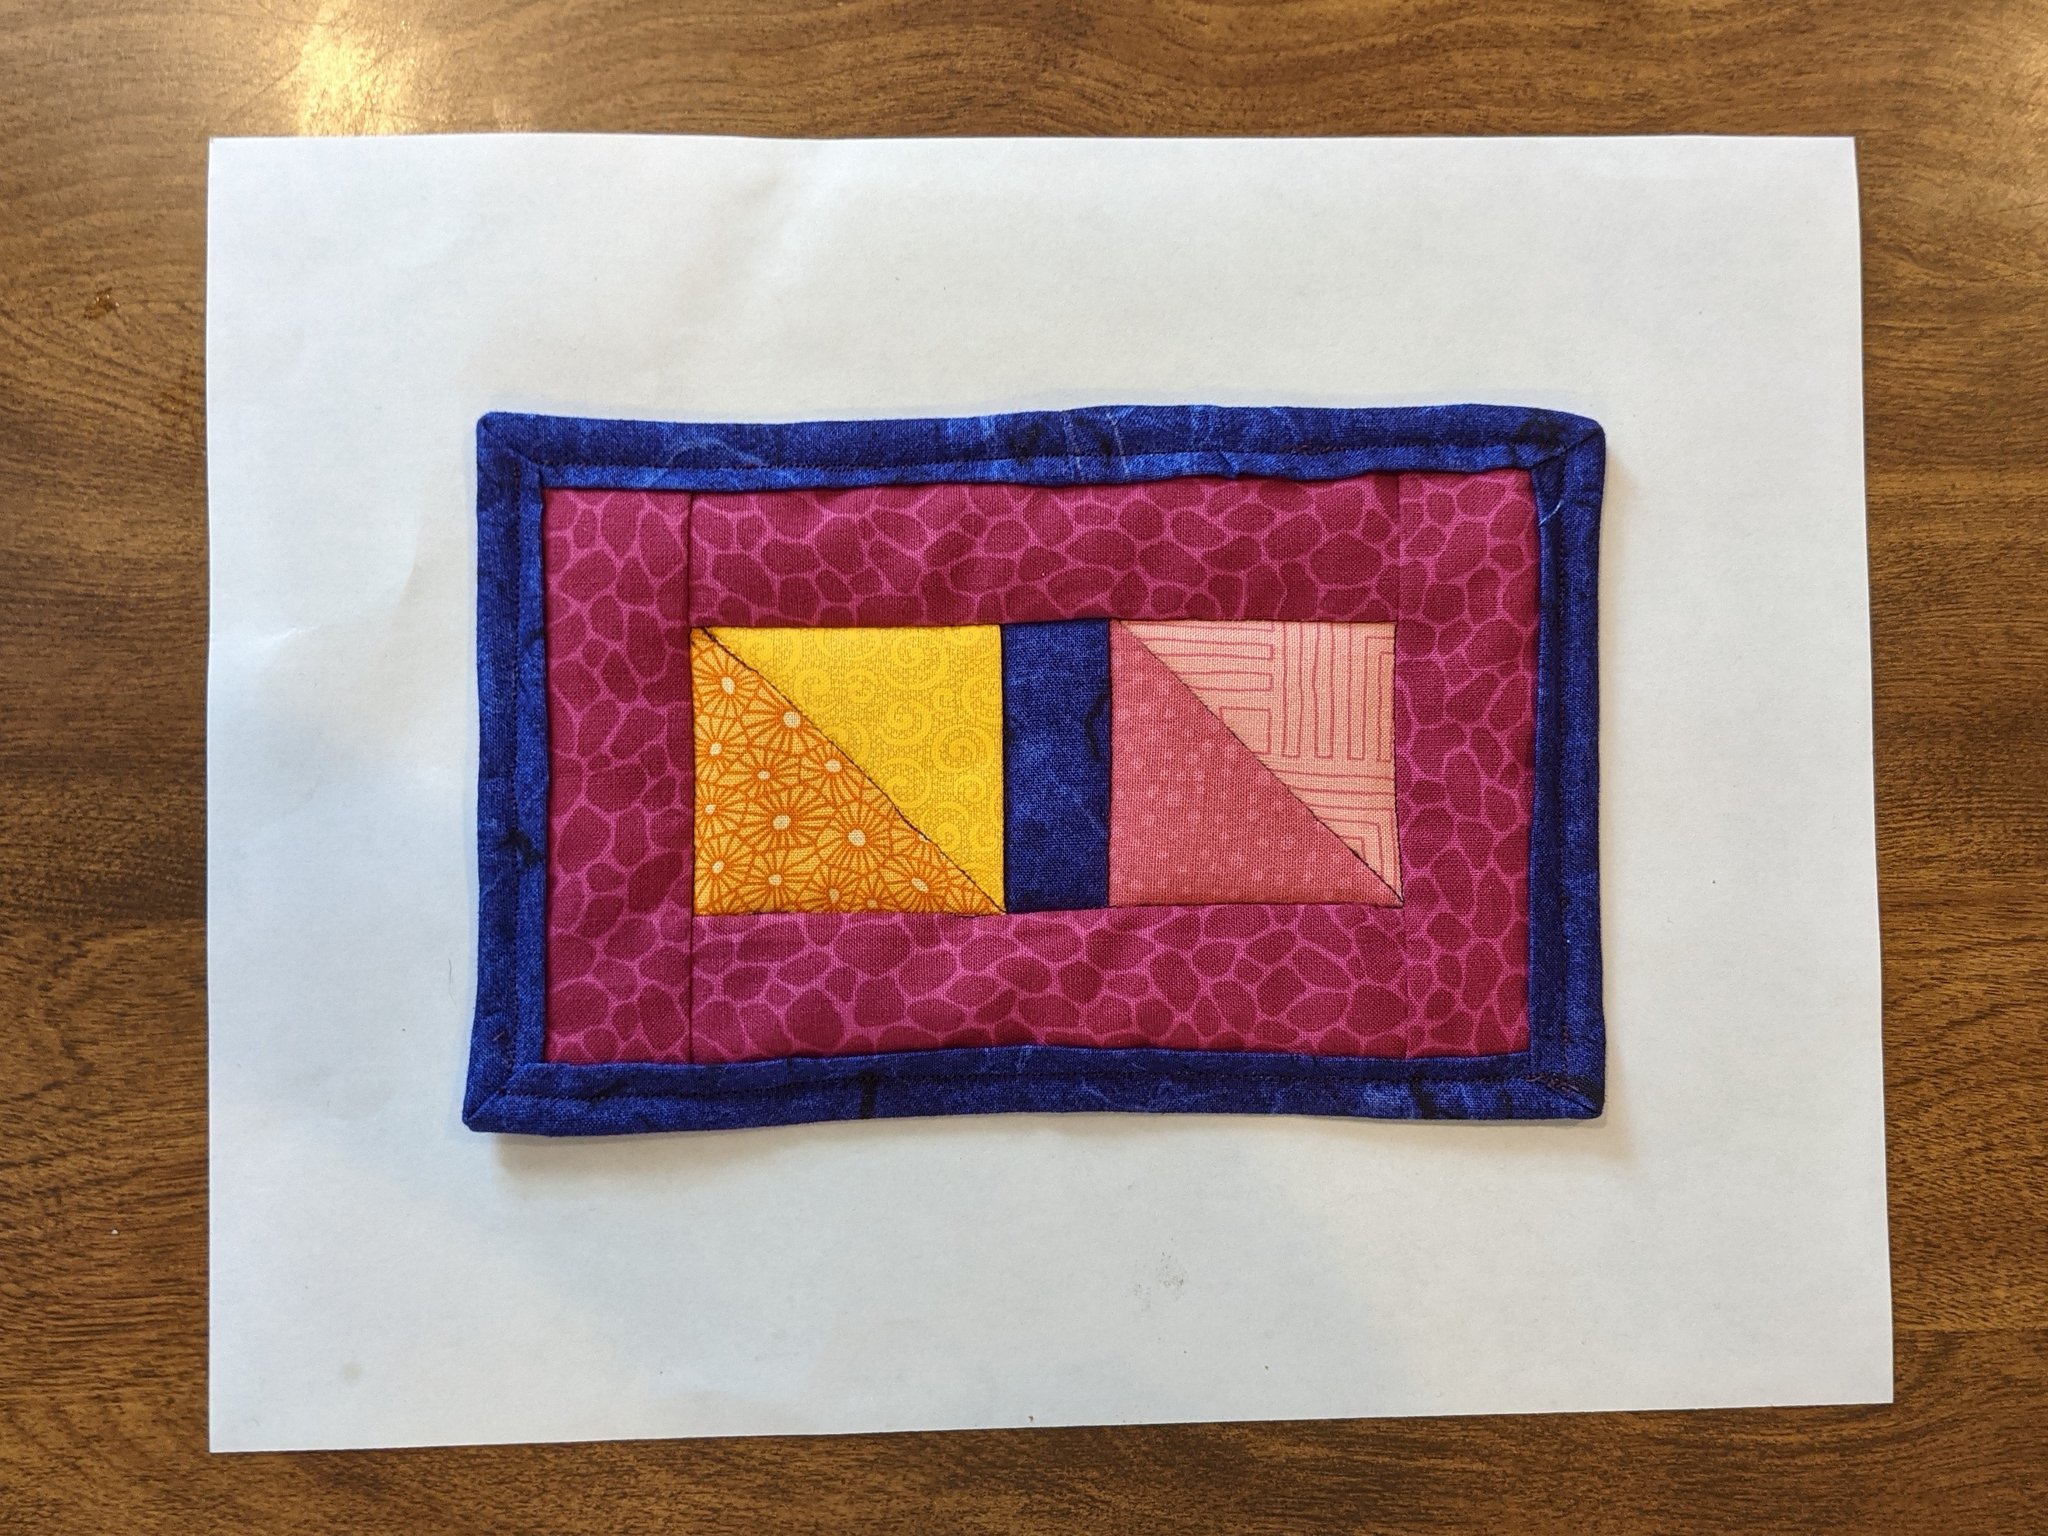
I liked what I saw, so by the end of March 2021, it was time to start fabricating for real.
April-May 2021: final fabrication
The first step was to cut out all four colors of fabric for the interiors of the half-kites and half-darts.
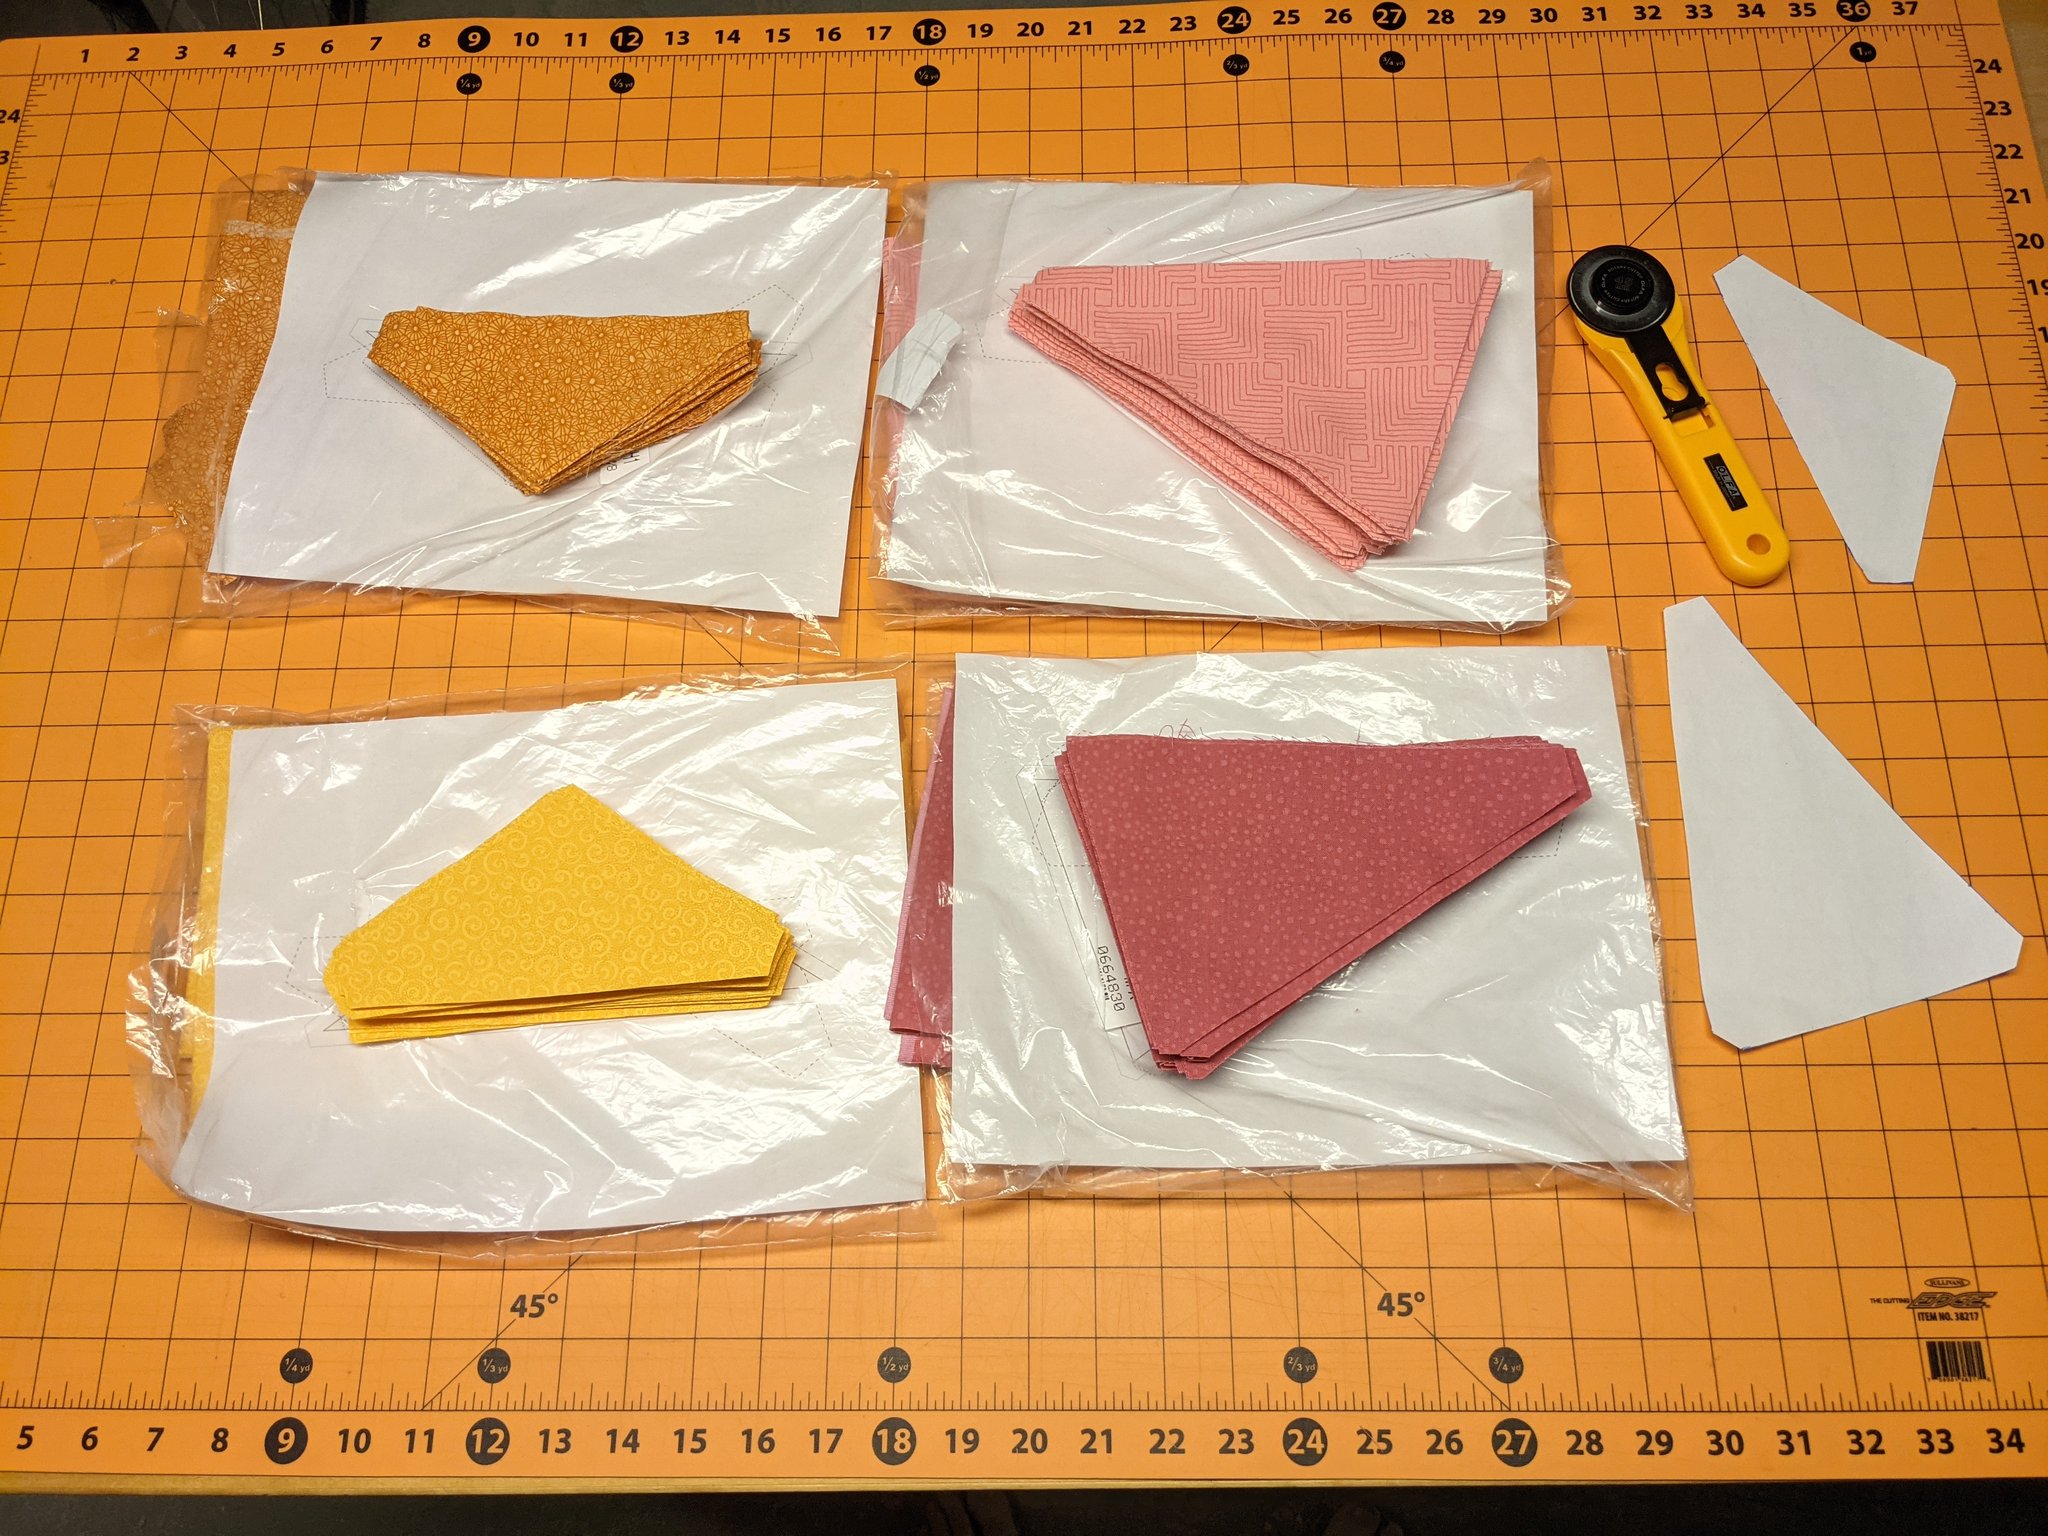
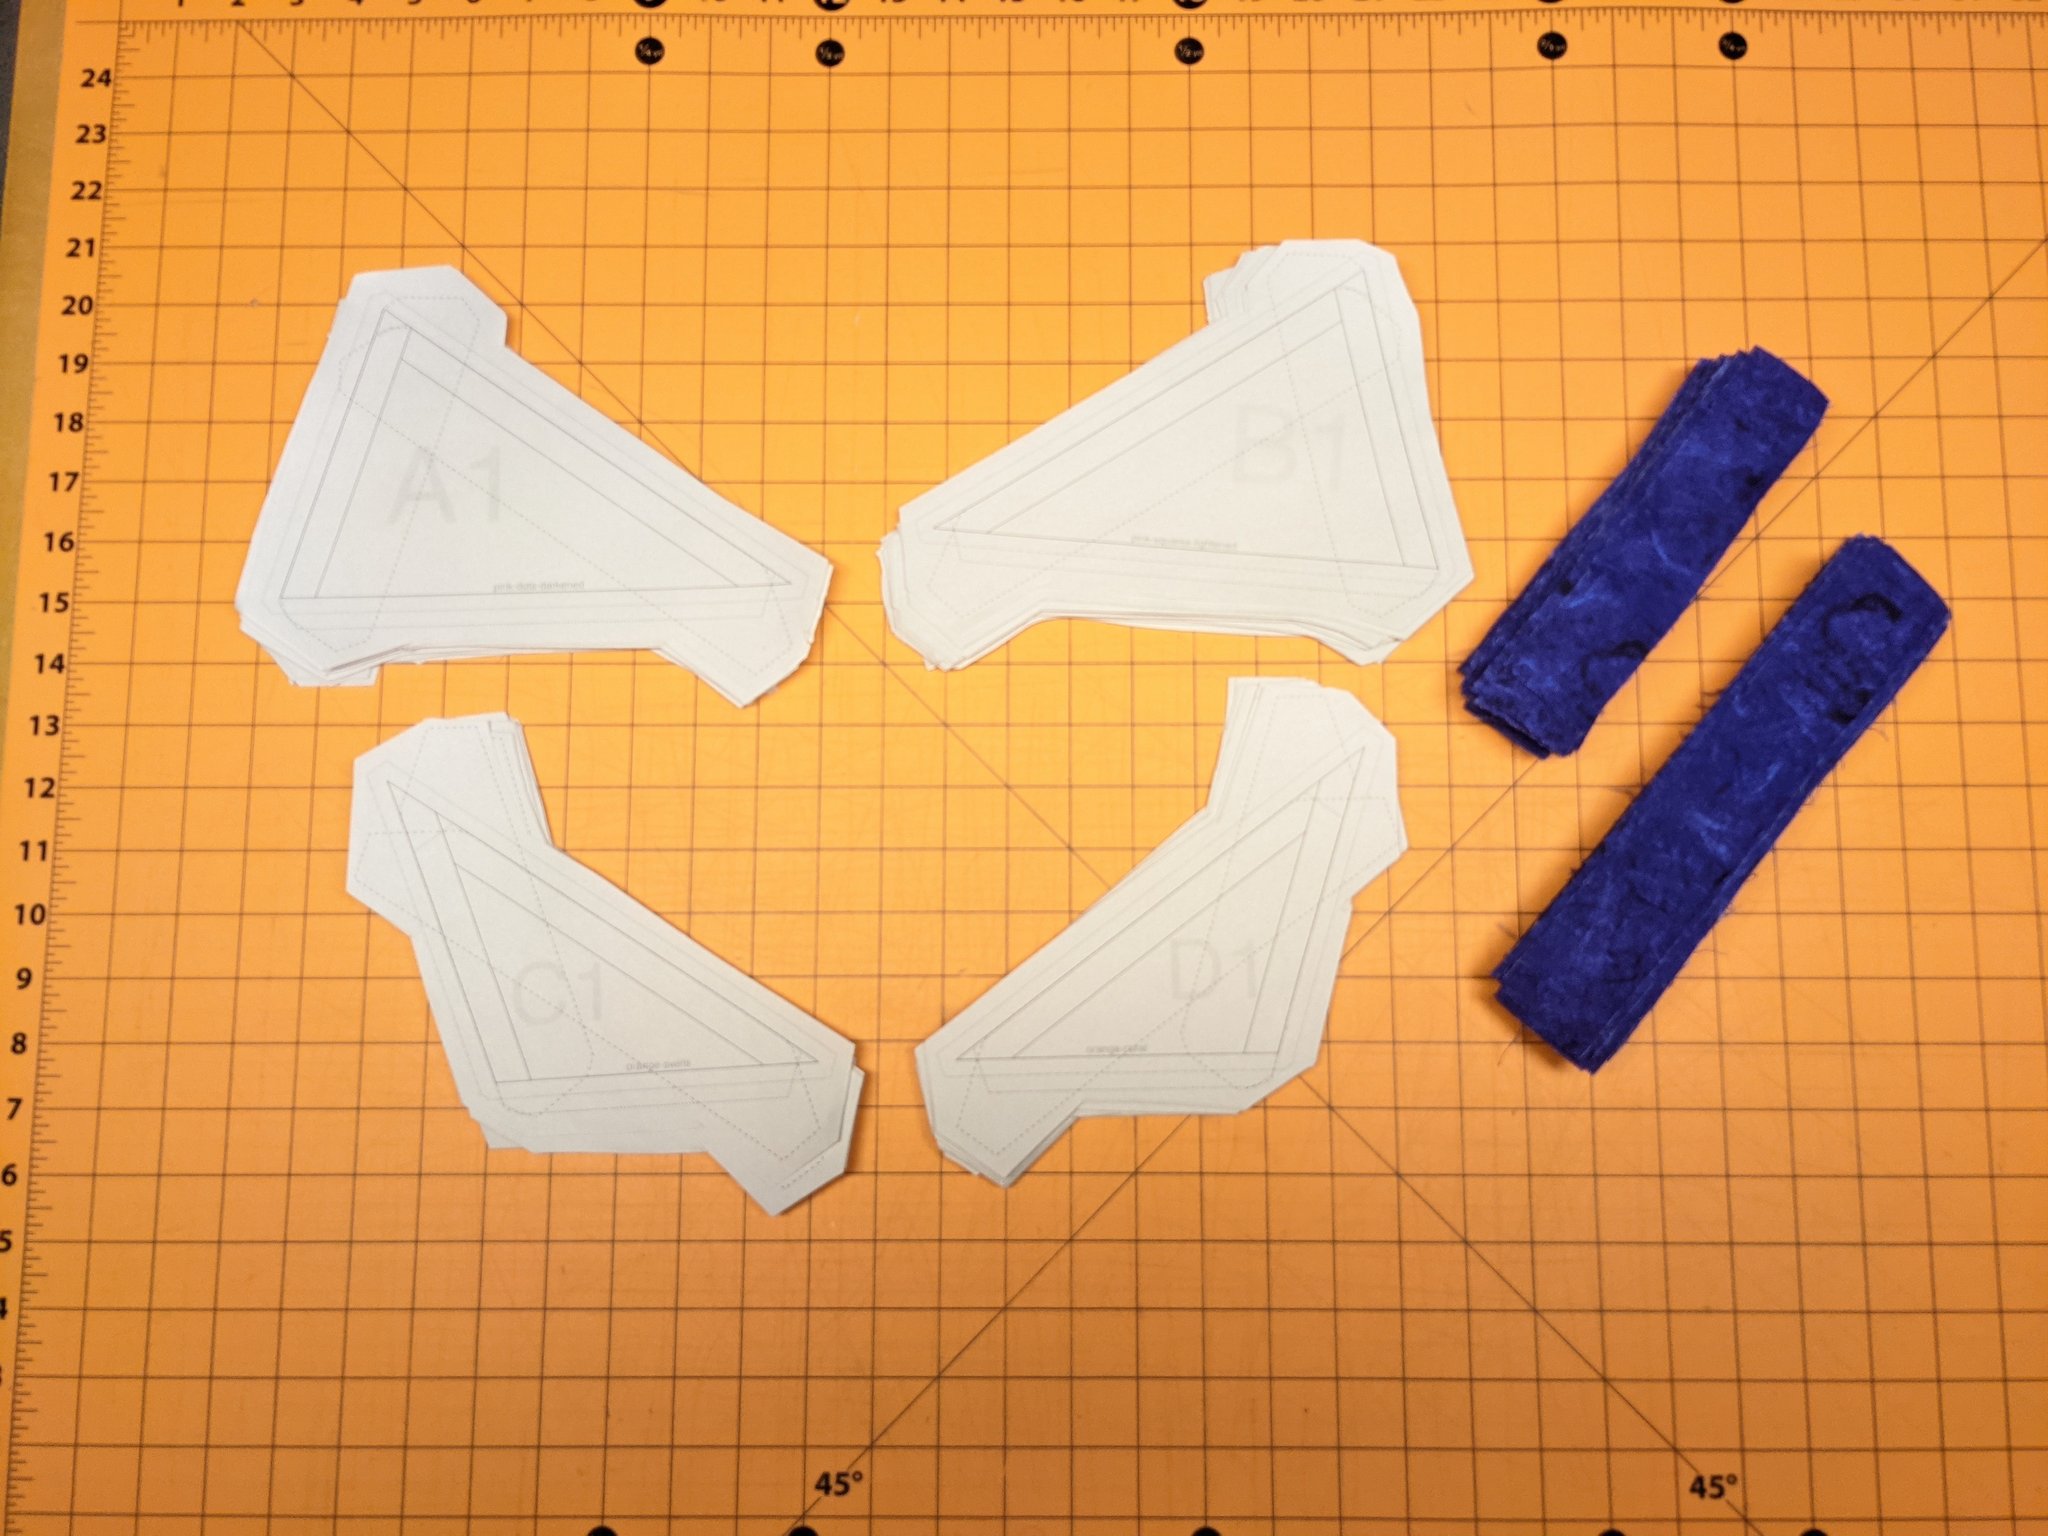
I also had to print and cut out the foundation paper piecing templates generated by my Rust program, as well as some dark purple strips to form the half-outlines of the half-tiles.
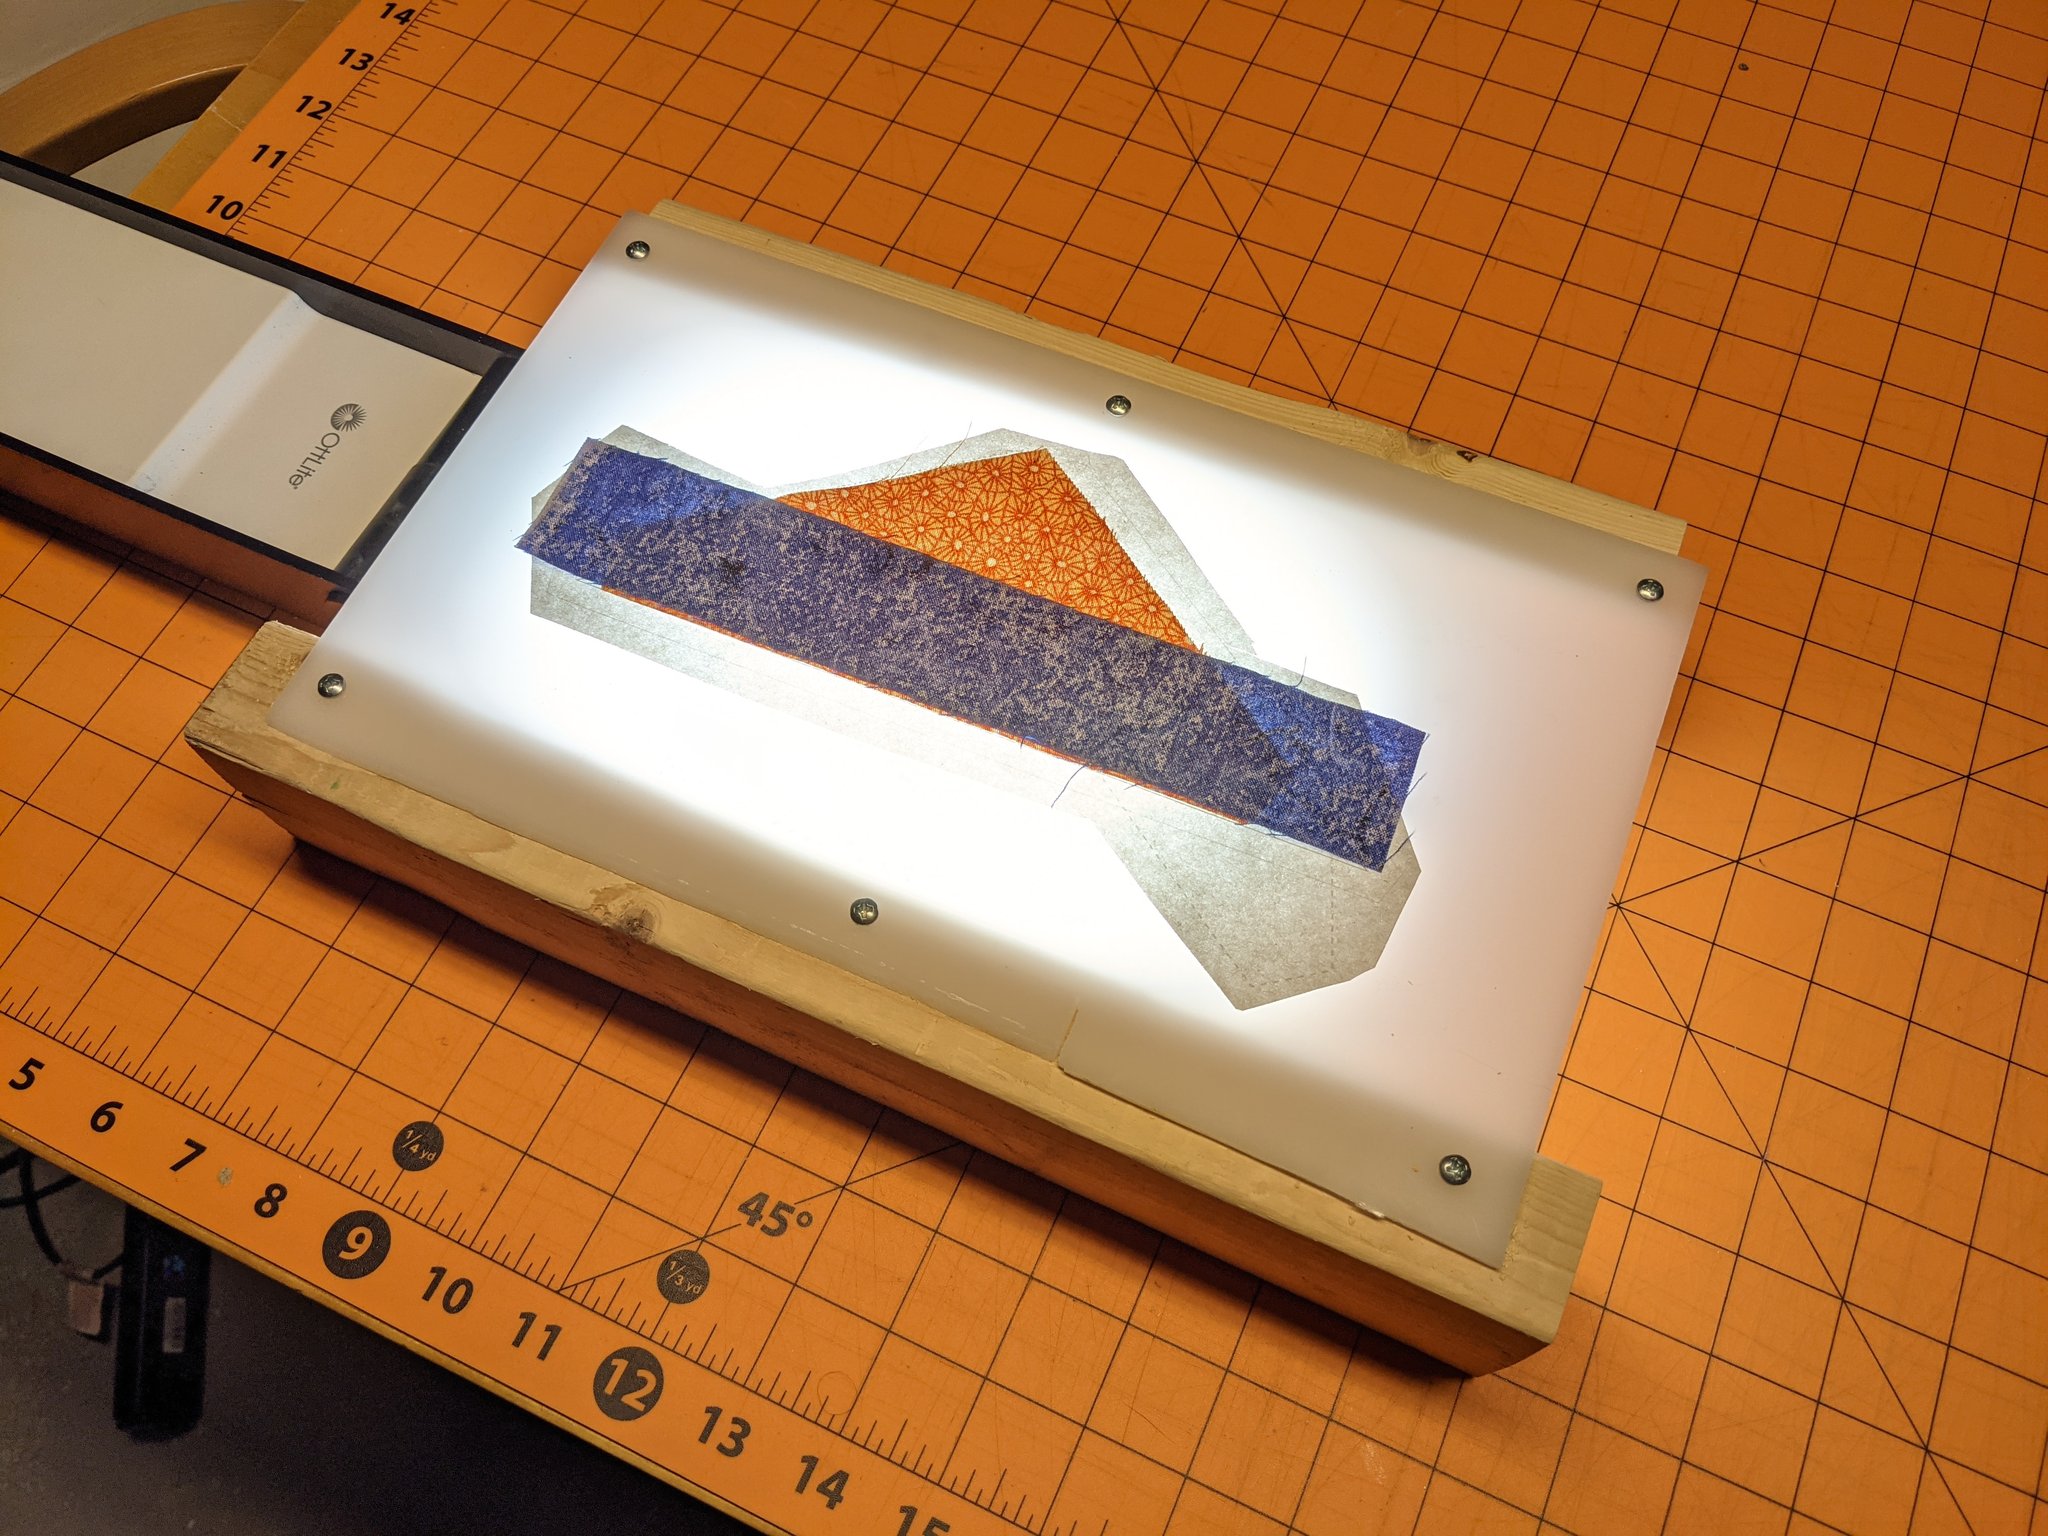
I rigged up a little light table out of some scrap acrylic, sections of 2×4, and a folding desk lamp. It made it easy to position and glue the fabric onto the paper templates with sufficient accuracy. (BTW, Elmer’s disappearing purple washable glue sticks are ideal for FPP. #NotSponsored)
Early 2021 was smack in the middle of a long work-from-home period, so I took advantage of every Zoom faculty meeting I could work at the project table with my laptop camera off (or on, if I felt like fielding questions from colleagues about it). In hindsight, it was probably misattention due to multitasking that led me to swap the light and and dark colors for each type of half-tile. But since I ended up swapping both, the overall composition still worked out fine.
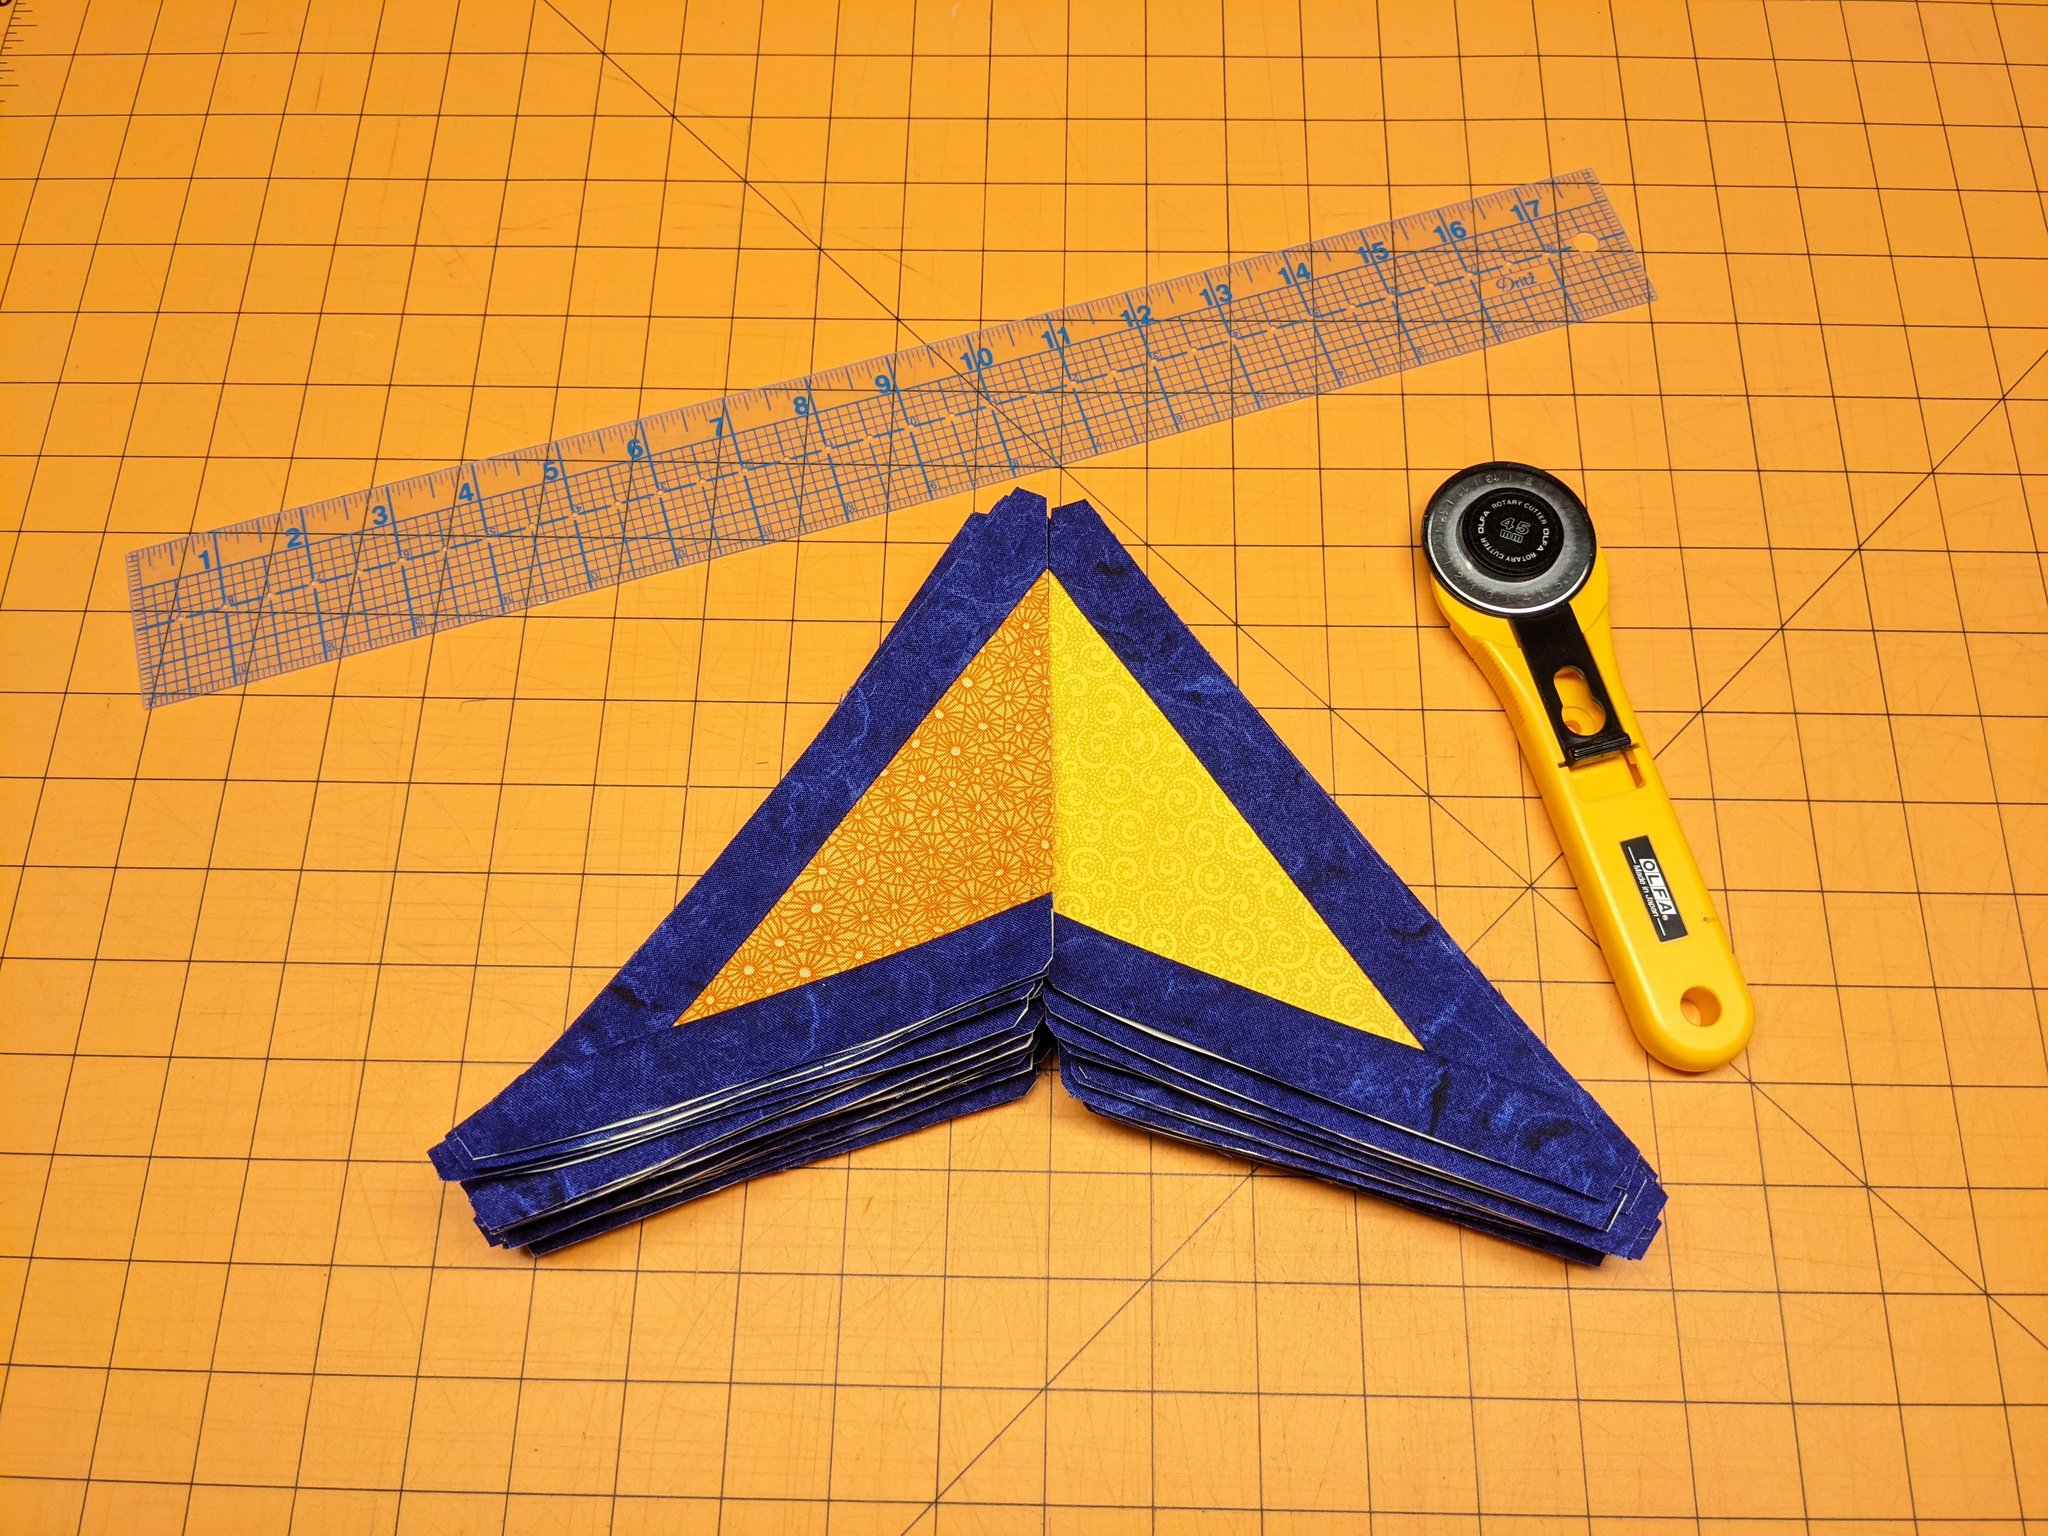
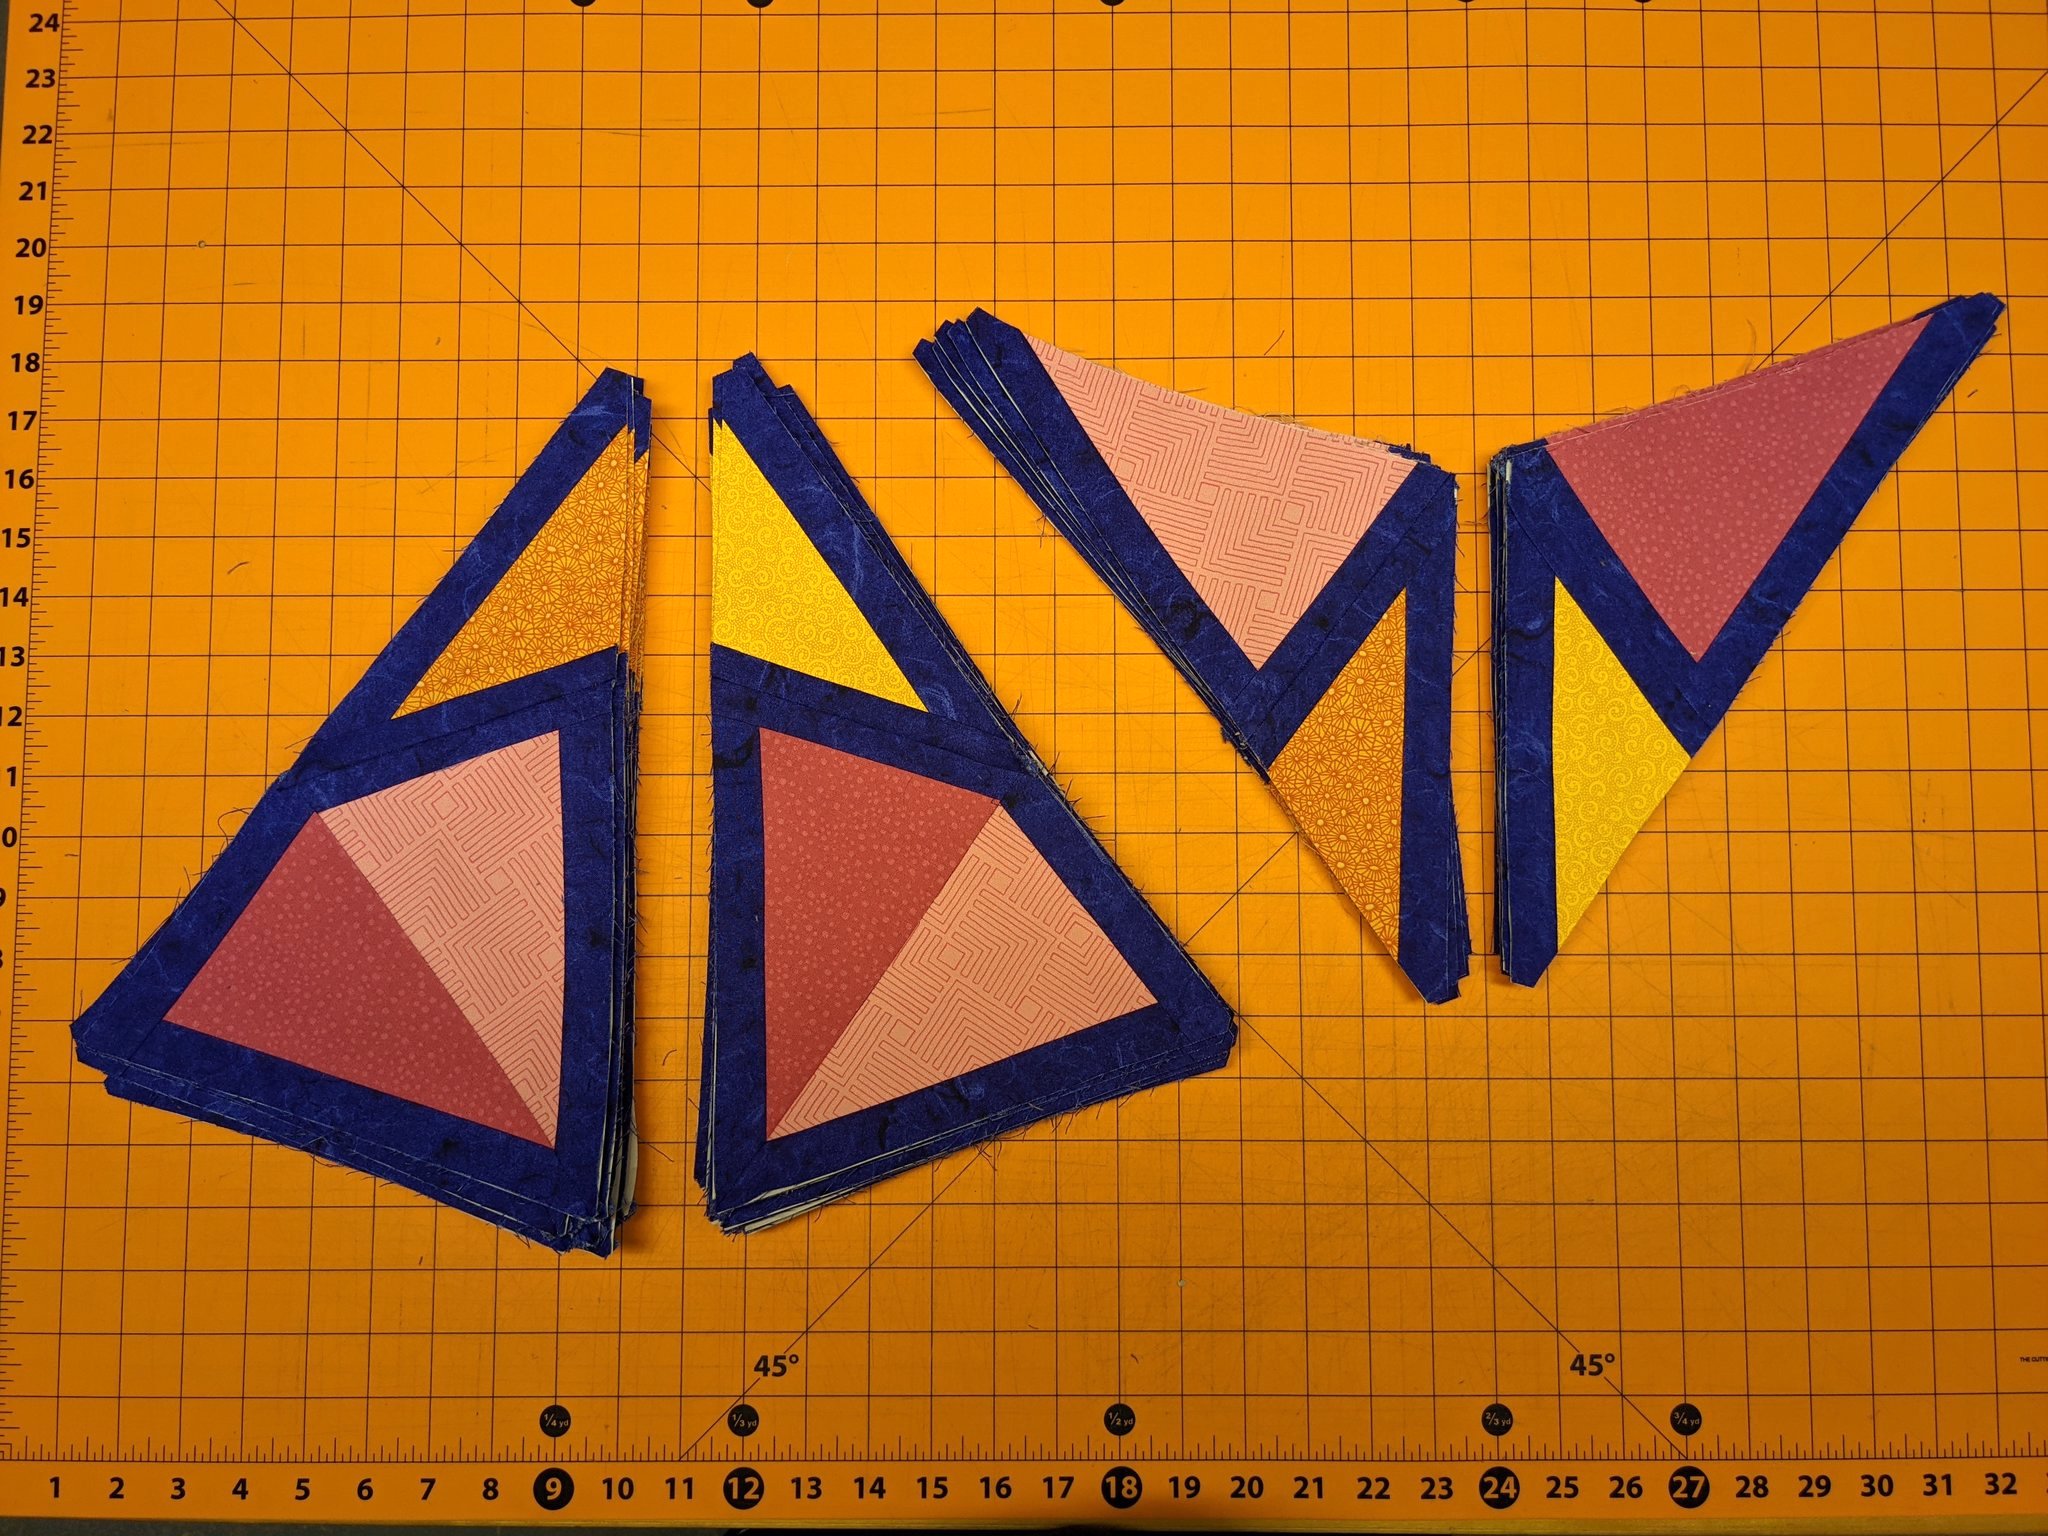
After a bunch of sewing and trimming, I had the 61 half-darts (pictured below) and 94 half-kites (not depicted) that I needed to form the composition.
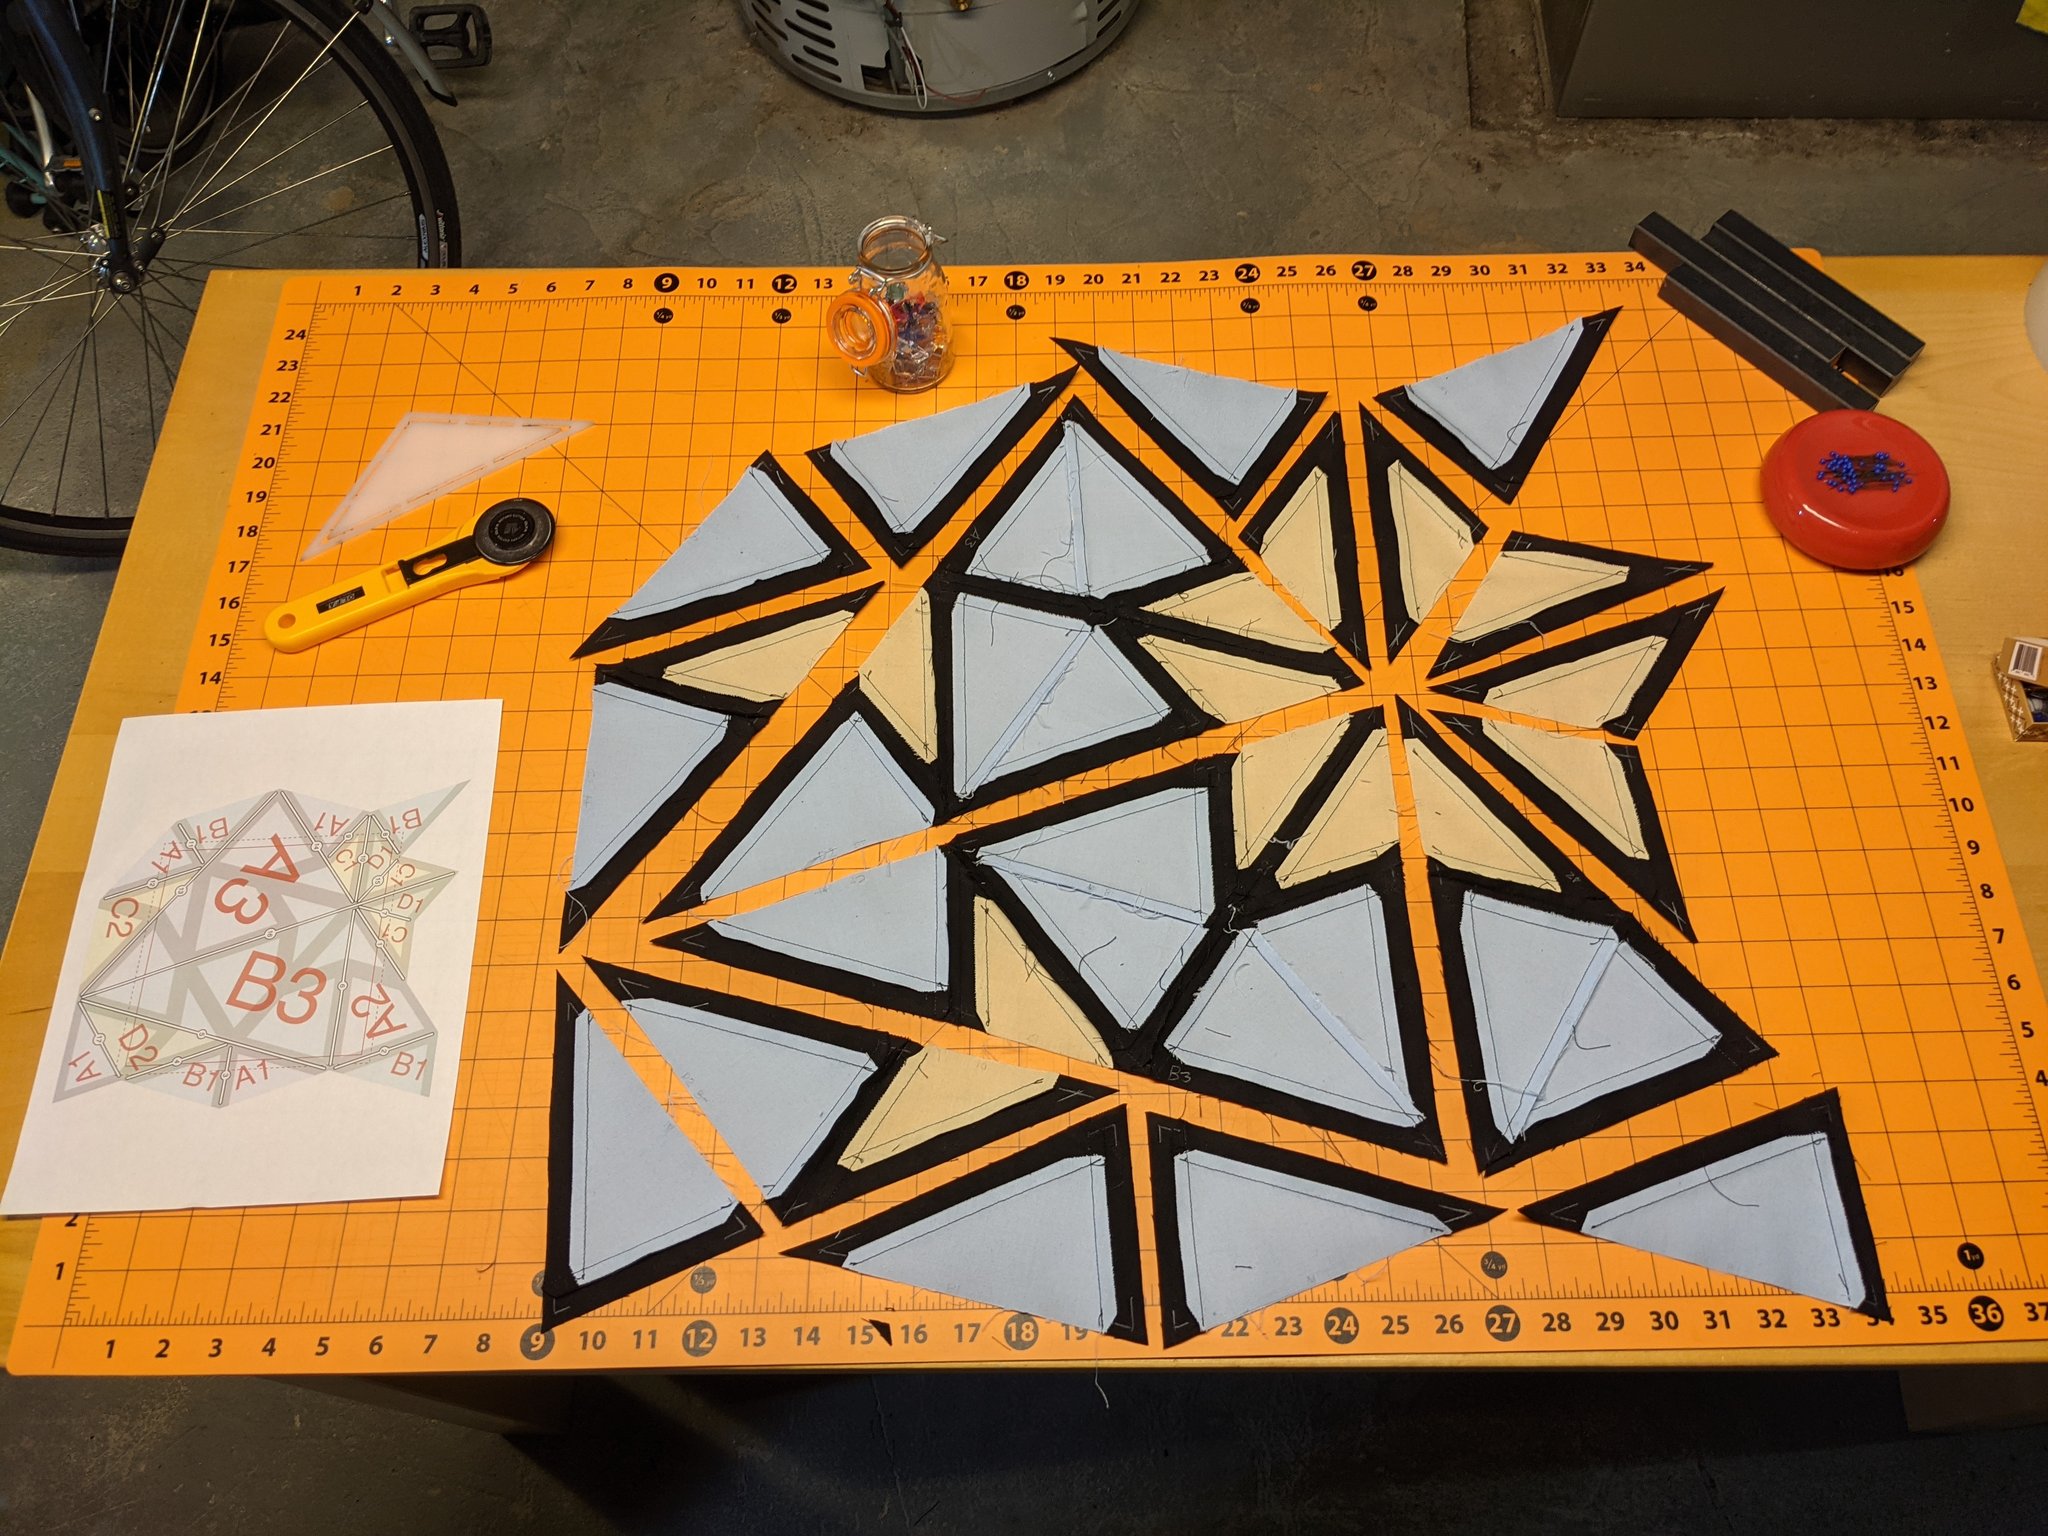
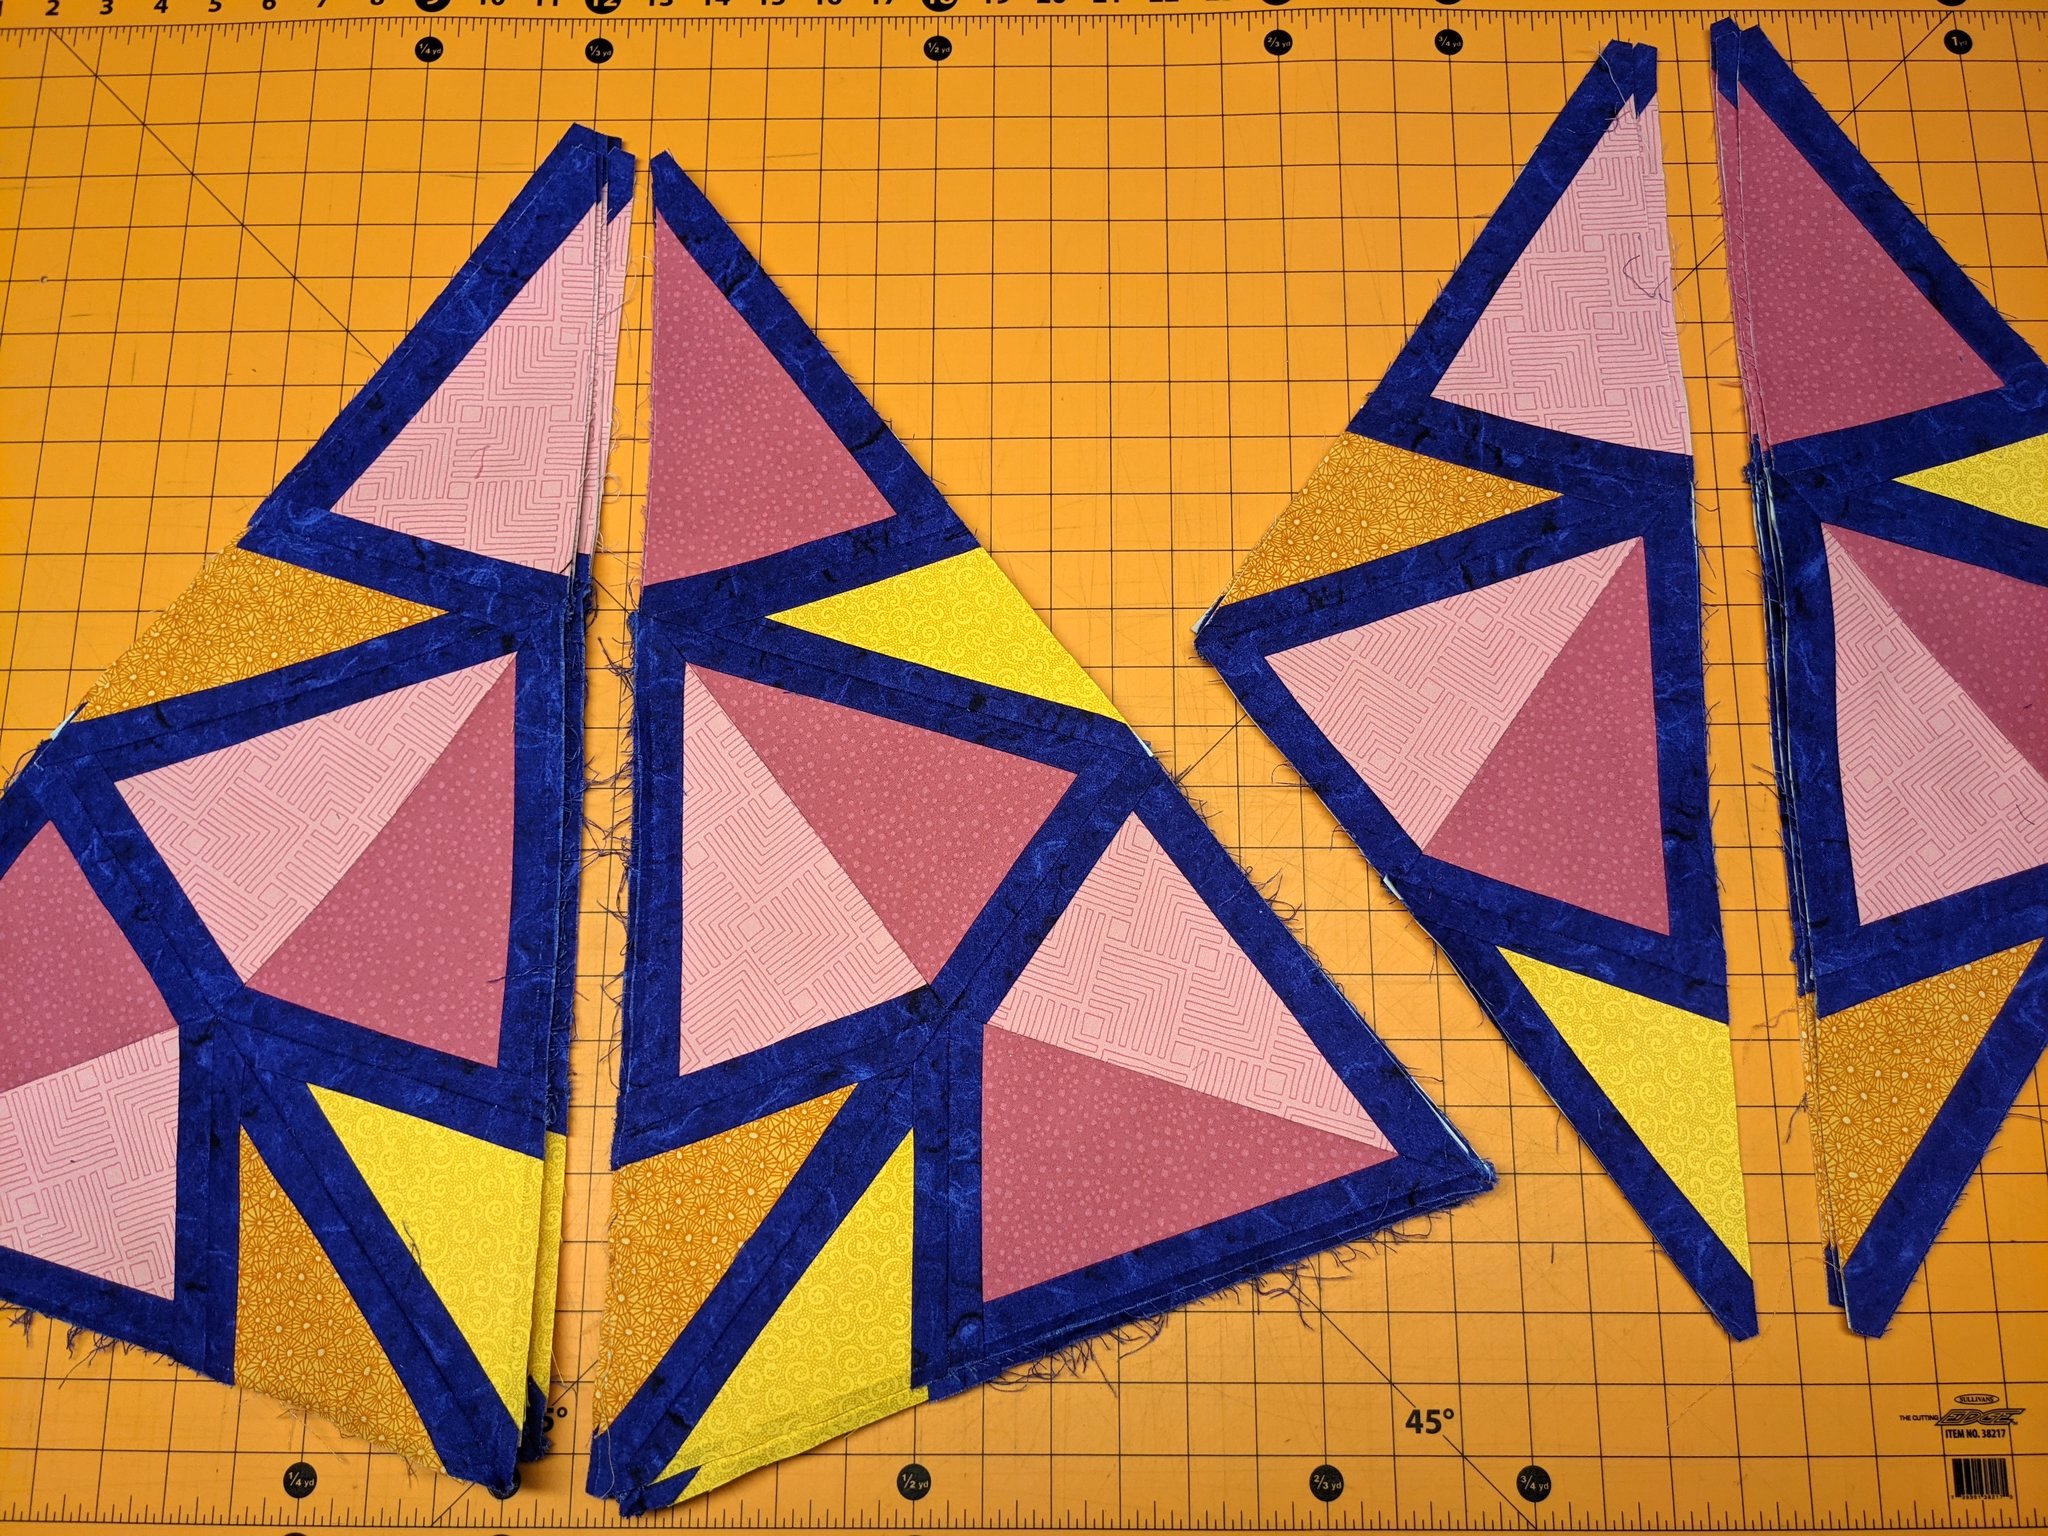
Most of these were recursively combined into progressively larger half-tile modules. Here are the next two levels according to the subdivision rules:
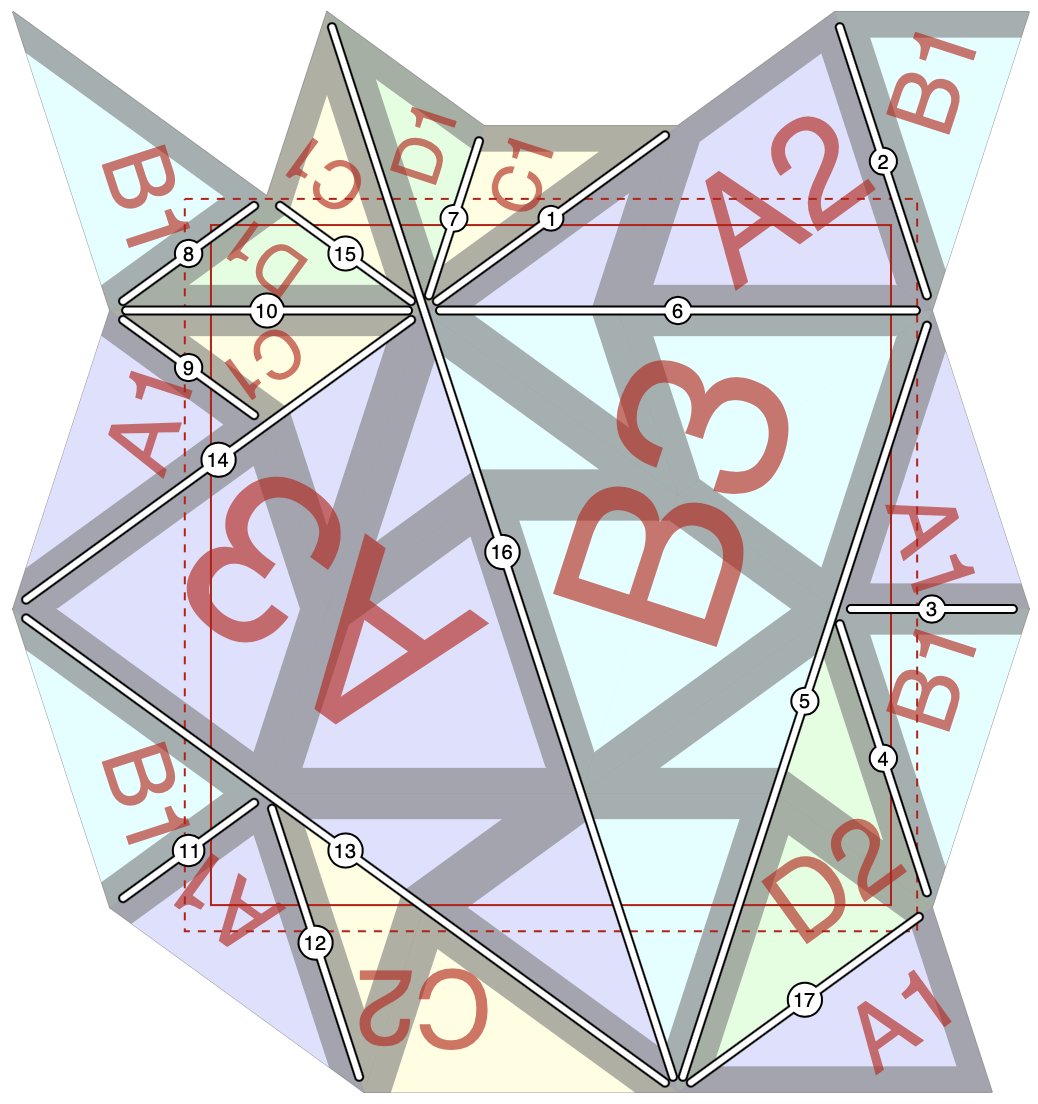
Once all of the half-tile modules were completed, the next step was to sew them together according to the instructions generated by my Rust program. The final pattern had 36 sub-assemblies, compared to the 18 sub-assemblies for the previous prototype.
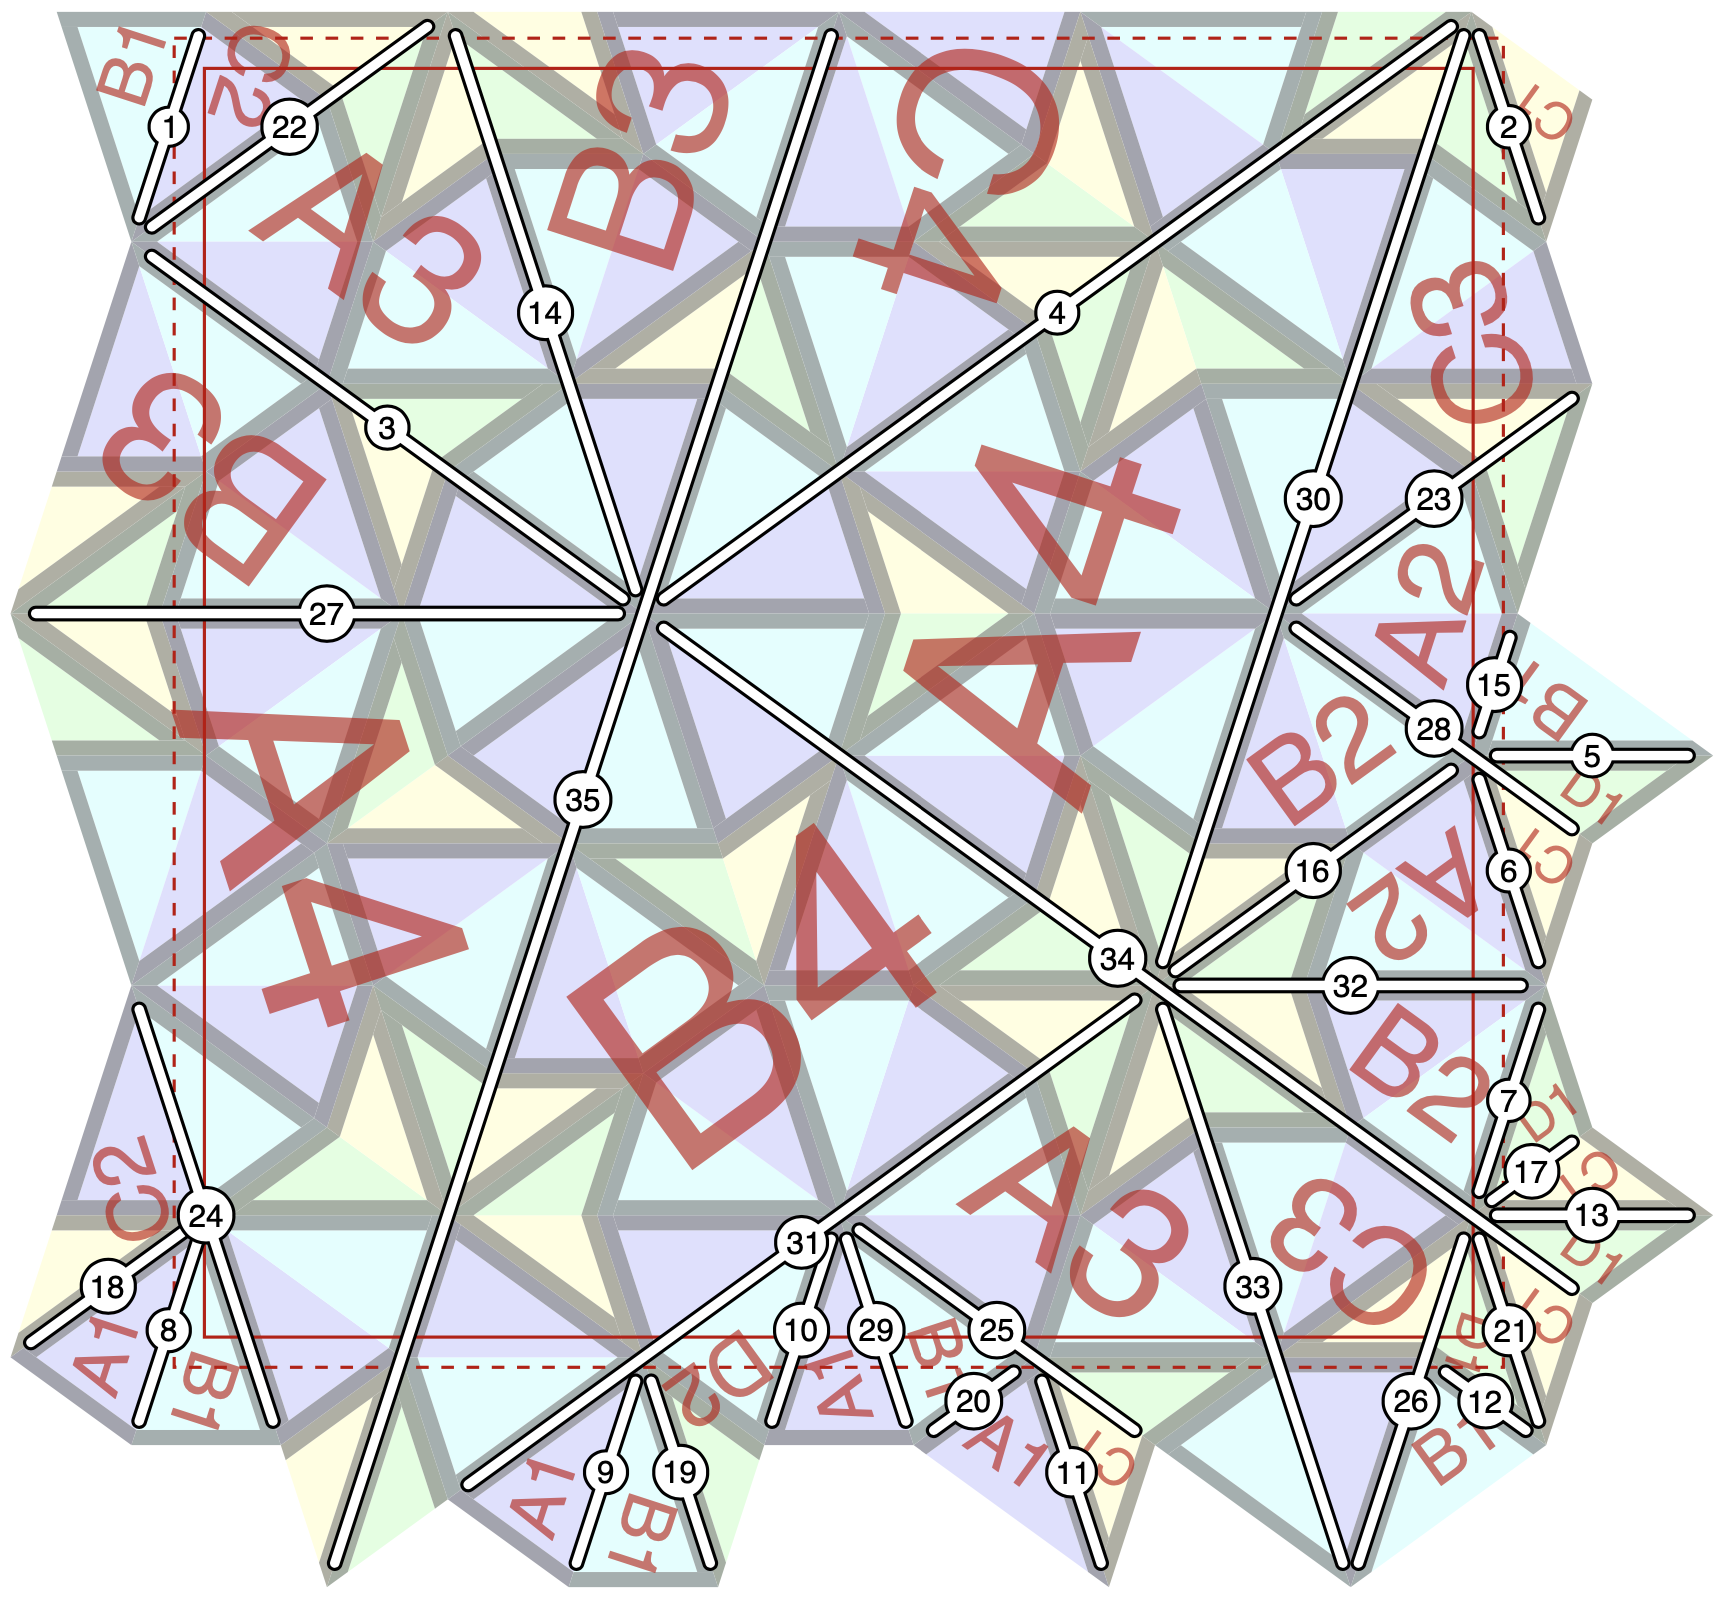
The overall assembly consists of half-tile modules of all levels up to level 4, joined along the numbered white seams shown in the schematic above.
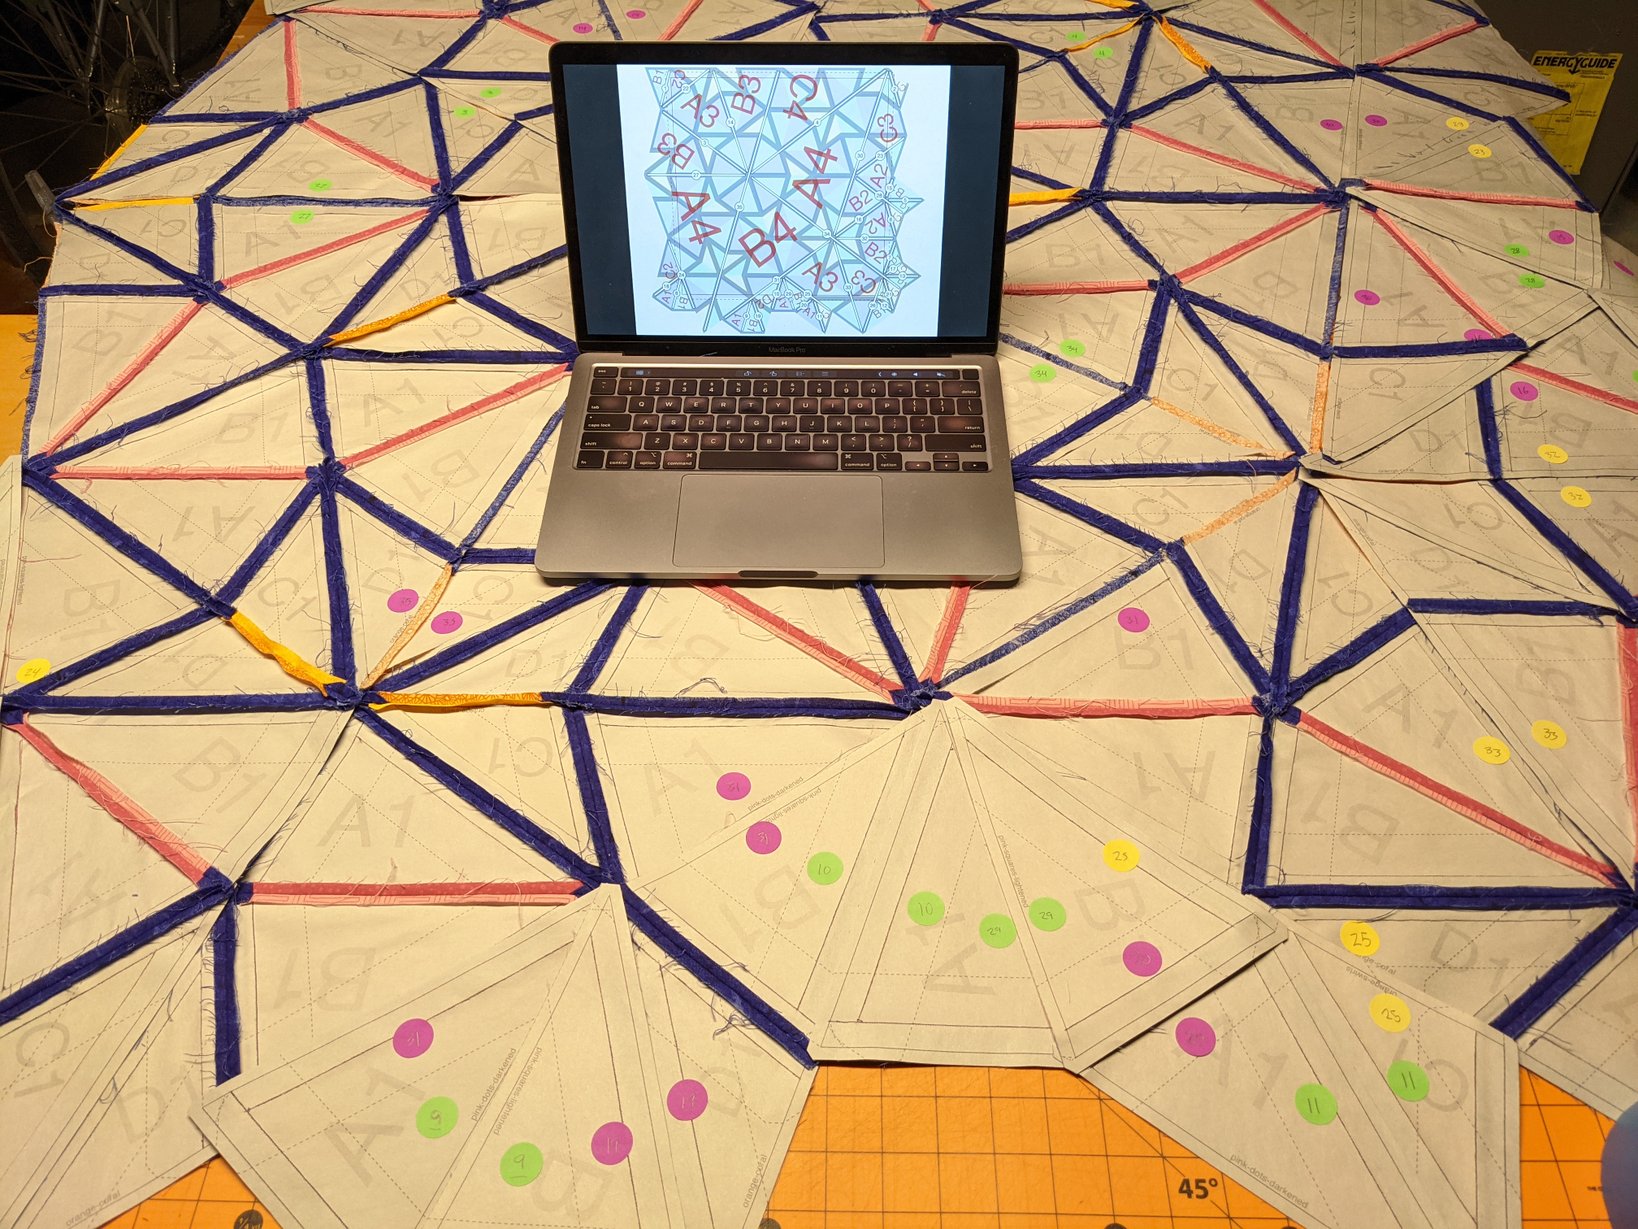
I labeled each seam using matching pairs of colored dots, using the Rust program output as a guide.
Then a lot more careful pinning and sewing, matching up the colors and numbers. Although the stabilization from the paper was helpful, there were nevertheless several occasions when I decided to tear out a seam because I didn’t like how it turned out.
In the end, the solution to the precision problems I encountered during my prototyping was a combination of foundation paper piecing and sheer fussiness.
Below you can see a finished sub-assembly. The long seam running from the bottom left to the top right corresponds to the one labeled #4 in the schematic above.
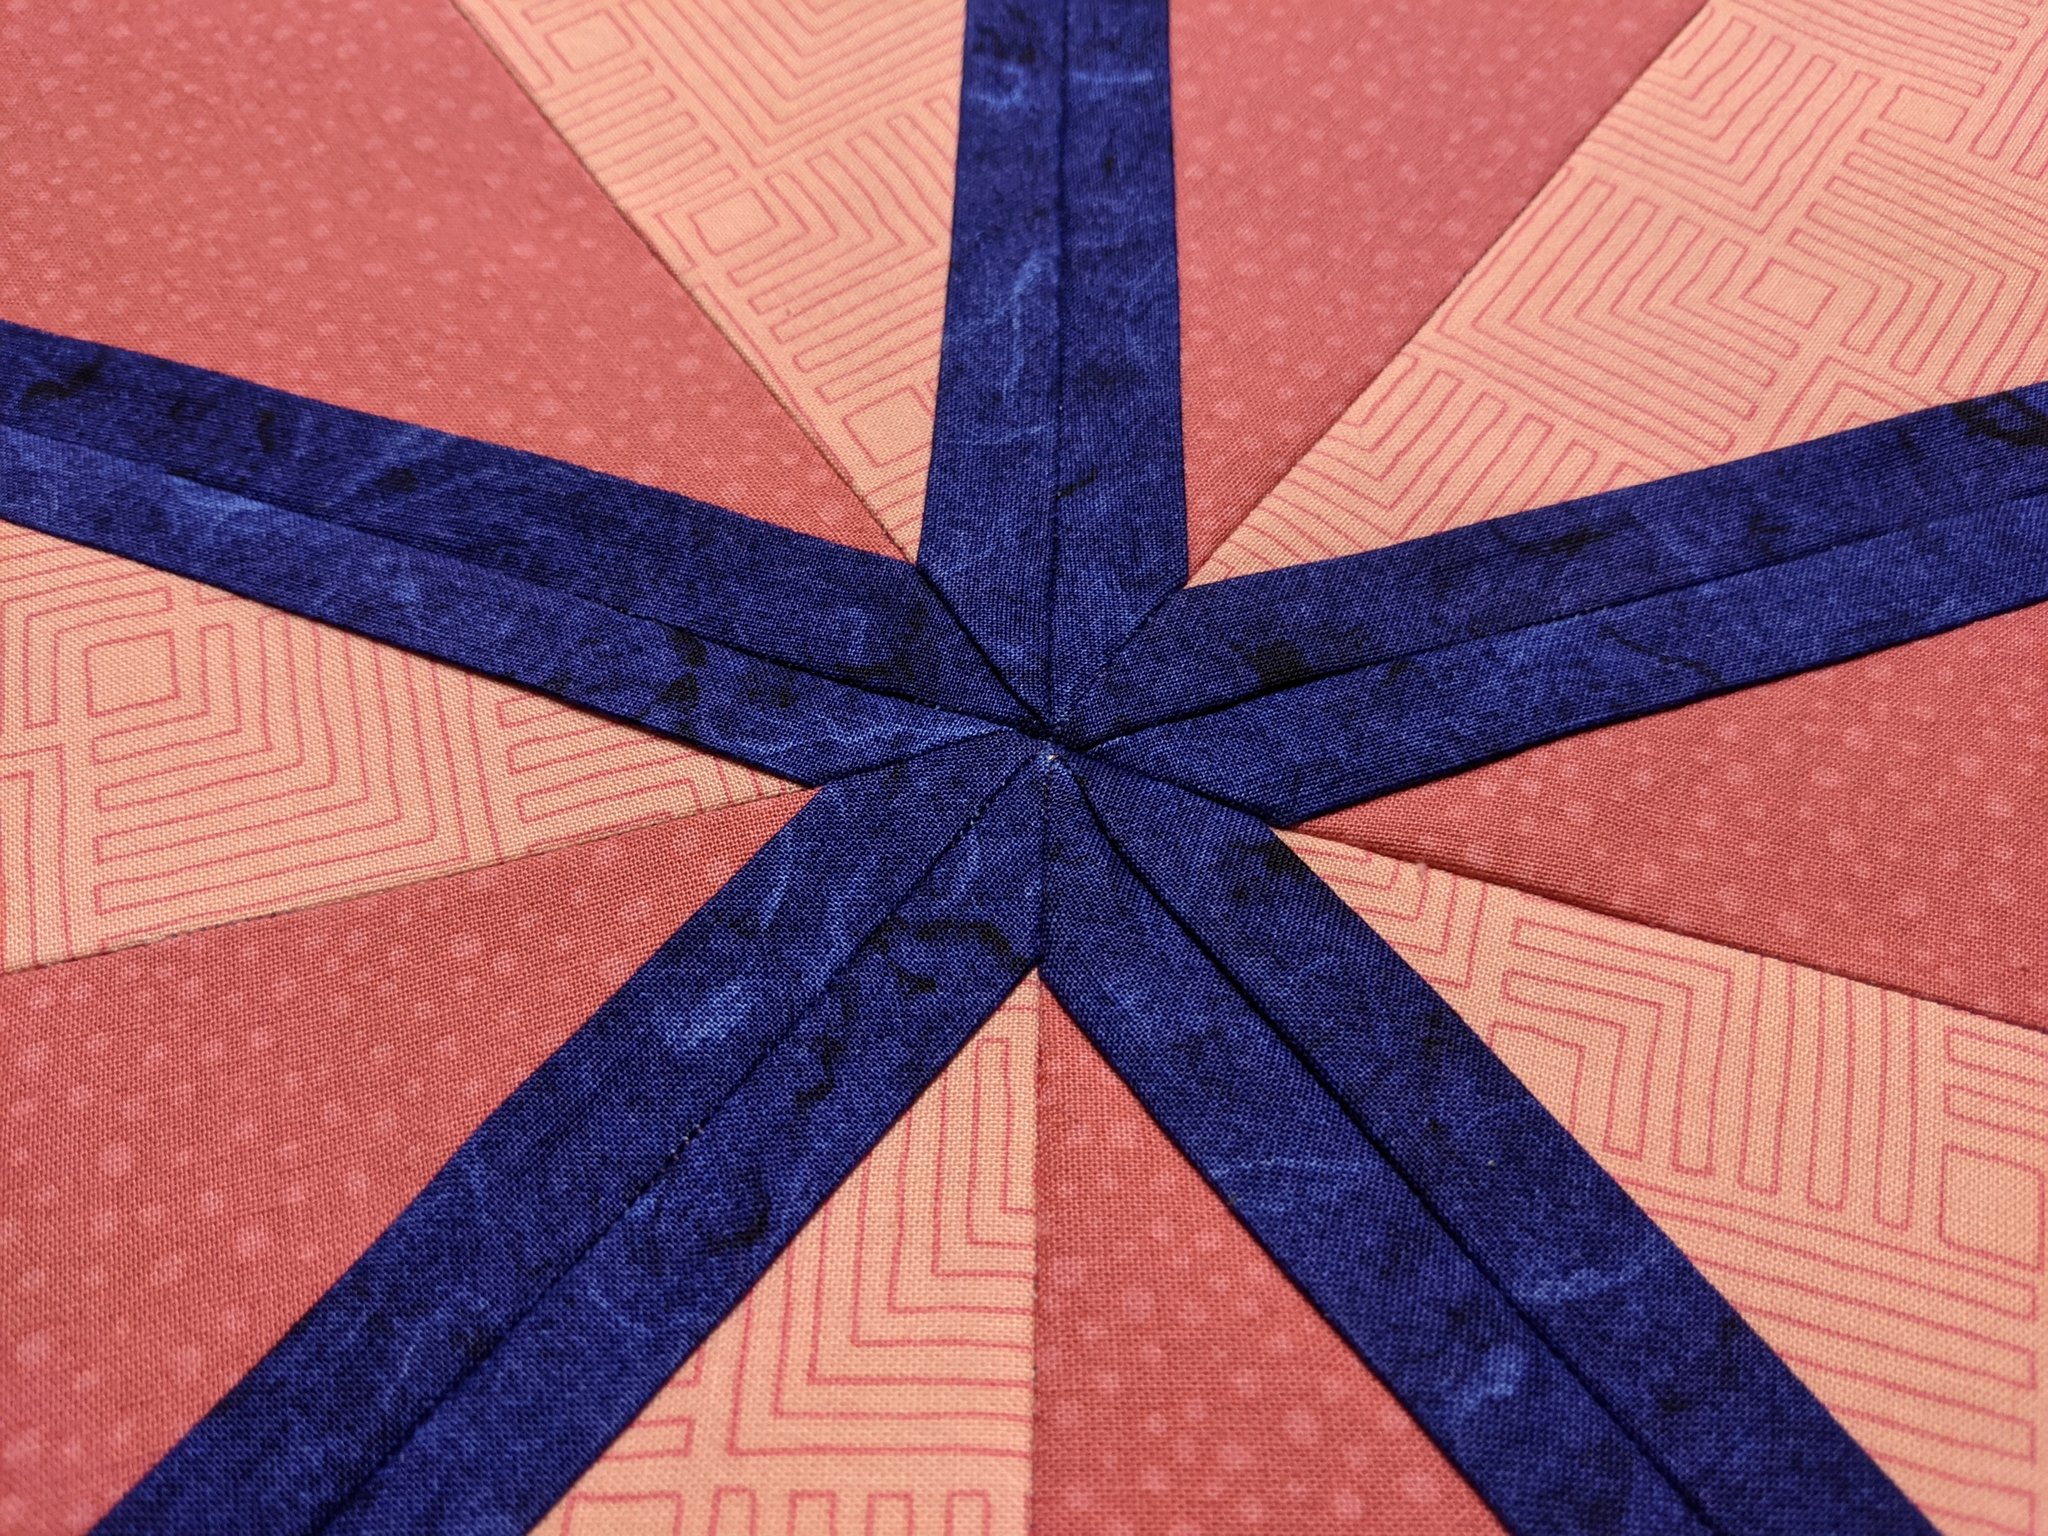
Through practice, patience, and reworking, I was able to gain control over precision. Here are a couple of successful examples of vertices where ten seams come together into a single sharp point:
And this is the final pair of sub-assemblies before joining along seam #35:

The longer the seams got, the tougher it was to ensure precision. I eventually figured out a technique for pinning that involved starting at the ends, and then repeatedly subdividing the seam into smaller intervals by pinning central vertices between two previous pin sites. I had two tools at my disposal to control accuracy: the printed ¼” seam allowance on the FPP templates, which helped to prevent across-the-seam positioning errors; and conjunctions at vertices, which helped to eliminate along-the-seam positioning errors.4
Regardless, by the end, it was pretty tough to keep everything registered properly. And to make matters worse, the more I manipulated the work in progress, the more the FPP templates would tear at the seams and come unglued, allowing everything to deform.5 I felt relieved once the last seam was sewn and the piecework for the quilt center was complete.
Next up was trimming the finished center into a square, then attaching the long border pieces. Due to poor planning, I ended up not having enough linear yardage of the magenta fabric for my border dimensions. I was impatient to finish and, rather than re-ordering and waiting for more fabric to arrive, decided to settle for piecing the borders together from smaller parts, resulting in extraneous seams.
I mentioned this to my mother-in-law, who strongly hinted that I would regret it for the rest of my life if I didn’t tear out the seams, order more fabric and do it the right way. And you know what? She was right.
Here’s the before and after shots for fixing the borders. Note the extra seam in the bottom left of the first image.
Take-away lesson: if you’re ever on the fence about whether to tear out a seam and do it right the second time, just go for it. Why live with the compromise?
A 4’ × 4’ quilt was a little too big to stretch out on my modest project table, so I ended up rigging together an extension using a sheet of OSB laminated with contact paper to prevent splinters from shredding the fabric, and supported by an Ikea table rescued from the curbside.
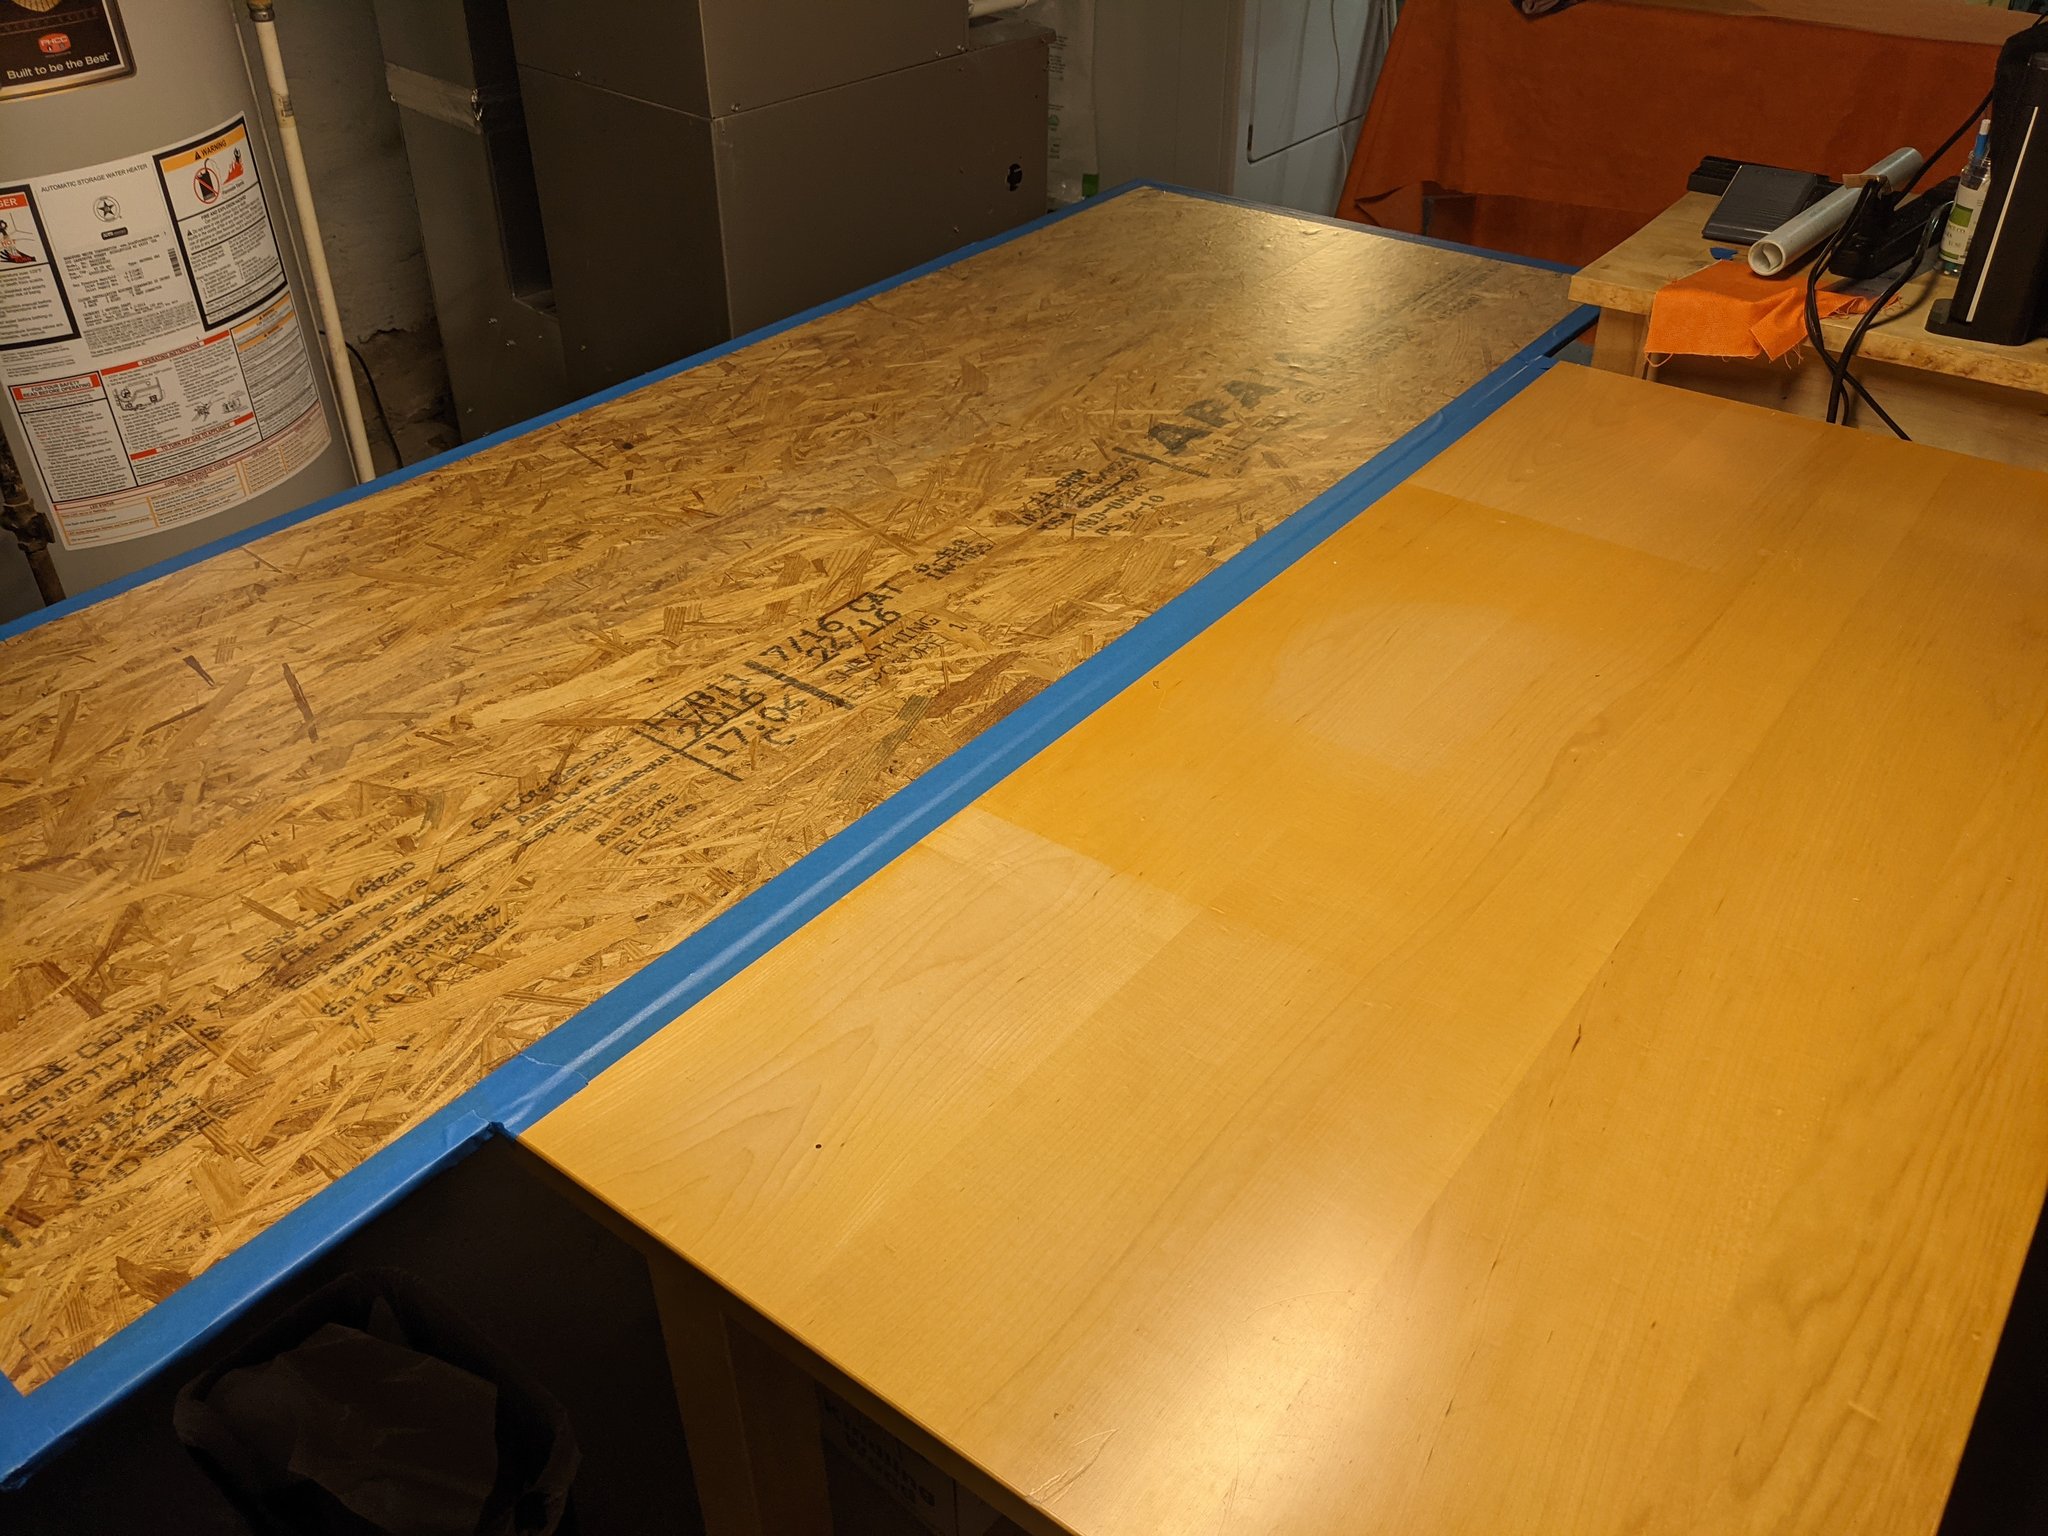
Once I did that, I was ready to pin-baste, as shown below. I used blue painter’s tape to pull each layer (backing, batting, top) flat and secure it to the table, and then fastened them all together using special curved safety pins designed for quilters.
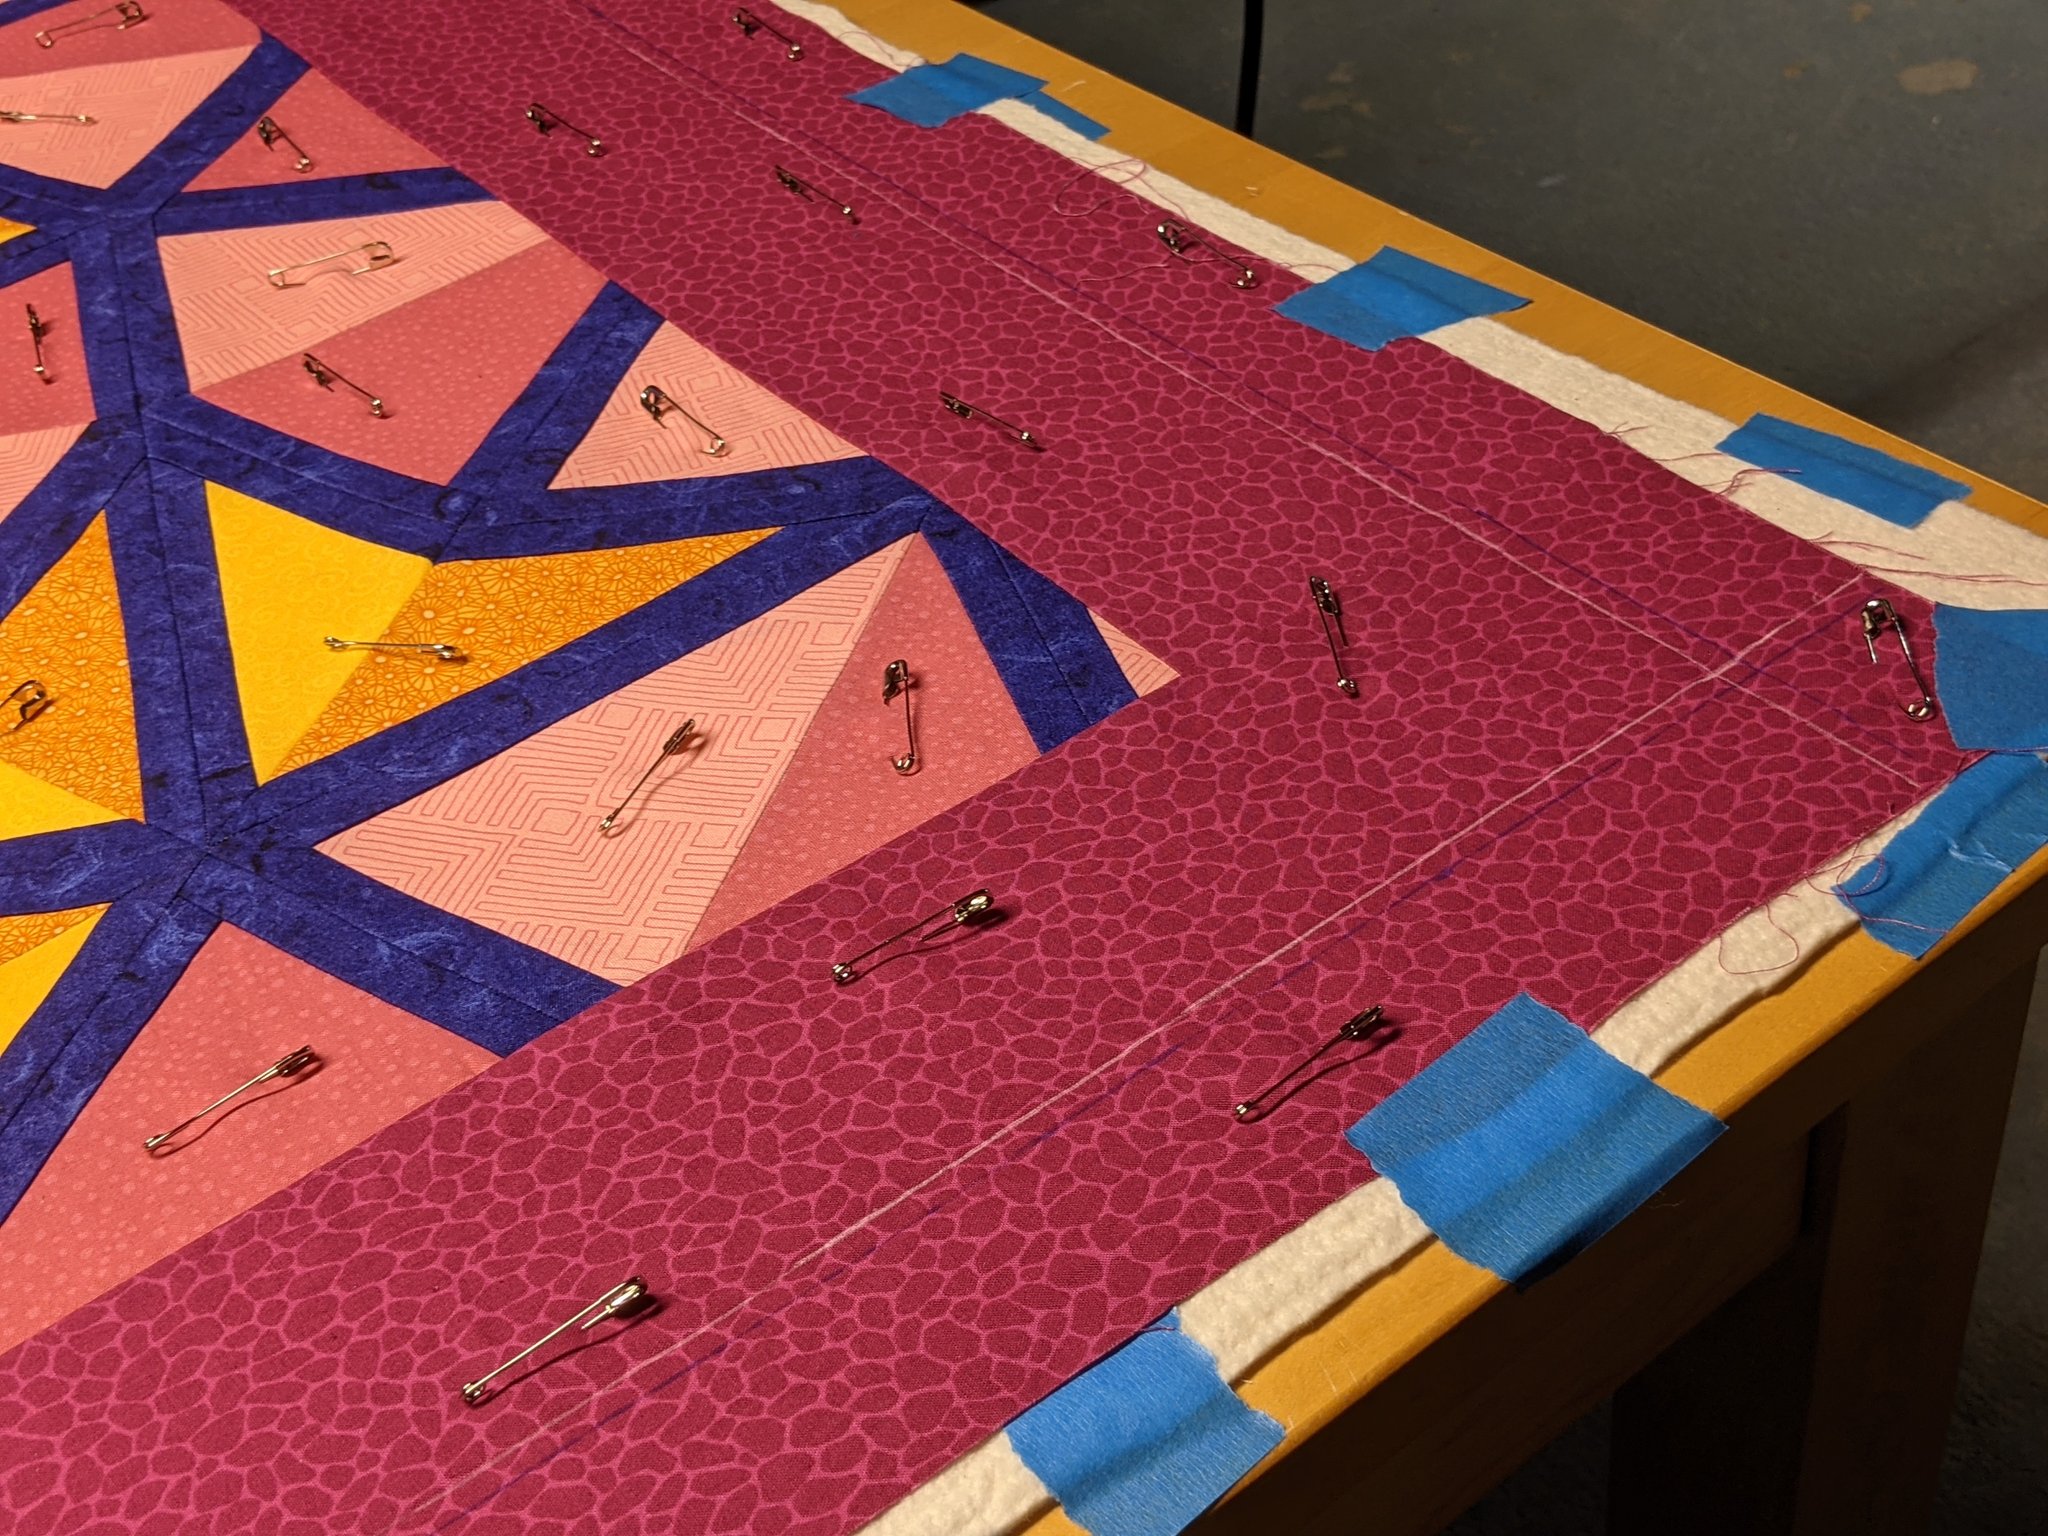
This stage of fabrication is known as a sandwich 🥪, and the next step is to quilt it – i.e., to lay down the seams that form the characteristic pillowy pucker that we associate with quilts.
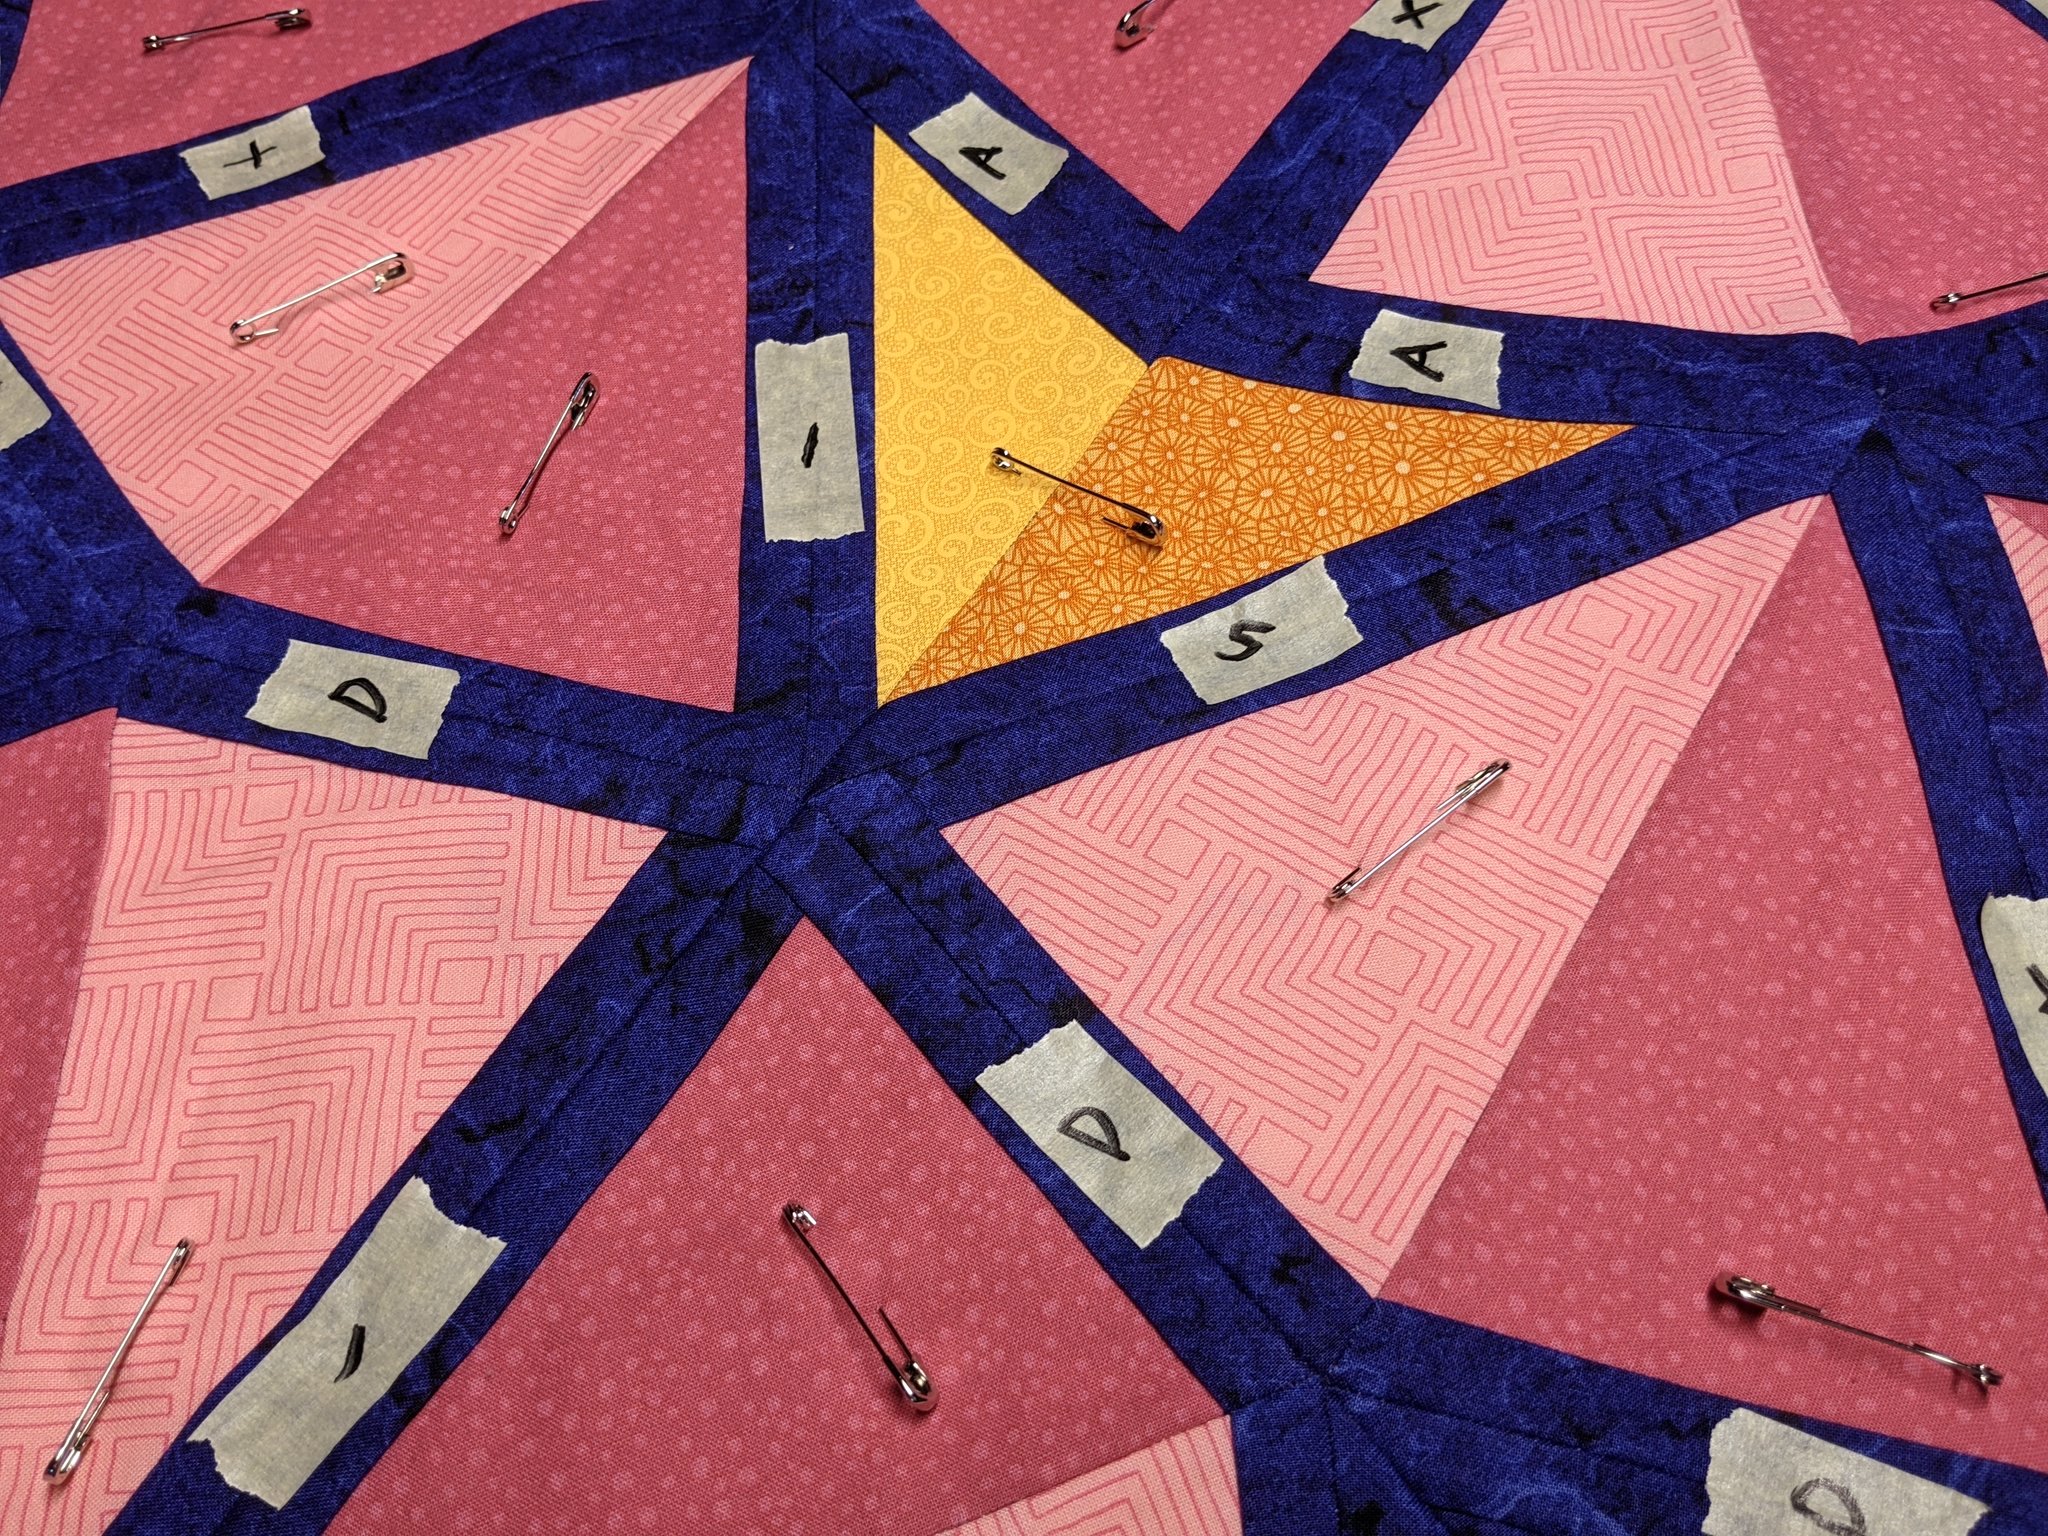
Like the prototype, the plan for quilting the final product was to “stitch the ditch” along the center seams of the outlines between tiles. To minimize the total number of moves between seams, I decided to identify and label long contiguous runs of outlines. It would have been natural to delegate this task to the Rust program, but contrary to my blog’s tagline (Why do it by hand if you can code it in just quadruple the time?™), my impatience to see the finished product led me to skip automating this aspect of planning.
Anyways, here’s a photo showing labels for each quilting seam. If I remember correctly, the numbered seams predominantly ran North-South in the pattern, and the lettered ones mostly ran East-West. All of the really short “one-off” seams got labeled with X’s.
All of the the sewing for this project – including quilting – was done on a tiny little Singer Scholastic model 5511 with a throat width of just 6” (15 cm). By rolling up the sandwich to tuck under the arm, it was just about feasible to quilt over all of the outlines. But I do truly regret waiting until my third quilting project to sink the sewing machine base flush to the top of my sewing table. In the absence of a low-friction setup, the final quilting on this project ended up with uneven stitches due to variations in feed rate as the sandwich got hung up on the edges of the table and of the machine. The good news is they’re only visible from up close, and only on the back side of the quilt.
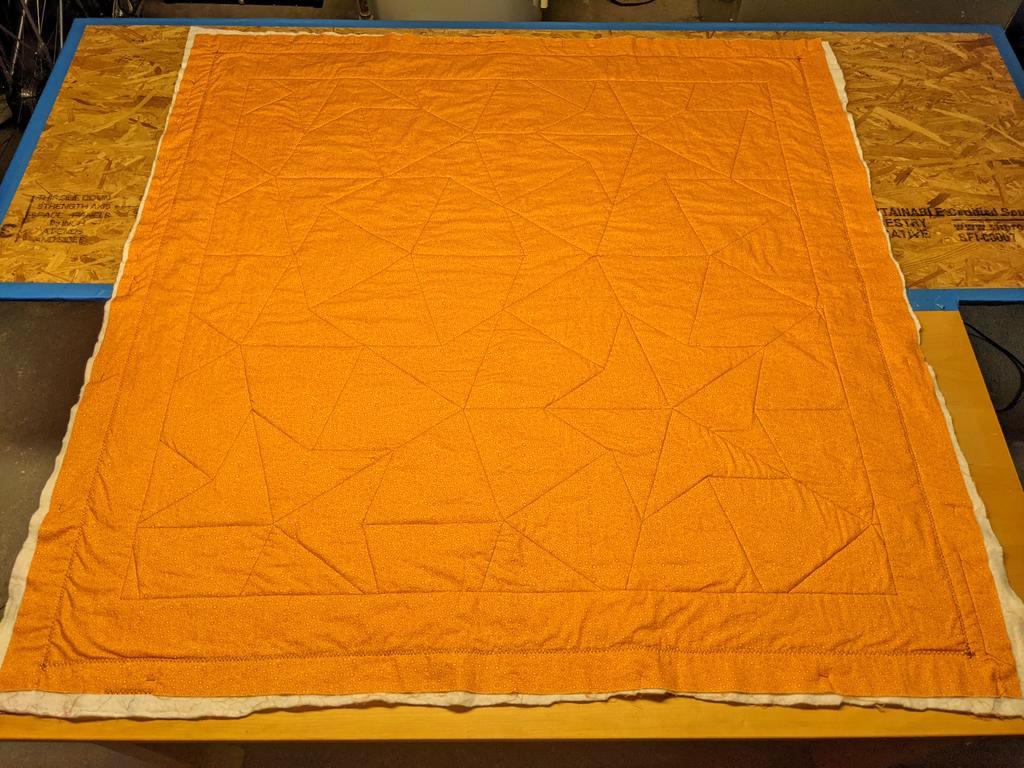
Speaking of which, here’s the quilted back. You can clearly see the outlines of the kites and the darts:
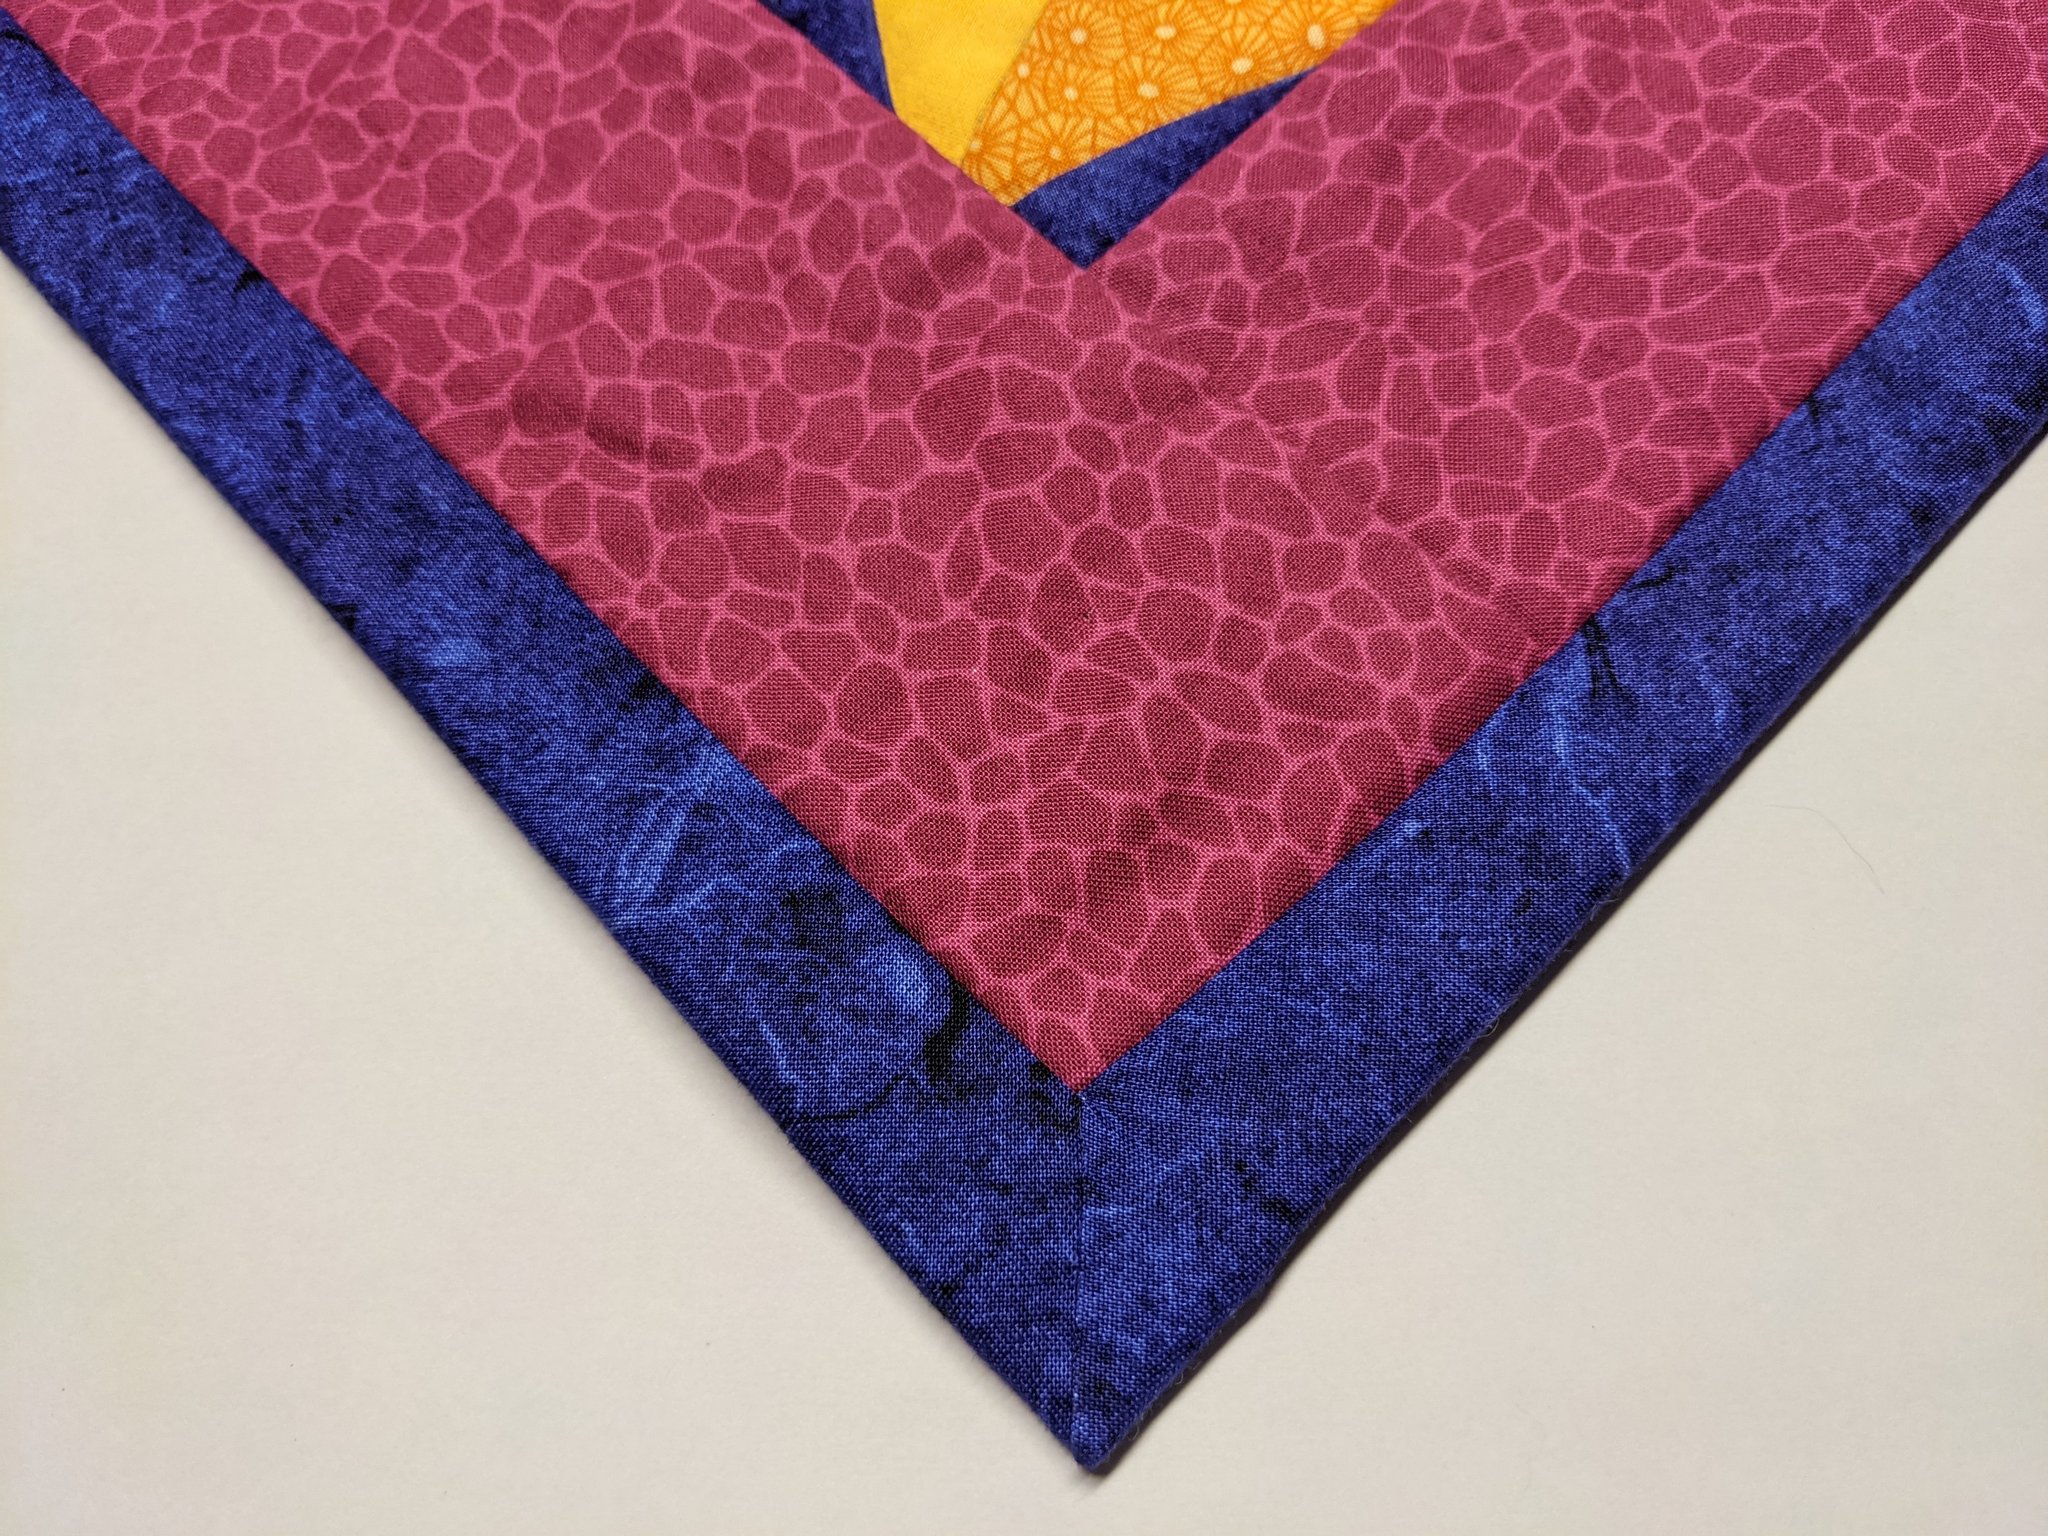
Finally, I trimmed the sandwich square and closed it up with a ¾” binding. (BTW, if you’re ever looking for a video tutorial on sewing a wide binding for a quilt, I recommend this one from Fat Quarter Shop.) The process used an interesting combination of machine sewing and hand stitching. I really like how sharp the mitered corners turned out.
I hand-stitched a sleeve onto the back of the quilt to accept a dowel for hanging, and then milled out some brackets to mount it in our living room wall.
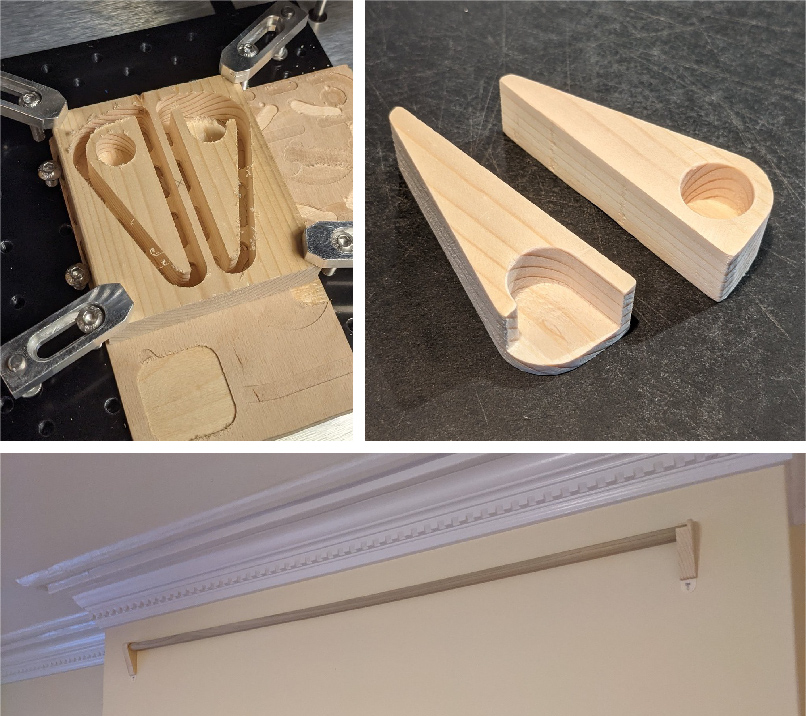
After a few weeks, the 3M adhesive strips securing my beautiful custom brackets gave up the ghost, and tragically, I had to put screws through them. At least they’re hidden behind the quilt now.
Finished project
The finished quilt currently hangs behind our TV, but it is easily removable in case it ever needs to travel to a show or competition.6
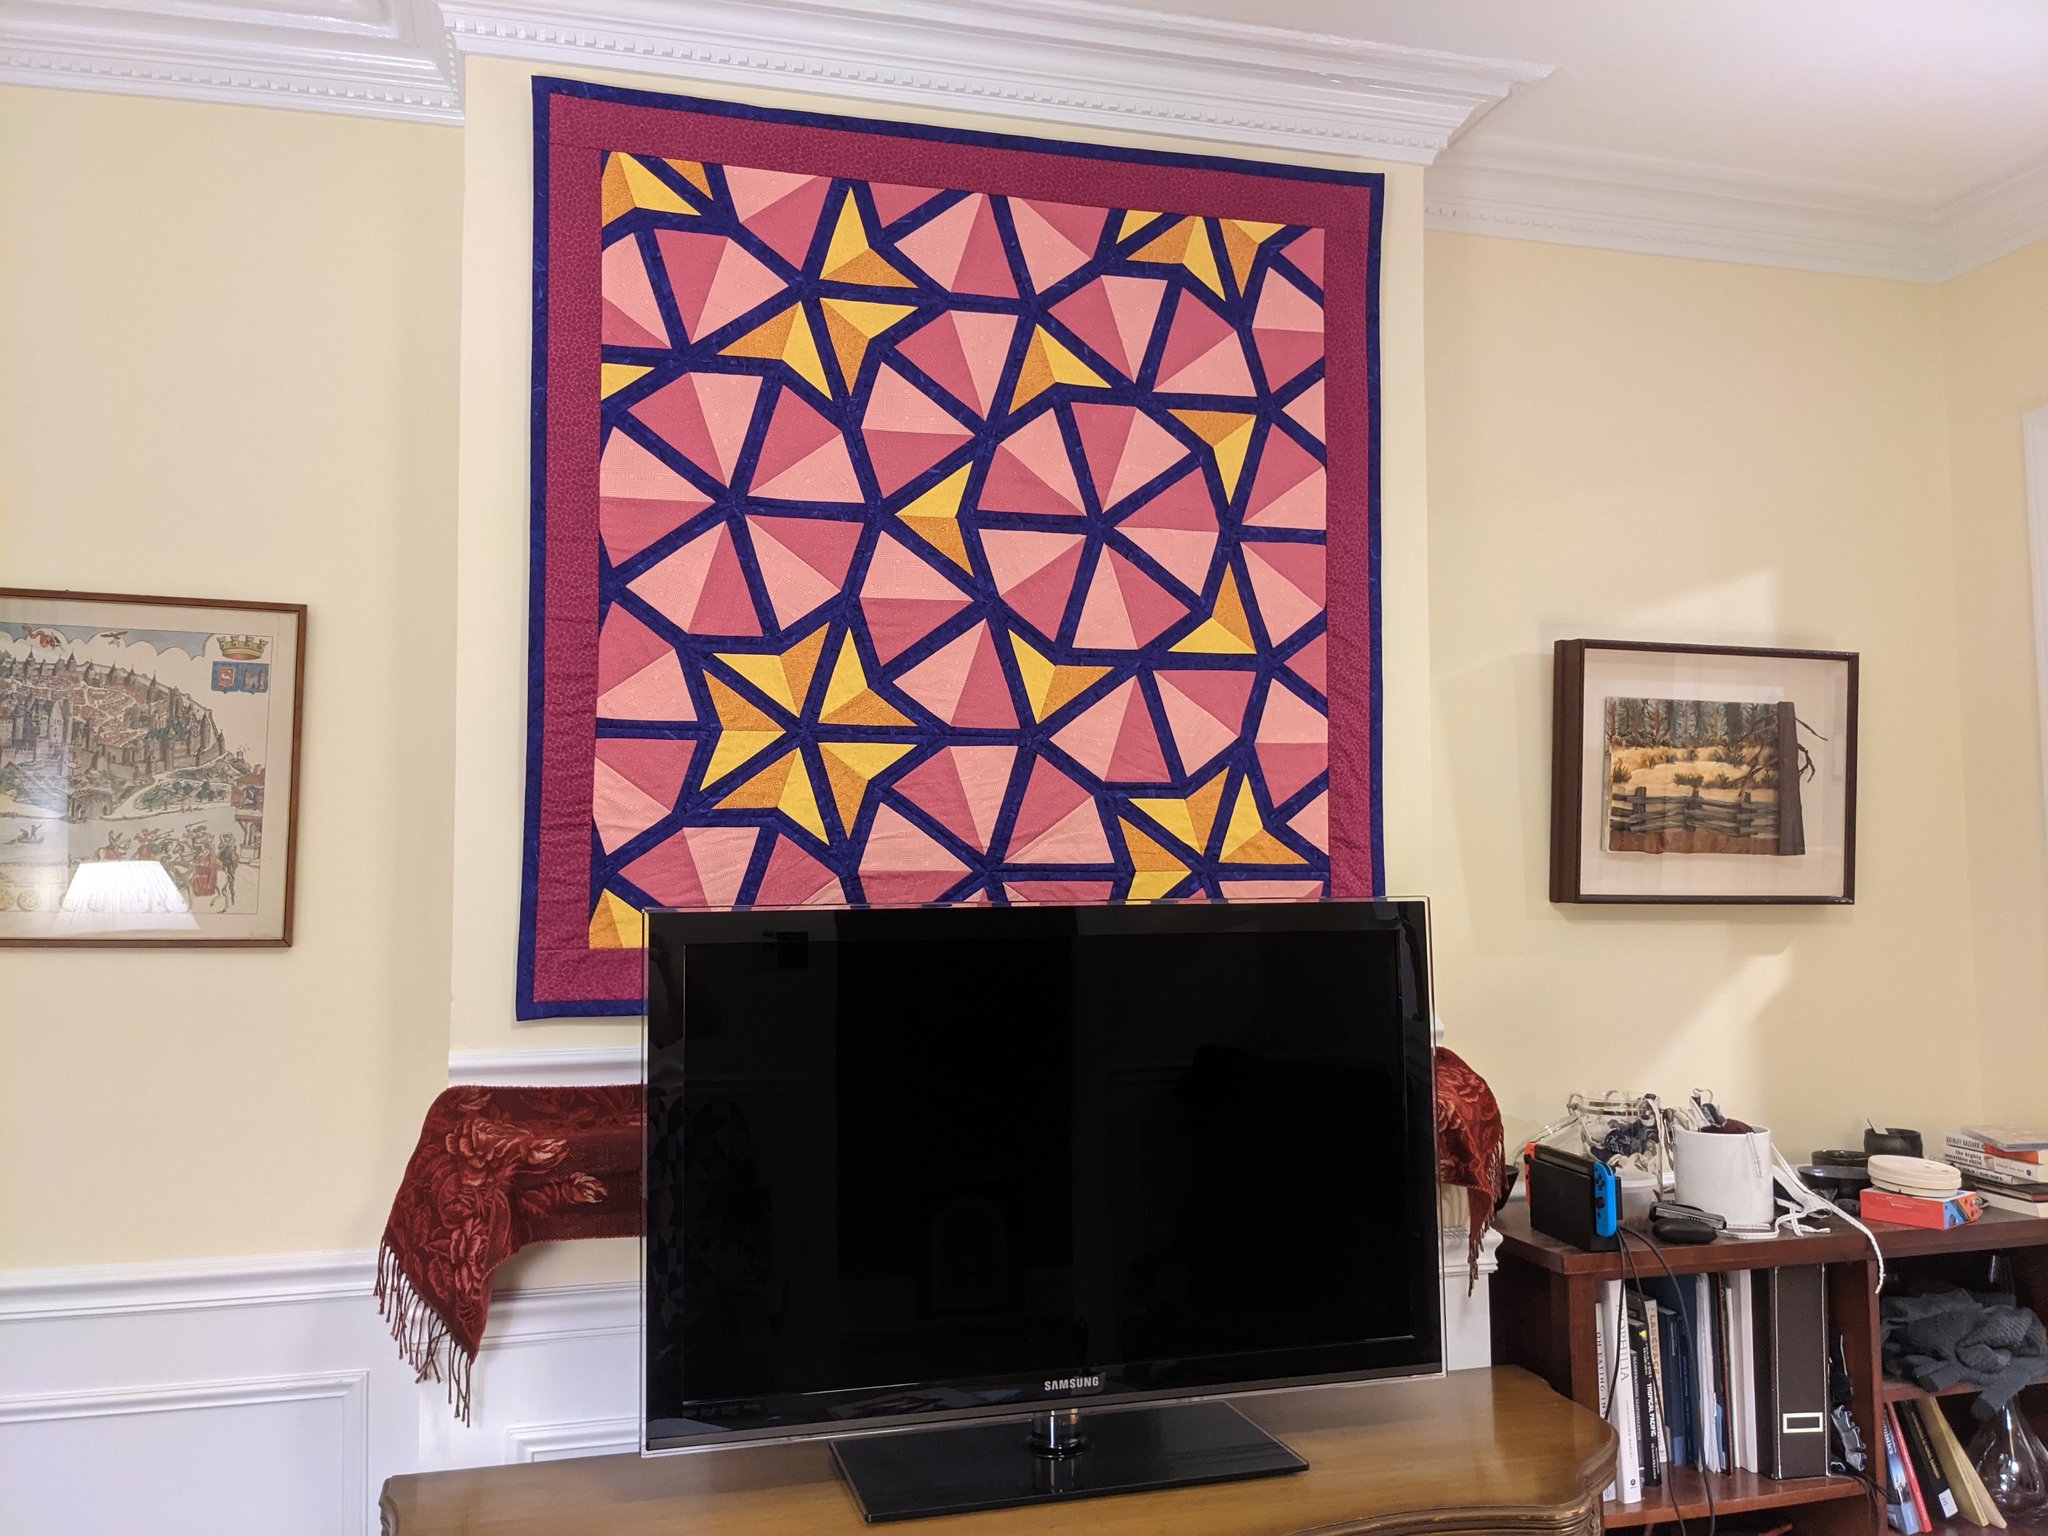
All in all, the project took four months exactly, from the first milled templates on January 29, to the final photo above taken on May 29. When I started, I had absolutely no idea how to make a quilt, and by the time I finished, I couldn’t wait to start the next one.
As it turned out, I wouldn’t end up beginning a new quilting project until nearly a year later, and it would turn out to be every bit as fussy and precision-oriented as this one.7 But that’s a another story for another blog post.
Questions? Comments? Share them by replying to this toot on mathstodon.xyz.
-
This article will also serve as the permanent archive documenting the creation of the quilt, because as of November 2022, there are some very serious questions about exactly how long Twitter will be sticking around for. ↩
-
Don’t all your sewing projects start out in a CNC mill, or is it just me? ↩
-
The first attempt, made with the non-FPP assembly, was uglier in every respect, so I’m not showing it here. Go find it on twitter, if tweets are loading right now. ↩
-
I found it really cool that these two indicators worked together to establish an orthogonal basis for eliminating error. I am also, as it turns out, a massive nerd. ↩
-
To be fair, by the end of the first year of the pandemic, I also had a tendency to tear at the seams and come unglued. ↩
-
Stay tuned for more updates! ↩
-
Did you forget the blog title? ↩