**Project 1: Thresholding & blob tracking**
**Due 3/8**
**[ENGR 27 Spring 2021](index.html#schedule1_2021-2-23)**
Once teams are finalized, you will find a personalized **`project1`**
repository on the
[Swarthmore github](https://github.swarthmore.edu/e27-spring2021).
Commit and push your code, source video(s), and writeup by 11:59:59 PM
on Monday, March 8.
# Overview
For this project, you will build a system to:
* threshold a sequence of color or grayscale images to distinguish
objects of interest from the background.
* apply morphological operators to the thresholded images in order
to remove noise and imperfections.
* perform a connected components analysis to distinguish between
separate objects, and to identify their locations in the image.
* track the connected components over time.
The last two items in the list above are collectively known as
*blob tracking*.
# Before you begin
Check out the starter code at
[https://github.com/swatbotics/e27_s2021_project1_starter](https://github.com/swatbotics/e27_s2021_project1_starter).
Run all three example programs **`capture.py`**, **`regions.py`**, and
**`bgsub.py`**. Read through them and note down any questions about
their implementations to answer as you work through Project 1.
Note you don't need to include any of the example programs or image
files in your final project submission (but you may want to grab code
from them, with proper attribution).
# Tasks
## Thresholding
Your system will produce a thresholded binary image where the non-zero
pixels correspond to objects of interest (foreground), and the zero
pixels correspond to background. You will need to decide on some important
details of your thresholding approach.
***RGB Thresholding:***
In class, we discussed a way to threshold RGB-valued pixels by
checking distance from a reference RGB value.
Remember, you do not want to simply threshold each channel of an RGB
image separately -- this will yield an image of shape `(h, w, 3)` of
datatype `bool`, which is not the single-channel mask that we expect
when doing background subtraction.
Here is a useful one-liner for RGB thresholding:
~~~ Python
mask = np.linalg.norm(img_cur.astype(np.float32) - object_color, axis=2) < tau
~~~
***Background subtraction and temporal averaging:***
Aside from thresholding on color, another useful technique is
to compare the difference of each frame to a reference image:
~~~ Python
mask = cv2.absdiff(img_cur, img_ref).max(axis=2) > tau
~~~
This is illustrated in the [**`bgsub.py`**](https://github.com/swatbotics/e27_s2021_project1_starter/blob/main/bgsub.py) example program in the
starter code.
If your scene does not give you a clean reference image, you may want
to use *temporal averaging* to generate one. In this approach, the
system looks at the difference between a given pixel value at some
location and the average intensity of that location over time. You
can take a temporal average by simply adding together multiple frames
and dividing by the number of frames; however, be careful about
overflow. In practice, this means you will want to convert frames from
8-bit integer format to a represenation with more precision before
summing them together as shown here:
~~~ Python
accum = np.zeros((h, w), dtype=np.float32)
cnt = 0
for frame in video:
accum += frame
cnt += 1
img_ref = np.clip(accum/cnt, 0, 255).astype(np.uint8)
~~~
Note the use of
[`numpy.clip`](https://numpy.org/doc/stable/reference/generated/numpy.clip.html)
to prevent overflow when converting back to the `numpy.uint8`
datatype.
Spatial averaging (adaptive thresholding) tends to be much more useful
for static images than dynamic video, so it is unlikely you will use
it for this project.
## Morphological operators
Apply morphological operators to thresholded frames to eliminate noise
and speckles. OpenCV provides [`cv2.erode`](https://docs.opencv.org/master/d4/d86/group__imgproc__filter.html#gaeb1e0c1033e3f6b891a25d0511362aeb), [`cv2.dilate`](https://docs.opencv.org/master/d4/d86/group__imgproc__filter.html#ga4ff0f3318642c4f469d0e11f242f3b6c),
and [`cv2.morphologyEx`](https://docs.opencv.org/master/d4/d86/group__imgproc__filter.html#ga67493776e3ad1a3df63883829375201f) functions to implement these. Your goal
here is to produce the best possible image to send into the next stage
of the processing pipeline.
Here are some tips about which operator to use, when:
* erosion gets rid of spurious foreground bits (e.g. "salt noise")
* dilation gets rid of spurious background bits (e.g. "pepper noise")
* opening/closing are good for "putting back" some of what
erosion/dilation remove, which can be useful if you're doing
special effects
* you can also pair up erosions and dilations with *different*
structuring elements - for instance, you could use erosion by a
small shape to eliminate salt noise, followed by dilation by a
larger shape to replace lost mass and merge nearby disconnected
components...
If you're getting both kinds of noise (salt noise *and* pepper noise),
it may be a sign that you can tweak your threshold value $\tau$
up or down until you only have one kind of noise.
***Converting masks between `bool` and `uint8`:*** If you have a
boolean mask array in numpy and you want to get a `numpy.uint8` array,
there are a couple ways of doing it. If you only care whether pixels
are zero or nonzero, you can do this:
~~~Python
# mask_bool is (h, w) of bool datatype
mask_uint8 = mask_bool.view(np.uint8)
# now mask_uint8 is (h, w) of np.uint8 datatype,
# probably full of 0's and 1's
~~~
If you want to make sure that `False` maps to `0` and `True` maps to `255`,
I suggest this code instead:
~~~Python
mask_uint8 = np.where(mask_bool, np.uint8(255), np.uint8(0))
~~~
Regardless, if you want to convert from a `numpy.uint8` array to a
boolean array, do this:
~~~Python
mask_bool = mask_uint8.view(bool)
# now mask_bool is True wherever mask_uint8 was nonzero
~~~
## Connected components analysis
The OpenCV function [`cv2.findContours`](https://docs.opencv.org/master/d3/dc0/group__imgproc__shape.html#gadf1ad6a0b82947fa1fe3c3d497f260e0) retrieves the outlines of
connected components of non-zero pixels. Applied to your thresholded
image, this corresponds to outlines of the objects of interest in your
scene. Some additional analysis of the contours yields information
such as the area, centroid, and principal axes of each connected
component (see the [**`regions.py`**](https://github.com/swatbotics/e27_s2021_project1_starter/blob/main/regions.py) example from the starter code
for details).
## Tracking
Your system should extract the position of each object's centroid in
each frame and be able to track objects' trajectories over time by
associating the connected components in the current frame with those
of the previous frame (note that this is trivial in scenes containing
a single object, but can become very tricky in scenes with many
objects).
## Scenarios
Your system should be targeted at some particular scenario. Here are
some examples, ordered roughly in increasing difficulty:
* A single brightly colored object moving through the scene.
Example: the video of the bright green cup that I showed in class.
* Two or three brightly colored objects with unique colors moving
through the scene. Example: video of someone juggling two or more
differently colored balls.
* A single, arbitrarily colored object, tracked using background
subtraction (with or without temporal averaging). Example: the cat
video I showed in class.
* Multiple objects with similar apperances, tracked using any
technique described above. Example: the fruit flies video from
class. (Fruit fly videos available [here](../images/flies1.avi)
and [here](../images/flies2.avi).)
You should be careful to pick a scenario that is feasible given your
programming ability and the time available. If you have questions
about picking a particular scenario, or coming up with your own, don't
hesitate to ask.
***Dealing with video inputs:***
The [**`capture.py`**](https://github.com/swatbotics/e27_s2021_project1_starter/blob/main/capture.py) example program in the starter code demonstrates
how to process video from a webcam or a video file in OpenCV.
Your program can optionally operate on live video, but it must be able
to successfully run on at least two distinct video files that you
include in your submission (they can be separate clips or excerpts
from a longer video).
Please resize your input videos to a maximum of 640 pixels wide. This
will make your program run much faster than full-HD video, and will
also result in smaller files being uploaded to github.
You can use the
[**`resize_video.py`**](https://github.com/swatbotics/e27_s2021_project1_starter/blob/main/resize_video.py)
utility program from the starter code to resize videos and optionally
trim them to length. Or if you like, you can adapt that code to
perform similar tasks, like resizing camera frames as they come in
from your webcam.
# Evaluation criteria
Your project will be evaluated by the following criteria (percentages are approximate):
1. **source code and raw data (15%)** - Turn in the full source code for
your project. I expect your code to be neatly indented and
reasonably commented. Unless the data was provided by me, you
should also turn at least two sets of raw data (movie files and
any additional input necessary) that can be supplied to your
program as input.
2. **thresholding and morphological operators (25%)** - Your system
should be able to output the thresholded binary images both
before and after morphological operators have been applied. The
output afterwards should be relatively free of noise and
speckles, with the objects of interest well-distinguished from
the background. Make sure your PDF writeup includes 2-3
representative image pairs from this intermediate data.
3. **connected components analysis & tracking (25%)** - Produce plots of the
positions of the object(s) of interest over time in the video
frame. Include at least one plot in your PDF writeup.
4. **performance (5%)** - Your system should run in real-time or close
to it. I expect it to be able to process 640x480 video at least
10 frames per second (note that most video cameras gen- erate
output at about 30 fps). If you help downsampling videos
(e.g. from a high-resolution camera), feel free ask how to do
that on the course Piazza. Pre-processing for things like
temporal averaging does not count against the real-time
performance of your program.
5. **"cool factor" (10%)** - Go a little above and beyond the tasks
described in the section above. Possibilities include allowing
parameters of the system to be modified interactively,
visualizing some aspect of the data not described above, using
your system to achieve special effects, etc. The goal here is to
engage a little more deeply with some aspect of the project that
interests you.
6. **written report (20%)** - Your report should descripe your
overall approach and its effectiveness. The report should include
the images and plots from b and c. In addition to addressing the
above criteria, your report should also address some questions
about generality. How broad a class of data can your system work
on? What assumptions are encoded in your methods? Would your
system work with objects of different colors? In changing
brightness conditions?
# What to turn in
Please make sure your github repository contains all of the following:
1. All source code needed to run your program. If your program
requires command line arguments to run, it must document them on
the command line when run with no arguments.
2. At least video files for input to your program. Please downsample
your video to a maxmimum frame width of 640 pixels both for
performance reasons, and in order to avoid storing huge binary
files in github.
It's fine if your system works interactively on a live camera view,
but it should also work on at least one recorded video you supply.
3. A PDF writeup describing your approach (see details below). Don't
forget to include:
* representative screenshots of input and binary mask images,
before & after morphological operators
* a plot of the trajectory of each object you are tracking
* credit/attribution for any input images or videos you did not
create yourself
* a description of additional "cool factor" features beyond the
minimal project requirements
## Example output
Here's an example of some code I wrote to track the colored balls in
this [youtube video](https://www.youtube.com/watch?v=rvxfXEHML4s&start=107&end=113):

Here are a few representative frames and masks, before and after
morphological operations. Note that each mask image is actually the
result of combining three independent mask images (one for each ball
color).
Frame | Masks before | Masks after
------|-------------|-----------
 |  | 
 |  | 
 |  | 
The mask cleanup here was achieved by eroding by a small circle,
followed by dilation with a slightly larger circle to merge up
disconnected components.
And here is a plot of $(x, y)$ pixel locations of blob centroids
throughout the small clip above:
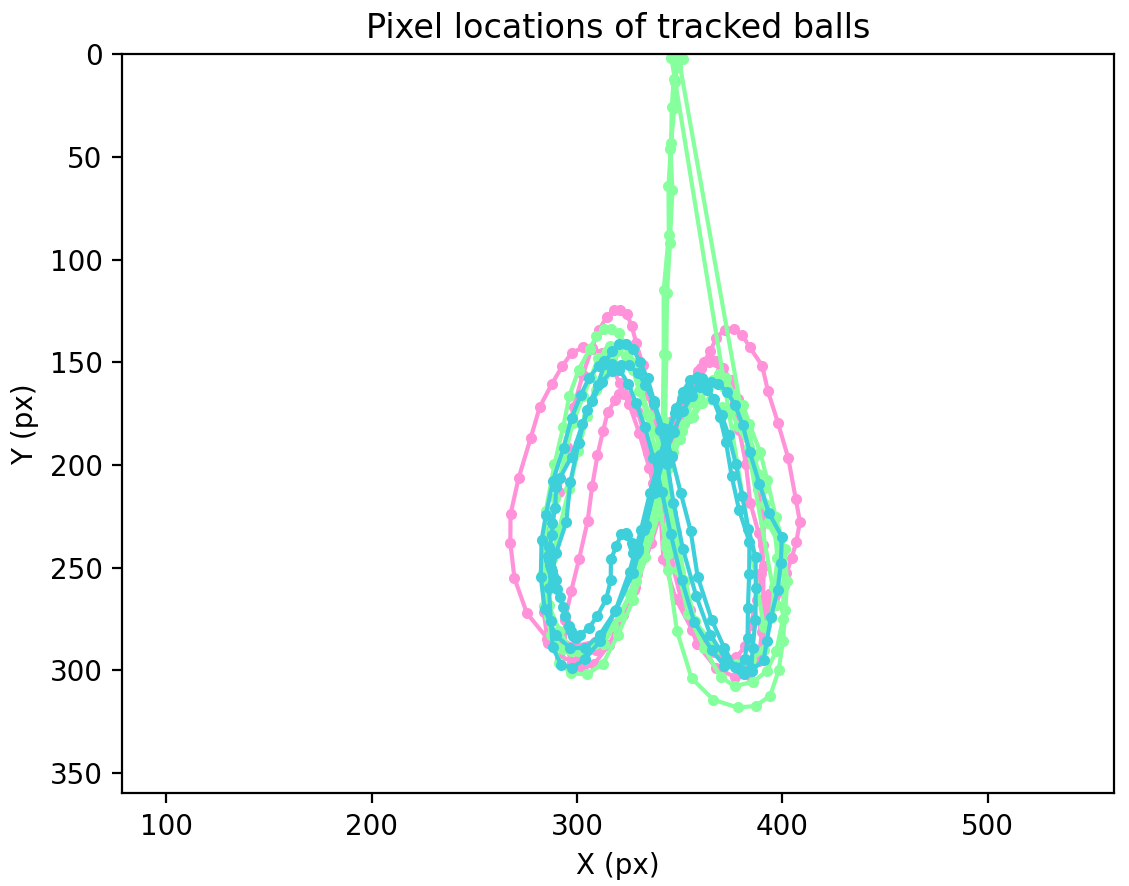
**Note:** I initially thought this would be a pretty easy clip to use,
but there were a few issues that made it much tougher than I expected:
* green ball color is similar to green grass color in some frames
* green ball color is similar to blue ball color in some framaes
* red ball color is similar to red shirt color in some frames
I could have avoided a lot of clever coding if I'd have just
picked an easier clip to start with!